Kornblith AB, Zlotolow IM, Gooen J, Huryn JM, Lerner T, Strong EW Quality of life of maxillectomy patients using an obturator prosthesis. Head Neck J Sci Spec Head Neck. 1996; 18:323-334
Rieger J, Wolfaardt J, Seikaly H, Jha N. Speech outcomes in patients rehabilitated with maxillary obturator prostheses after maxillectomy: a prospective study. Int J Prosthodont. 2002; 15:139-144
Pigno MA. Conventional prosthetic rehabilitation after free flap reconstruction of a maxillectomy defect: a clinical report. J Prosthet Dent. 2001; 86:578-581
Beumer III, Curtis TA, Marunick MT.St Louis, Toronto, London: The CV Mosby Co; 1979
Walter J. Obturators for cleft palate and other speech appliances. Dent Update. 2005; 32:217-223
Alhanbali E, Kelleway JP, Howlett JA. Acrylic denture distortion following double processing with microwaves or heat. J Dent. 1991; 19:176-180
Zarb GA, Bolender CL, Carlsson GE., 11th edn. St Louis: Mosby; 1997
Sutton AF, McCord JF. A randomized clinical trial comparing anatomic, lingualized, and zero-degree posterior occlusal forms for complete dentures. J Prosthet Dent. 2007; 97:292-298
Rogers SN, Lowe D, Humphris G. Distinct patient groups in oral cancer: a prospective study of perceived health status following primary surgery. Oral Oncol. 2000; 36:529-538
Rogers SN, Gwanne S, Lowe D, Stat C, Humphris G, Yueh B The addition of mood and anxiety domains to the University of Washington quality of life scale. Head Neck J Sci Spec Head Neck. 2002; 24:521-529
Irish J, Sandhu N, Simpson C, Wood R, Gilbert R, Gullane P Quality of life in patients with maxillectomy prostheses. Head Neck J Sci Spec Head Neck. 2009; 31:813-821
Alani A, Owens J, Dewan K, Summerwill A. A national survey of oral and maxillofacial surgeons’ attitudes towards the treatment and dental rehabilitation of oral cancer patients. Br Dent J. 2009; 207:540-541
Pace-Balzan A, Shaw RJ, Butterworth C. Oral rehabilitation following treatment for oral cancer. Periodontology 2000. 2011; 57:102-117
Rehabilitation of oncology patients with hard palate defects part 3: construction of an acrylic hollow box obturator Rahat Ali Asmaa Altaie Brian Nattress Dental Update 2024 42:7, 707-709.
This article will discuss the clinical stages in the fabrication of a definitive acrylic hollow box obturator to restore a hard palate defect. The first two papers described the restorative/surgical planning phase and the principles of obturator design.
CPD/Clinical Relevance: Each of the clinical stages required to make a hollow box obturator must be performed to the highest possible standard to ensure than an optimal prosthesis is fabricated.
Article
Advances in microvascular surgery and the use of free flaps have allowed many oncology patients (with palatal tumours) to undergo resection and immediate reconstruction. Ideally, a flap with vascularized bone should be used as this will optimize the future prosthetic bearing area. If it is not possible to close the resection site surgically, the provision of an obturator is obligatory. Significant improvement in the quality of life is achieved after constructing the prosthesis, as it restores the partition between the nasal and the oral cavities, improves mastication, swallowing, speech, dental aesthetics and facial support.1
Conventional rehabilitation with an obturator may be a treatment requirement for some oncology patients post-surgical resection.2,3 For patients who will have a significant maxillary defect or are due to have radiotherapy post resection, the placement of zygomatic or dental implants at the time of ablative surgery may be advantageous to help retain the future prosthesis. However, this will require careful planning and a high degree of surgical skill. This third article in our series will discuss the clinical stages involved in making a definitive, acrylic resin, one-part hollow box obturator to restore a hard palate defect. The authors hope that it will be useful for clinicians who are new to the subject and are making their first obturators.
Construction of a one-part hollow bulb obturator
A period of 6 months may be required (post-resection) before the definitive obturator can be constructed. However, this period of surgical healing will clearly differ between patients.4 The restorative dentist should examine the patient extra-orally to look for any facial asymmetry, mandibular displacement and trismus. If the patient has significantly limited opening, a two-part impression technique (and obturator design) may have to be considered.
As with any conventional prosthesis, the primary impression should record the entire denture-bearing area such that an appropriate special tray can be made. The denture-bearing area will depend on the tumour and the extent of the resection site. However, if present, the primary impression should record the standing teeth, residual tuberosities, remaining hard/soft palate and the extent of the resection site. At this stage, it is not crucial to record the undercuts within the defect as these can be more accurately recorded at the master impression stage.
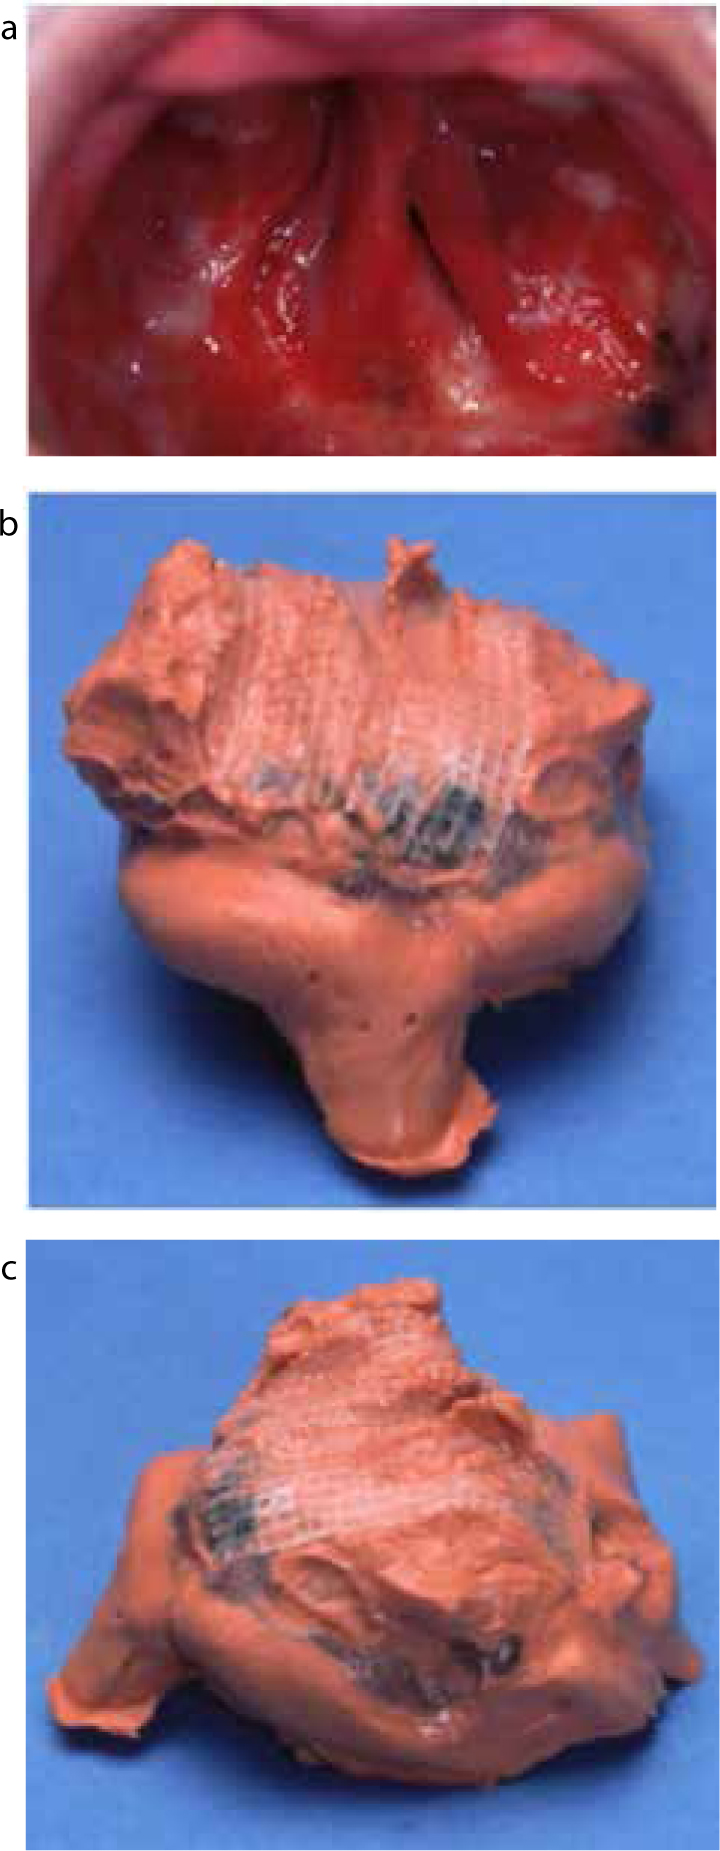
One approach to making the primary impressions for an obturator is to place some impression compound into a stock tray, and to use the compound to record the extent of the palatal defect bucco/palatally and mesial/distally. Compound is a relatively inexpensive, thermoplastic, viscous material that can be heated and adapted to record the dimensions of the defect. The thermoplastic property allows the material to be reheated and modified if the initial attempt to record the defect proved unsatisfactory. However, compound produces poor surface detail, has poor dimensional stability and is rigid. The latter property makes it unsuitable for recording undercuts within the defect, but this is not an objective at the preliminary impression stage. An alternative material is silicone putty which is a viscous material that can support itself well and is resilient in nature (Figure 1a and b). Care must always be exercised when using silicone putty within the surgical defect to ensure that the material does not become locked in place. If significant undercuts are present, an incremental technique can be applied whereby the impression is built in sections with vaseline placed in between the increments. This will allow the impression to be withdrawn from the undercuts and then reassembled outside the mouth.
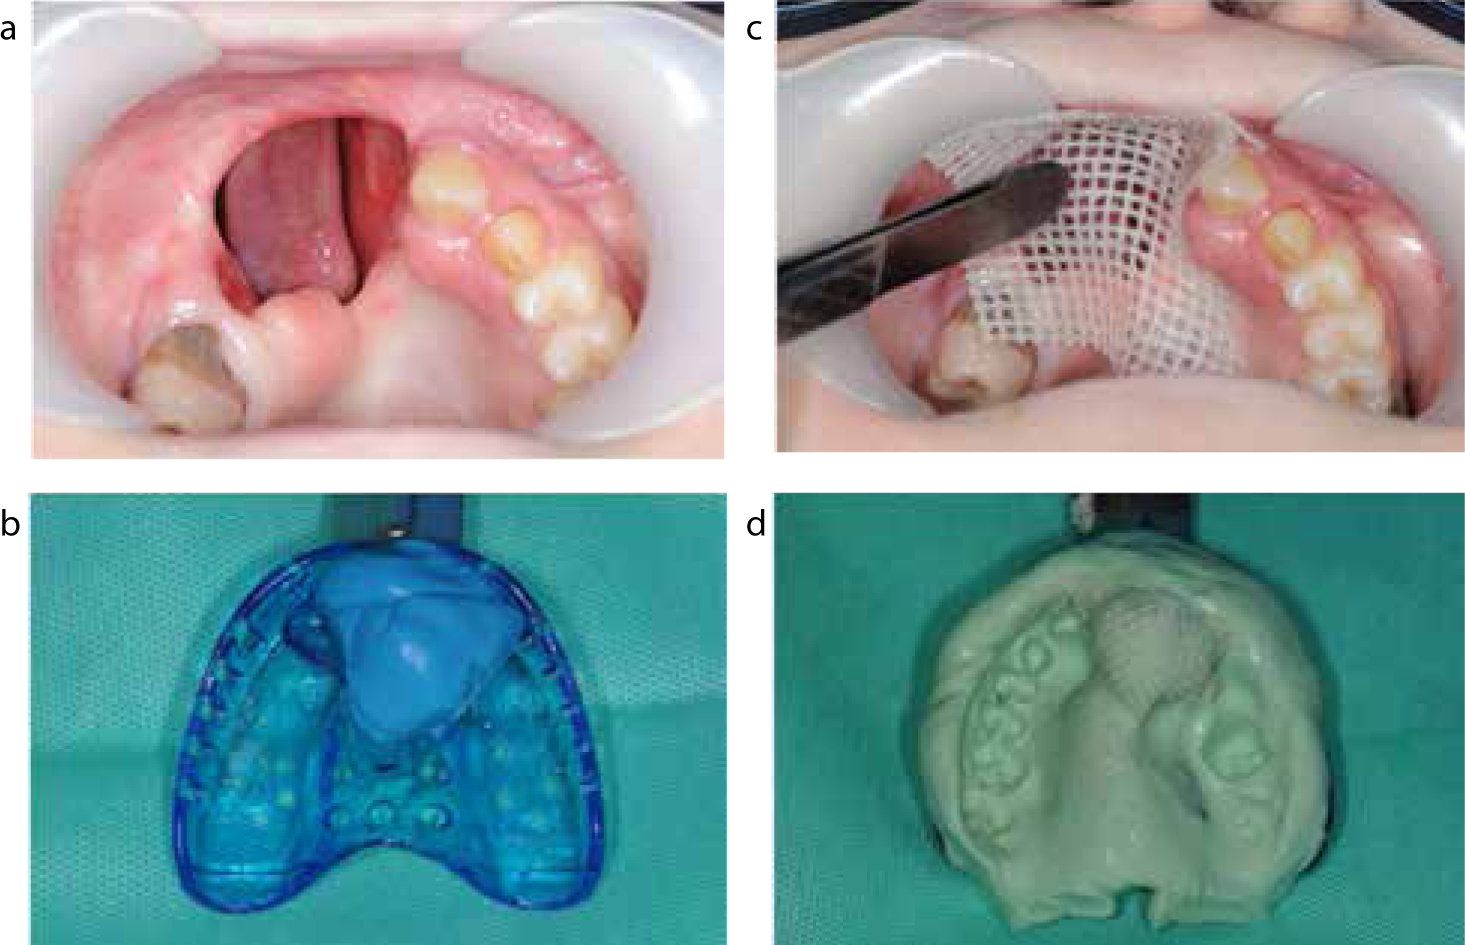
Figure 1.
(a) A patient with an anterior maxillary defect post-surgical resection. (b) Silicone putty impression of the maxillary defect taken in a stock tray. (c) Defect packed with Jelonet prior to taking the primary impression. This will prevent any material from escaping into maxillary sinus. (d) Primary alginate impression of the defect and the remaining denture-bearing area.
When recording the defect with more fluid impression materials, it is important to prevent the material from escaping in between the nasal turbinates or into the maxillary sinus. It is often the smaller defects which are more troublesome in this regard as material tends to ‘mushroom’ through the defect and become locked in place. To prevent this, the defect can be packed with vaseline impregnated gauze or Jelonet (Smith & Nephew, UK) (Figure 1c). The primary impression can then be recorded with irreversible hydrocolloid material (Figure 1d). A smear of impression material should always be placed over the silicone putty recording of the defect to record any of the hard palate defect which the more viscous impression putty may not have recorded. Alginate is hydrophilic and produces good surface anatomy detail. It is an ideal material for the preliminary impression. However, it does not support itself and needs to be rigidly supported by the stock tray and silicone putty moulding. Another suitable impression material that can be used is Accudent (Ivoclar Vivadent, United States). It is a thixotropic, two phase, hydrocolloid impression material which produces excellent surface detail. Accudent has both viscous and light-bodied phases with a syringe delivery system. The light body is used to record the soft tissues accurately, and the heavy body is used to record the defect as its high viscosity can reach into deep areas without slumping (Figure 2a–f).
Figure 2.
(a, b) The maxillary defect being packed with Jelonet. (c) Light-bodied Accudent being syringed onto the sulcus, tuberosity and over the teeth. (d) The stock tray loaded with heavy-bodied Accudent. (e, f) The primary Accudent impression of the defect/denture-bearing area and the primary cast.
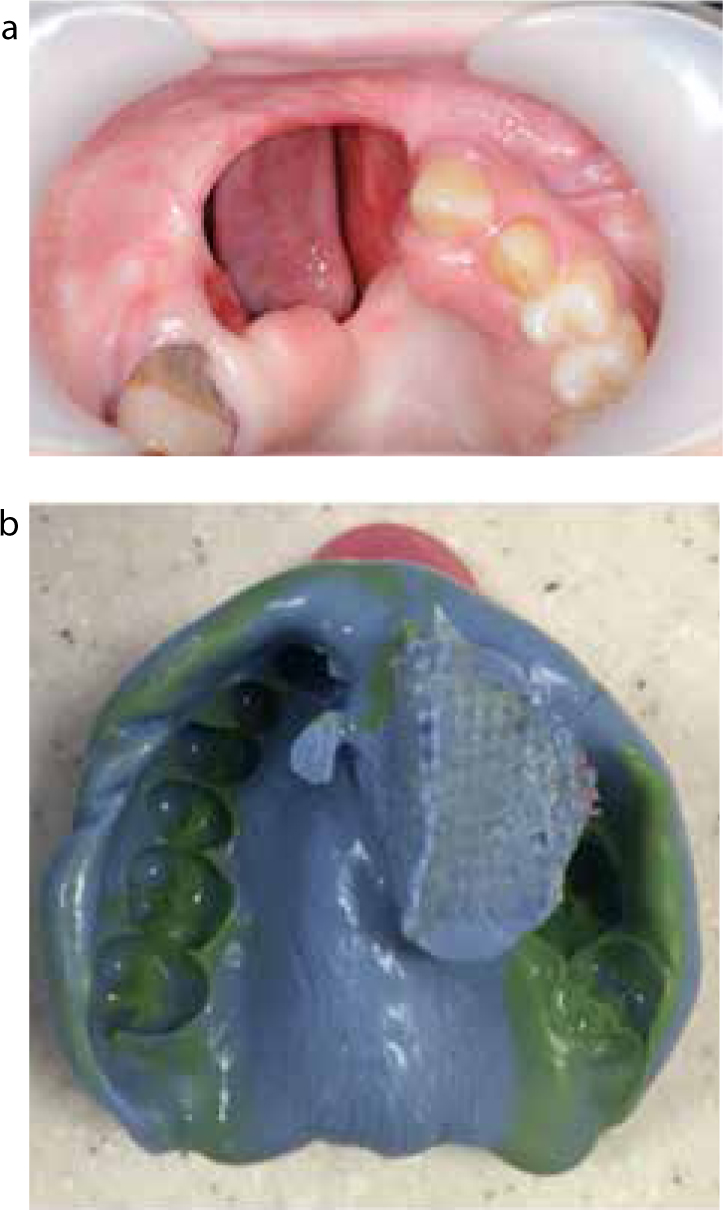
Once the primary cast has been poured and trimmed, it should be surveyed to evaluate obstructive and useful undercuts. The obturator should be designed at this stage in line with the principles outlined in Part 2 of this series. A one piece special tray in light-cured acrylic resin can be made on the primary cast (Figure 3 a–c). Any obstructive undercuts should be blocked out on the primary cast. At least one thickness of baseplate wax spacing should be provided for the skin-graft/mucosal junction and the superior and lateral aspects of the defect.4 As with conventional prosthetics, the master impression can be developed in stages using an appropriate border moulding material, such as thermoplastic greenstick or pink isofunctional material.
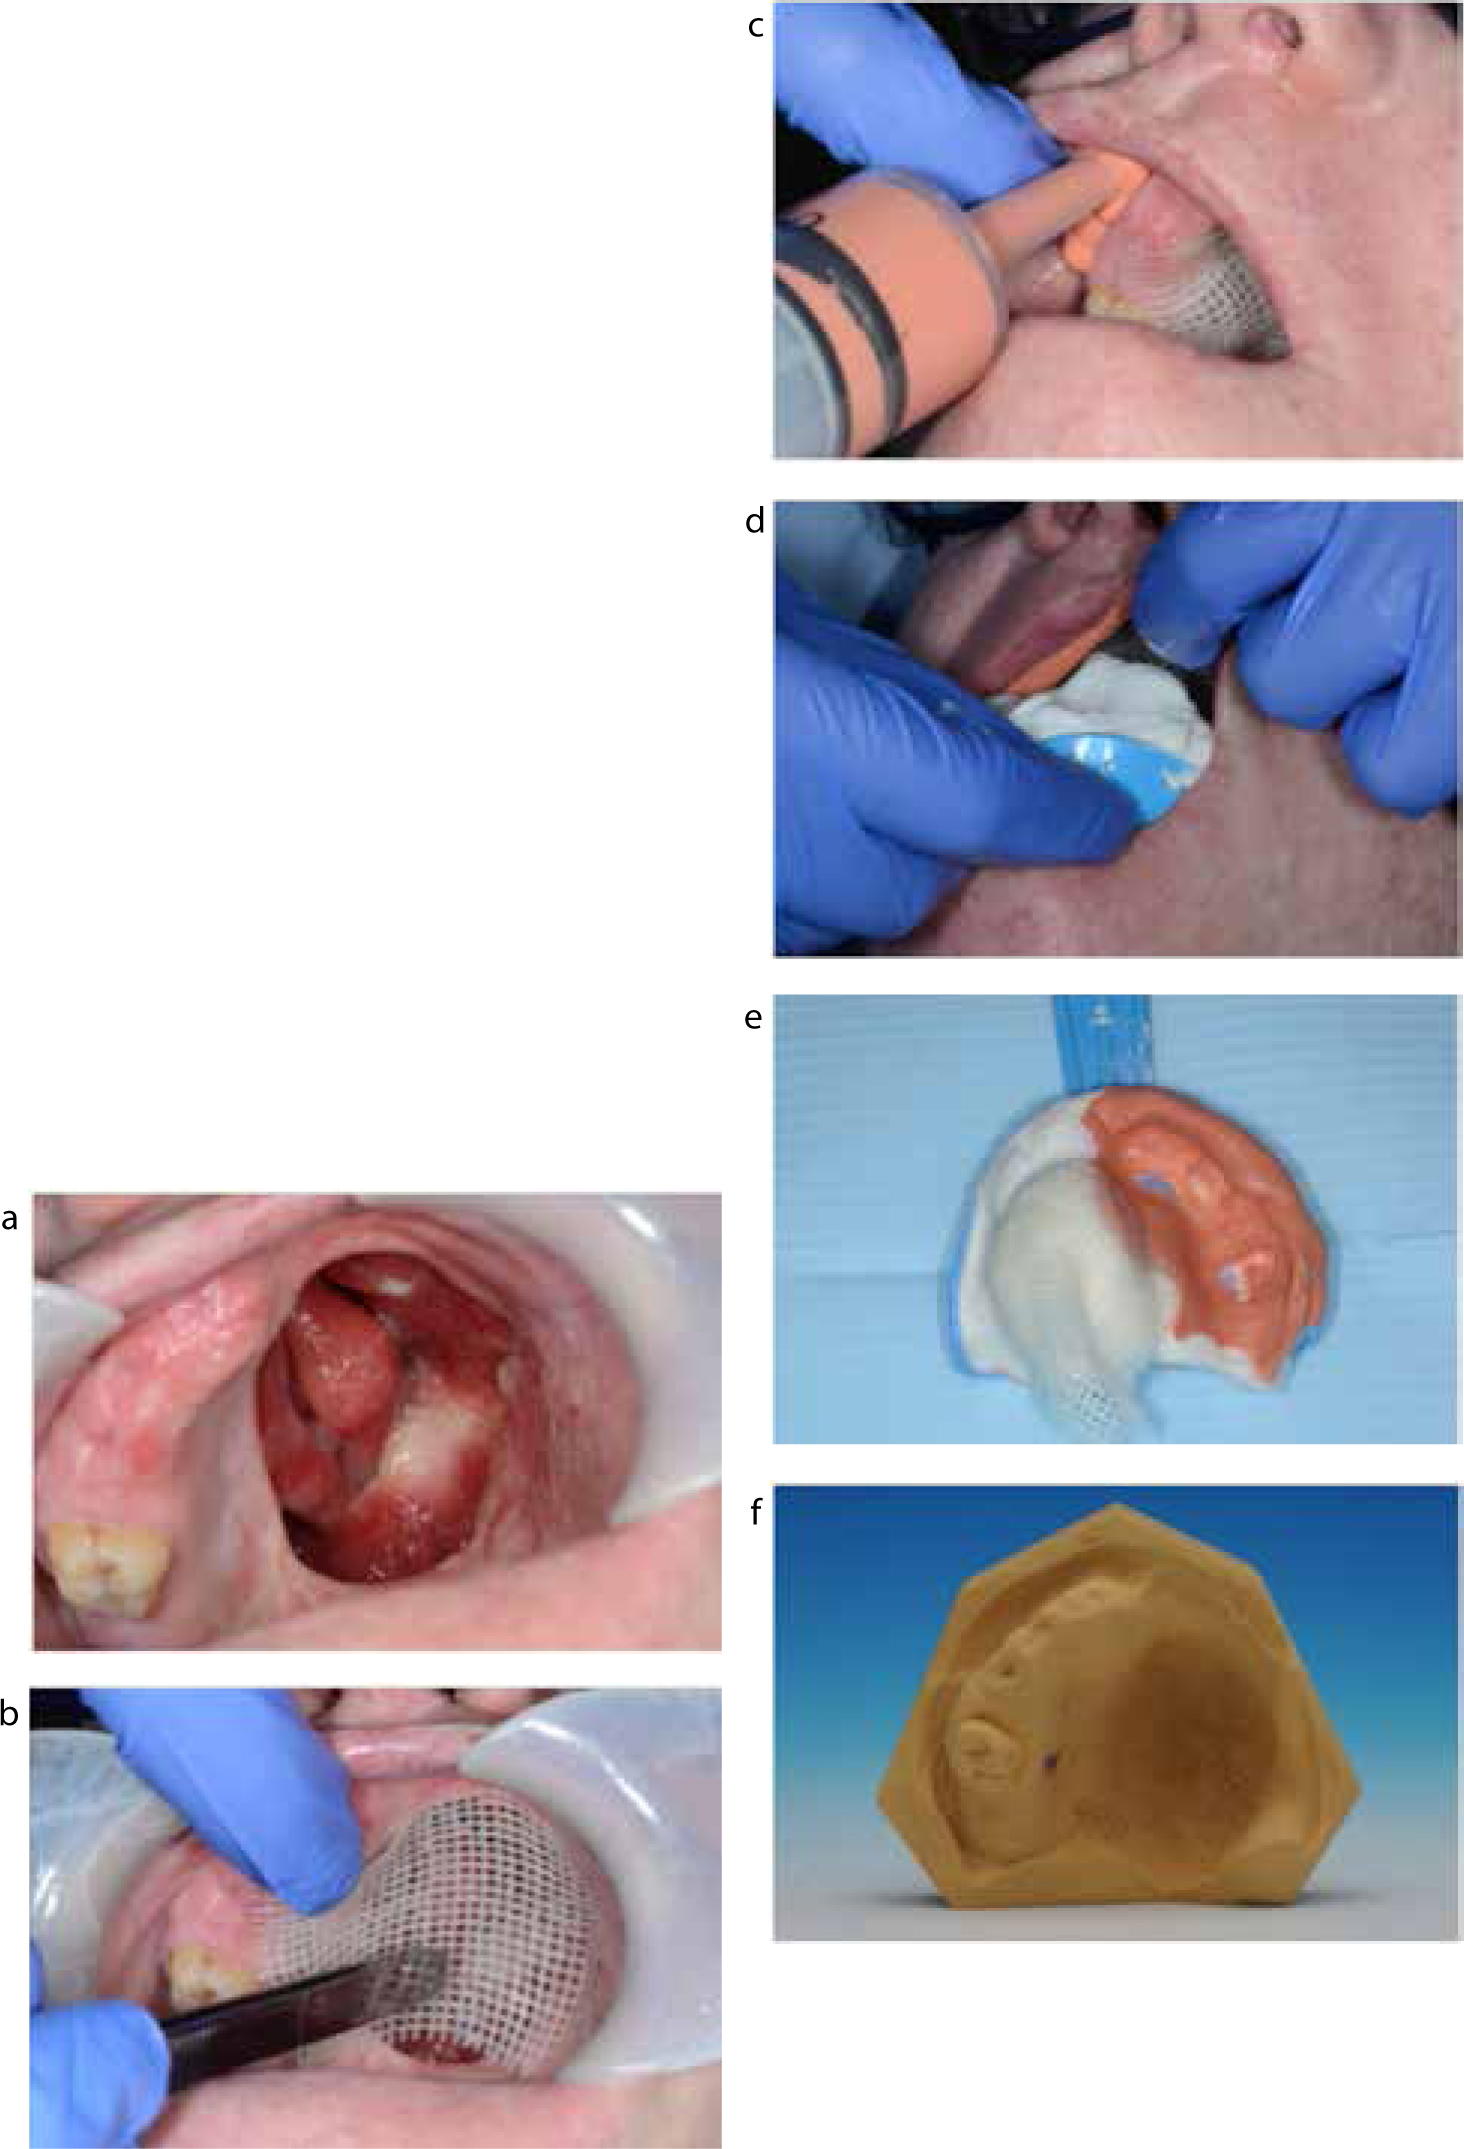
Figure 3.
(a–c) The primary cast and spaced special tray produced for a patient with an Aramany Class IV palatal defect. (d, e) Spaced special trays modified with thermoplastic greenstick. (f) Pinkstick functional moulding of the defect, sulci and post dam region using a spaced special tray.
It is recommended that the tray be initially modified with the addition of stops and a post dam added to it with green/pinkstick. These provide a greater degree of stability to the tray and allow it to be inserted and reinserted more accurately. Once the stops have been added, the extensions can be checked. Ideally, the tray should be 2–3 mm short of the sulcus depth. Any areas of overextension should be reduced with an acrylic trimming bur. The functional width of the sulcus can then be developed incrementally with green/pinkstick. The authors favour border moulding the unresected side of the tray (before moulding the bung) to improve the stability of the special tray further.4 After the peripheral aspects of the tray have been developed, the bung can be developed with an appropriate thermoplastic material to record the dimensions of the defect (Figure 3 d–f).
The thermoplastic border moulding material on the bung tends to be too rigid to record any residual hard palate and soft tissue undercuts within the defect. However, these can be recorded with the master impression material.
Once the tray has been modified, the master impression can be recorded after protecting the defect with Jelonet (Smith & Nephew, UK). Different elastic materials can be used to record the master impression. These include:
Figure 4.
(a–c) Alginate master impressions of a patient with no hard or soft palate. Notice that the Jelonet has prevented any impression material from getting lost.Figure 5.
(a, b) The master impression of an anterior maxillary defect taken with light- and medium-bodied silicone impression material.
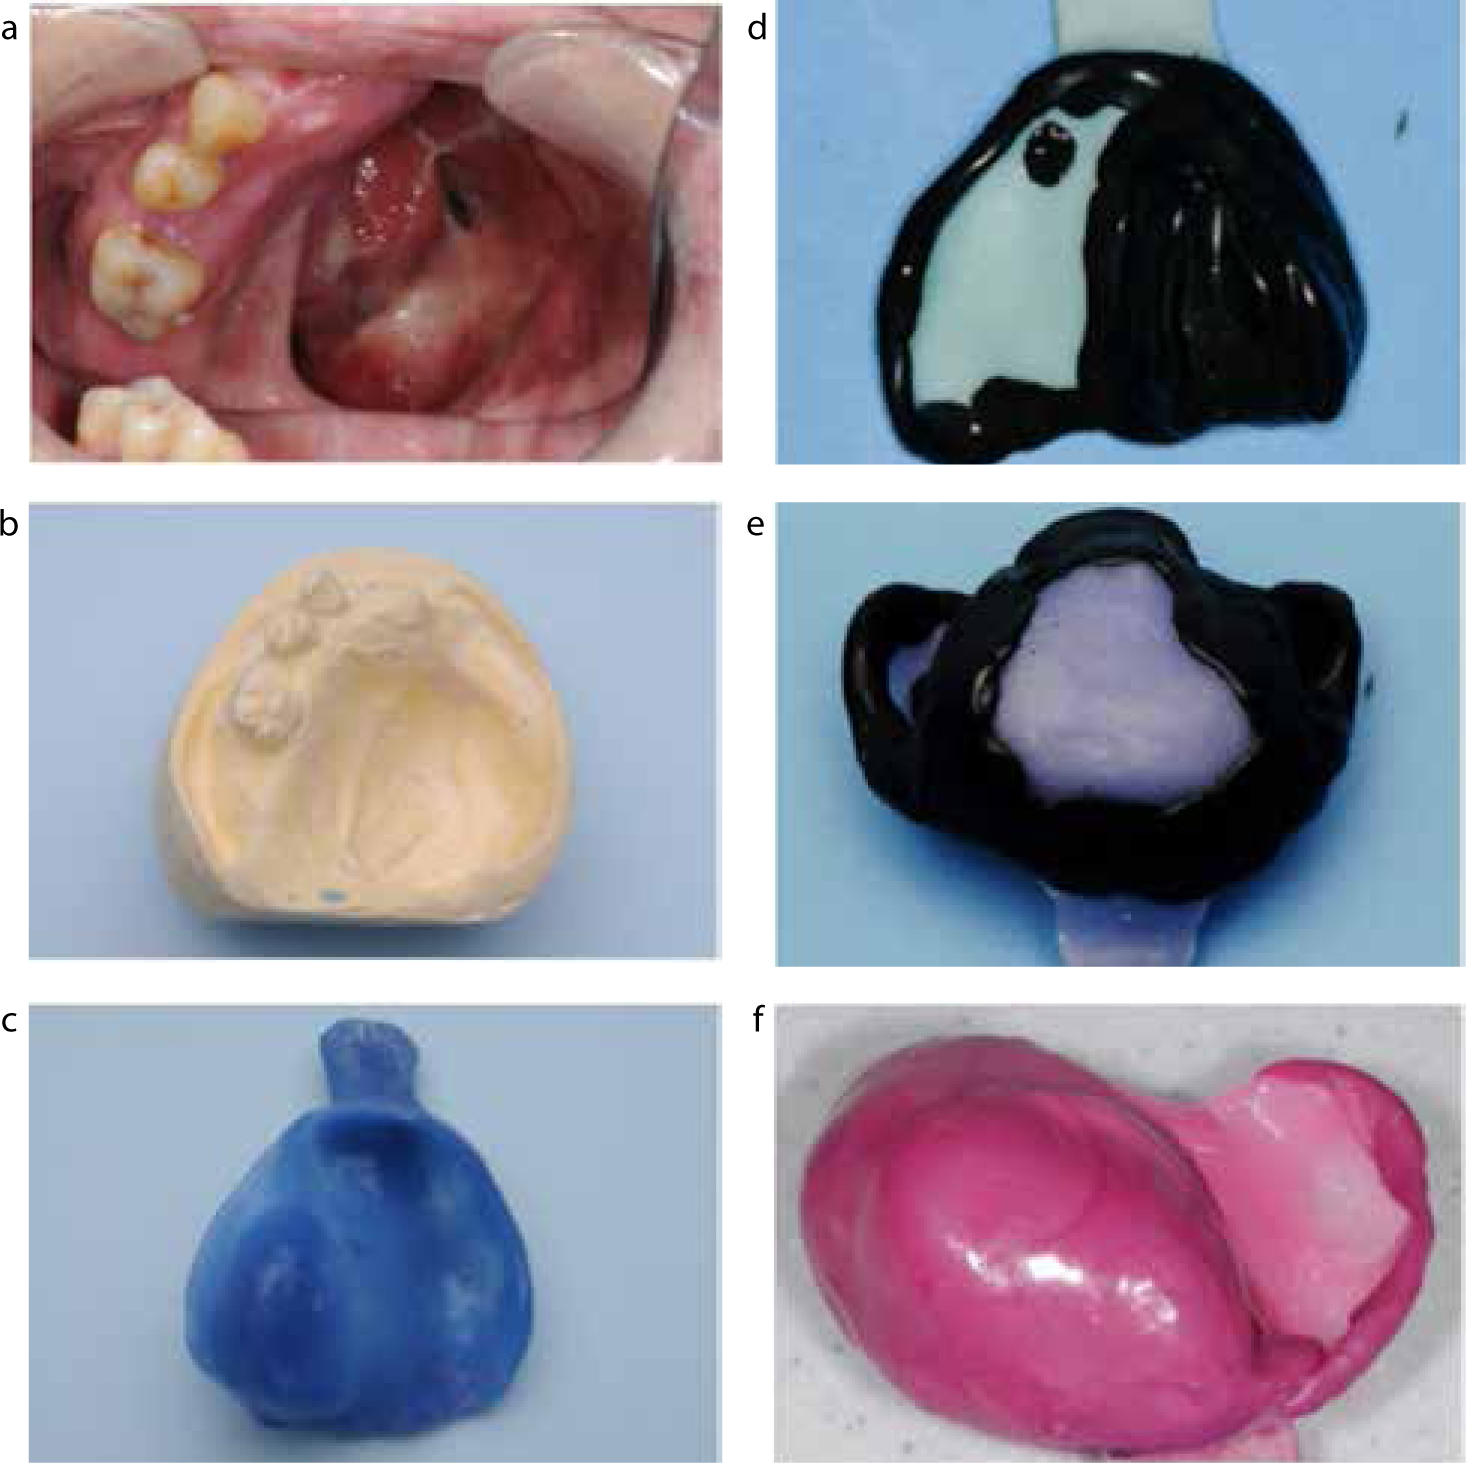
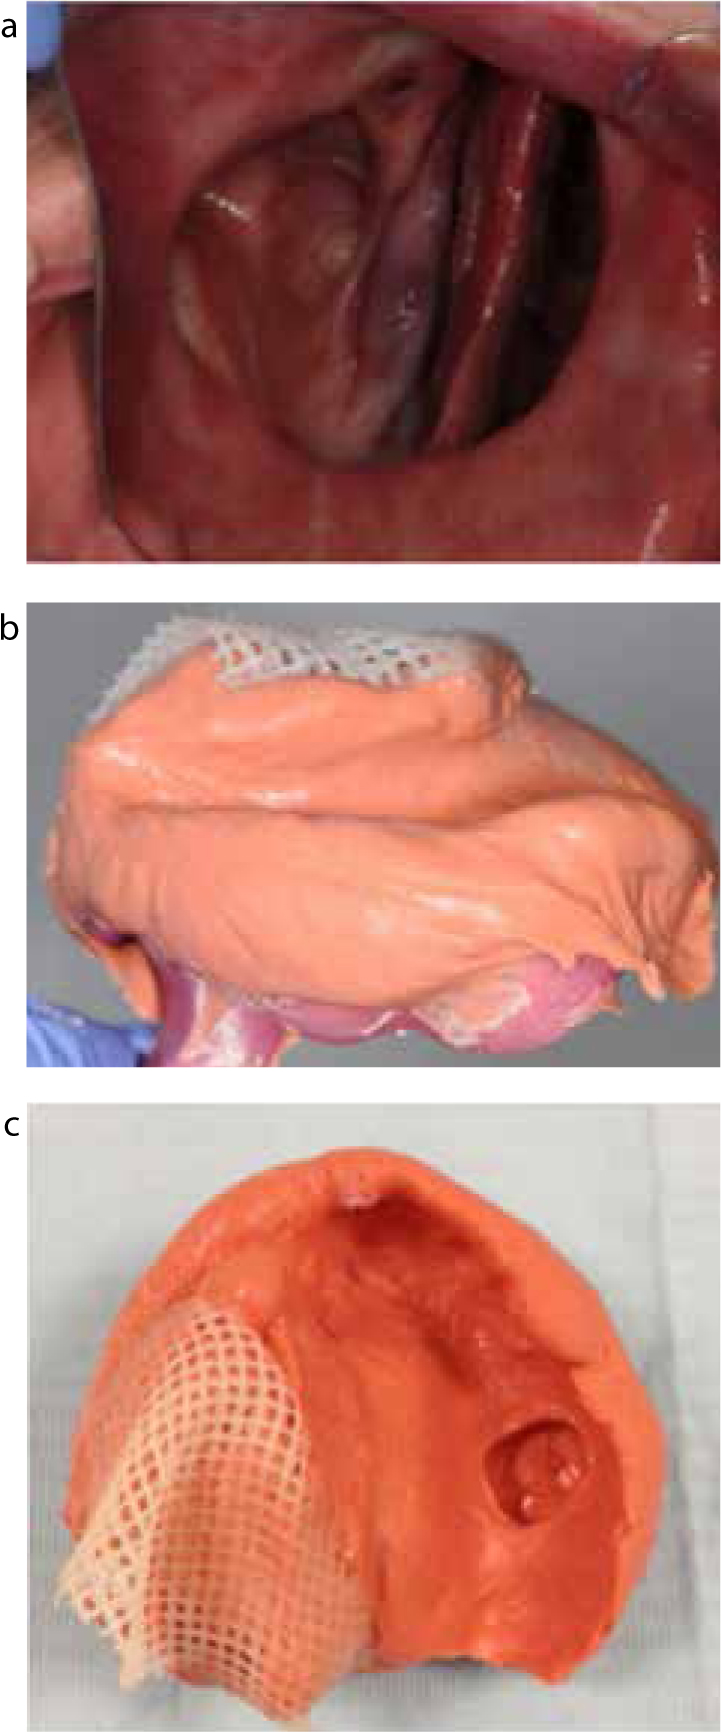
The authors routinely favour the use of light-bodied Accudent (Ivoclar Vivadent, United States) impression material when taking master impressions for obturators (Figure 6a–c). The master impression should record the remaining denture support area, such as the residual tuberosities, the functional depth/width of the sulci, muscle attachments and any remaining teeth or precision attachments. A smear of impression material should always be placed over the functionally moulded bung to record the functional anatomy of the buccinator muscle and any of the undercuts within the palatal defect which the more viscous thermoplastic tracing material may not have recorded.
Figure 6.
(a–c) A patient with a significant maxillary defect. The defect was initially protected with Jelonet before the master impression was taken in Accudent. Notice how the undercuts in the defect have been recorded by the impression material, in addition to the remaining denture-bearing area.
Accurate recording of the denture-bearing area and undercuts within the defect will ensure an accurate master cast upon which an accurate and well-fitting record rim can be constructed. For patients with severe trismus, a 2-part impression technique (and obturator design) may have to be employed. The special tray is made in acrylic resin and in two parts. It consists of a smaller part (with a locating peg on its undersurface) to fit into the defect, and a larger baseplate (with a locating slot) to record the denture-bearing area. The smaller part can be used to take a functional impression of the defect. This first impression is left in situ whilst an impression is taken in the larger baseplate of the remaining anatomy. The operator must ensure that the slot locates positively on the peg of the defect impression. After setting, the impressions can be removed separately to account for their different paths of insertion. This technique allows the operator to employ different viscosities of impression material between the defect and the denture-bearing anatomy.5
The wax record rim should have a rigid base to maximize stability and accuracy of the jaw registration. The baseplate of the wax rim should be made in light- or heat-cured acrylic resin. Light-cured resin can be used if the defect is relatively small. In such situations, the residual denture-bearing area will adequately support and stabilize the rim, ensuring that an accurate jaw relation has been recorded. If this method is used, all undercuts must be blocked out on the master cast to preserve its integrity. However, it does not allow the clinician to evaluate the bung until the obturator is processed.
For larger defects, it will be difficult to obtain a stable record rim if it is made on a blocked out master cast. In these cases, consideration can be given to constructing the definitive baseplate and hollow bung in heat-cured acrylic resin.4 The master cast will need to be carefully sectioned (through the defect) to allow the definitive hollow bulb to be taken on and off the master cast. Wax can be added to the baseplate to record the occlusion. Although a heat-cured baseplate is more time consuming to construct, the resulting rim will be more stable and will ensure that an accurate jaw relation has been recorded. However, given that the baseplate will be incorporated into the definitive denture, it will be subjected to a second curing cycle that may encourage warpage and distortion.6
There is a tendency for record rims to rotate into the surgical defect, hence it is worthwhile to ask the technician to overbuild the wax rim arbitrarily on the resected side. If replacing an obturator, the patient's present appliance should be used as a guide to the dimensions of the resected side (Figure 7).
Figure 7.
(a, b) The patient's existing obturator was satisfactory in terms of height. The laboratory was asked to match the dimensions of the wax rim to the patient's existing prosthesis to minimize chairside adjustment.
Once the maxillary rim has been tried in, it should be adjusted to ensure that the rim is parallel to the inter-pupillary and alar-tragal lines.7 The rim should also be within the neutral zone with sufficient tooth display at rest and providing bilateral even contacts on the retruded arc of closure. If these principles are being used to construct the interim obturator, the clinician should ensure that there are no occlusal contacts on the resected side. This will prevent any occlusally directed loads from interfering with the healing of the palatal tissues post resection. An appropriate tooth shade and mould should be selected.
If the patient has trismus (secondary to radiotherapy), consideration should be given to reducing the occluding vertical dimension (OVD) of the rim. This will facilitate the fabrication of a smaller obturator that will be easier for the patient to insert. Once the rim has been adjusted, the jaw relation can be recorded. Given that there can be a tendency for the occlusal rim to be displaced superiorly into the defect when the opposing teeth are brought into contact with it,4 an appropriate low viscosity recording material, such as TempBond (Kerr, Orange, CA, USA) or an addition-cured silicone should be used to record the occlusion.
The master casts should be mounted using an average value articulator using the rim. Once mounted, the teeth should be set as indicated by the dimensions of the wax rim. The posterior occlusal scheme needs to be carefully considered for the edentulous maxillary patient requiring an obturator. Low cusp angle anatomical teeth and bilateral balanced articulation should be used to improve stability of the definitive obturator during function. Others have recommended the use of non-anatomic teeth and a monoplane occlusal scheme.4 This will certainly reduce tipping forces on the obturator but may be difficult for patients, as they may find it difficult to masticate with prosthetic teeth that have no cuspal anatomy.8 If the patient is also wearing a lower complete denture, consideration can be given to providing a lingualized occlusal scheme to improve the stability of the mandibular prosthesis. The position of the prosthetic teeth on the resected side tends to be less of a clinical concern as patients generally chew on the unresected side.
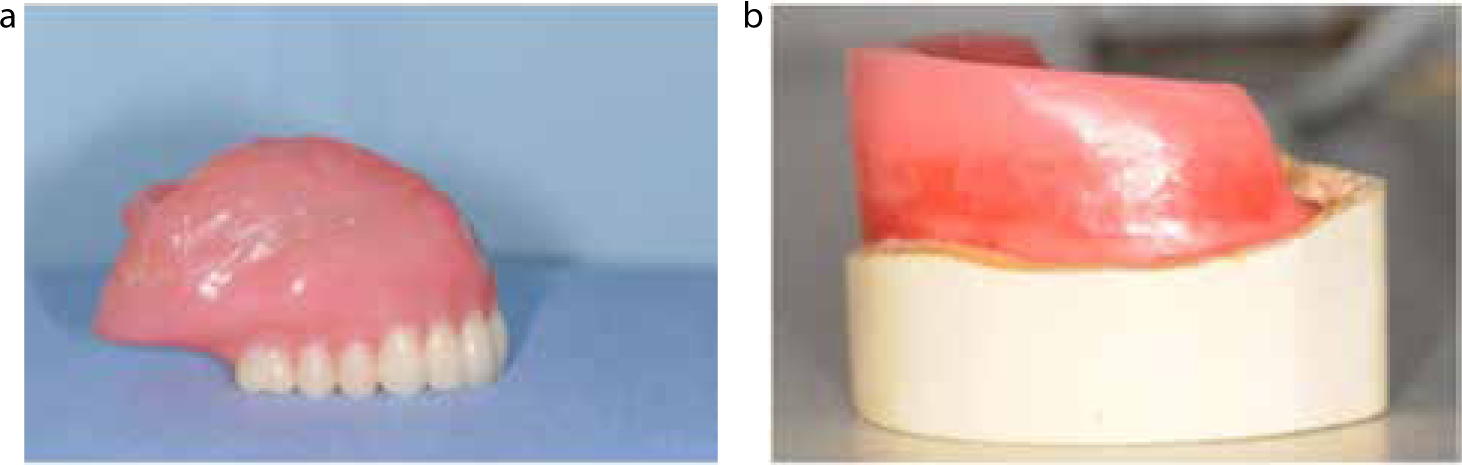
At the try-in appointment, the obturator should be assessed to ensure that the teeth are within the neutral zone, the incisal/occlusal planes are correct and that the occlusion is balanced (Figure 8a and b).
Figure 8.
(a) The wax/tooth try-in on the master cast. (b) The wax/tooth try-in in place clinically. The patient was satisfied with the aesthetics of the trial denture.
At the delivery appointment, the obturator should be inserted to ensure that adaptation, occlusion and extensions of the prosthesis are adequate. If the record rim and trial dentures were made on a blocked out master cast, the clinician will be evaluating the bung for the first time at this appointment. The master impression may have extended further superiorly/medially and laterally into the defect in a way that is not consistent with normal insertion of the prosthesis for the patient. If the bung has been processed into these areas of the defect, it may require considerable adjustment to allow insertion and removal by the patient.4 The superior aspect of the bung may also require reduction if it is touching the highly sensitive nasal turbinates. However, slight pressure of the bung against the cheek is desirable to maximize retention/stability and support for the prosthesis. It is recommended that the bung is adjusted first until it is comfortable for the patient to insert easily. Once the bung has been corrected and the prosthesis is correctly seated, the extensions into the sulci can be evaluated and appropriately adjusted before giving the denture to the patient (Figure 9a and b).
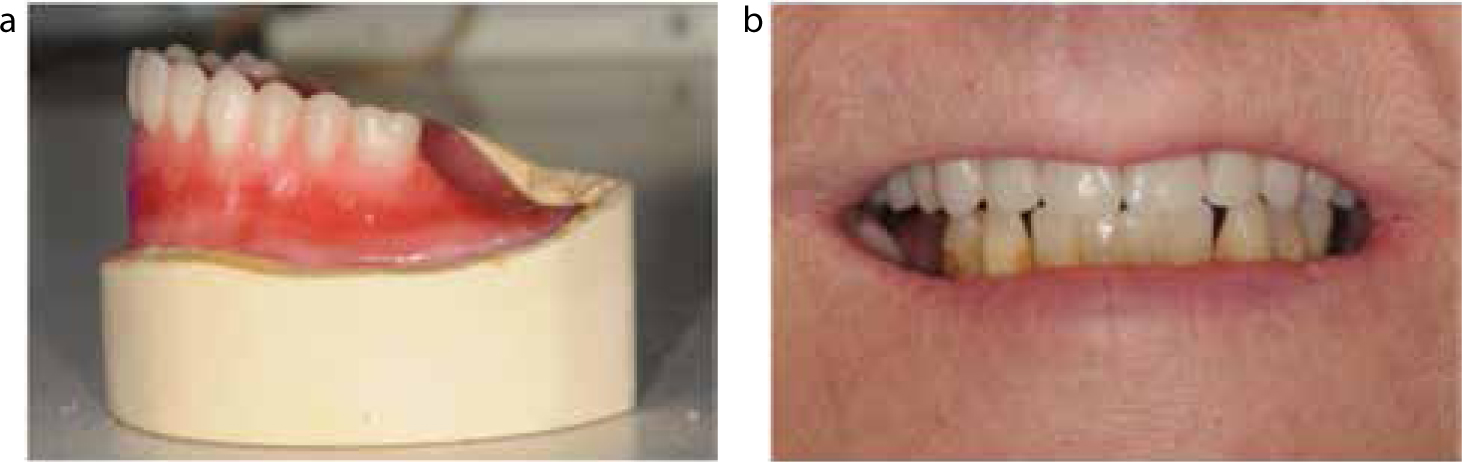
Figure 9.
(a) The definitive obturator with stainless steel clasp around the UL6, magnetic attachment and hollow box bung for the patient shown in Figure 6. (b) The definitive obturator in situ.
After the prosthesis has been delivered, the patient should be reviewed within two weeks to check for any areas of pain and ulceration. The obturator should be appropriately eased and the patient should continue to be followed up until he/she is comfortable with the prosthesis. In the first year after delivery of the definitive obturator, there may still be some soft tissue remodelling of the resection site. If this is found to be the case, the bung can be modified with chairside self-cured acrylic resin.
Once the patient is satisfied with the definitive obturator, the patient should be reviewed on an annual basis. The fit/adaptation of the prosthesis can be checked and any appropriate adjustments made. For the partially dentate patient, the caries and periodontal status of the abutment teeth can also be evaluated. Furthermore, the prosthesis can be removed and the surgical site inspected to check that there is no evidence of recurrence of the original tumour.
Discussion
Throughout their journey, the priorities of the oral cancer patient can change. Once the patients have overcome the surgical aspects of treatment and any adjuvant chemo- or radiotherapy, their concerns shift towards improvement and maintenance of their quality of life.9 One major concern relates to oral function, particularly mastication, swallowing and speech. Furthermore, restoring facial form and appearance is a very important aspect for all oncology patients.10 If a patient is not surgically reconstructed, provision of an obturator is required. Although the provision of such an appliance can be challenging due to the absence of suitable abutment teeth, trismus, reduced denture support area and other co-morbidities, a well-made obturator can significantly improve a patient's quality of life.1 There are many ways to fabricate and design an obturator and this manuscript is by no means an authoritative guide. For patients with severe trismus, a two-part design may be more appropriate than a one-part appliance. Elderly patients presenting with a satisfactory (but deteriorating) complete denture obturator may benefit from having their obturator remade using the duplicate denture technique, as opposed to having it conventionally remade. A copy technique will clearly require less adaptation on behalf of the patient to accommodate the new prosthesis. Every patient is different and will require a different design and means of obturator construction. Therefore, clinicians must keep up-to-date in their field and treat each patient with an open and imaginative mind.
A significant proportion of obturator patients have problems with speaking, eating and oral/nasal leakage.11 Individuals managing such patients must therefore ensure that each stage of obturation construction is carried out to the highest possible standards. To manage this group of patients effectively, the restorative dentist and technician must have a good understanding of removable prosthodontics principles, obturator design, dental materials science and oral/maxillofacial anatomy. With more surgeons offering surgical reconstruction post maxillary resection,12 fewer patients should present with maxillary defects in the future. However, there still remain a cohort of patients who may require prosthetic obturation. Hence, it is important that this form of treatment is not regarded as an outdated or obsolete treatment option.
The provision of dental implants in this patient group is increasing.12 The provision of dental or zygomatic implants can certainly improve the retention of a large obturator and clinicians should consider using them if it will benefit the patient. However, the placement of suitable fixtures may be complicated by previous radiotherapy or the higher tumour re-occurrence and mortality rate in this cohort of patients.13
Head and neck oncology patients represent a unique cohort. The physical and psychological impact of treatment on these patients should not be underestimated. It is vital that head and neck oncology patients are treated with compassion and care by all members of the team. We do have a unique opportunity to provide dental superstructures (both conventional and implant-retained) that can significantly improve our patients' quality of life. It is an opportunity suitably trained clinicians should embrace and execute to the best of their professional ability.