Sujak SL, Abdul Kadir R, Dom TN. Esthetic perception and psychosocial impact of developmental enamel defects among Malaysian adolescents. J Oral Sci. 2004; 46:221-226
Barber AJ, King PA. Management of the single discoloured tooth Part 1: aetiology, prevention and minimally invasive restorative options. Dent Update. 2014; 41:98-110
Denis M, Atlan A, Vennet E, Tirlet G, Attal J-P. White defects on enamel: diagnosis and anatomopathology: two essential factors for proper treatment (part 1). Int Orthod. 2013; 11:139-165
Sixou JL, Bailleul-Forestier I. Prescription des florures de la naissance à l'adolescence. J Odontol Stomatol Pediatr. 2004; 11:157-168
Garg N, Jain AK, Saha S, Singh J. Essentiality of early diagnosis of molar incisor hypomineralization in children and review of its clinical presentation, etiology and management. Int J Clin Pediatr Dent. 2012; 5:190-196
Tirlet G, Chabouis HF, Attal JP. Infiltration, a new therapy for masking white spots on enamel: a case series with 19-month follow-up. Eur J Esthet Dent. 2013; 8:180-190
Denis M, Atlan A, Vennet E, Tirlet G, Attal J-P. White spots on enamel: treatment protocol by superficial or deep infiltration (part 2). Int Orthod. 2014; 12:1-31
Wiegand A, Stawarczyk B, Kolakovic M, Hämmerle CHF, Attin T, Schmidlin PR. Adhesive performance of a caries infiltrant on sound and demineralised enamel. J Dent. 2011; 39:117-121
Tooth whitening to treat unaesthetic yellow/brown lesions has a strong evidence base and is a routine cosmetic procedure in many dental practices. The management of white lesions, however, is more challenging and is the subject of debate. As traditional whitening procedures may make white lesions more obvious in the short term, there is a risk that patients may be misinformed that limited treatment options are available, and they may be prescribed invasive cosmetic procedures instead. This paper aims to help clinicians accurately diagnose aetiological factors that produce white lesions and describes a hierarchy of treatment options which are both aesthetic and biologically respectful, focusing on the materials, equipment and clinical techniques that are available for the minimally invasive management of white lesions using resin infiltration.
CPD/Clinical Relevance: This paper aims to help clinicians select the optimal materials, equipment and clinical techniques for the minimally invasive management of unaesthetic white enamel defects.
Article
White or coloured inclusions in teeth are relatively common. Although many patients may remain unaware of these lesions, in some cases they can have a significant impact on the patient's confidence and willingness to smile.1
White lesions are challenging to treat using tooth whitening procedures, as treatment with conventional bleaching systems may make them more obvious. Historically, the unpredictability of minimally invasive treatment options often forced clinicians to resort to more destructive restorative techniques, such as direct or indirect veneers, to mask the lesions completely.
This paper provides a practical guide to the diagnosis of tooth discoloration and presents a hierarchy of minimally invasive management options, focusing on the use of resin infiltration.
Diagnosis of tooth discoloration
An understanding of the aetiology of tooth discoloration is paramount for successful management as brown/yellow lesions call for different treatment options compared to white lesions.
Brown/yellow lesions
The aetiological factors resulting in yellow/brown lesions which affect teeth may be categorized as extrinsic and intrinsic:2
Extrinsic discoloration includes stains accumulating on the surface of the tooth as a result of external factors, eg foods, drinks, tobacco, chlorhexidine-containing mouthwashes. It generally causes widespread superficial discoloration of multiple teeth.
Intrinsic discoloration describes both lesions resulting from disruption in the formation of dental hard tissues as well as post-eruptive changes in normal structure. Examples include enamel hypoplasia caused by a disturbance to the developing tooth germ, trauma to deciduous teeth, molar/incisor hypoplasia and dental fluorosis.
Yellow/brown lesions may result from a combination of extrinsic and intrinsic factors and, although they may occasionally be severe, they are usually amenable to traditional bleaching treatments.
White lesions
Enamel is the most highly mineralized tissue in the body and is made up of approximately 96% mineral and 4% organic material. In white lesions, organic fluids replace part of the mineral phase and the total mineral content is reduced.3 As saliva is supersaturated with calcium and phosphate ions, under optimal conditions, demineralized defects may be remineralized, resulting in white lesions that are covered by a layer of unaffected mineralized enamel.
Histologically, white lesions are less mineralized and less organized than unaffected enamel, altering the lesions' optical properties. Light entering a white lesion changes course numerous times due to the differing refractive indexes. The resulting reflected light appears much brighter compared to light reflected by healthy adjacent enamel. White lesions may be classified as follows:3
Pre-eruptive (developmental): lesions arising from changes during tooth formation;
Post-eruptive (environmental): lesions arising from changes once exposed to factors in the oral environment.
These categories of white lesions may be further divided into ‘deep’ and ‘superficial’ lesions.
Pre-eruptive (developmental) lesions
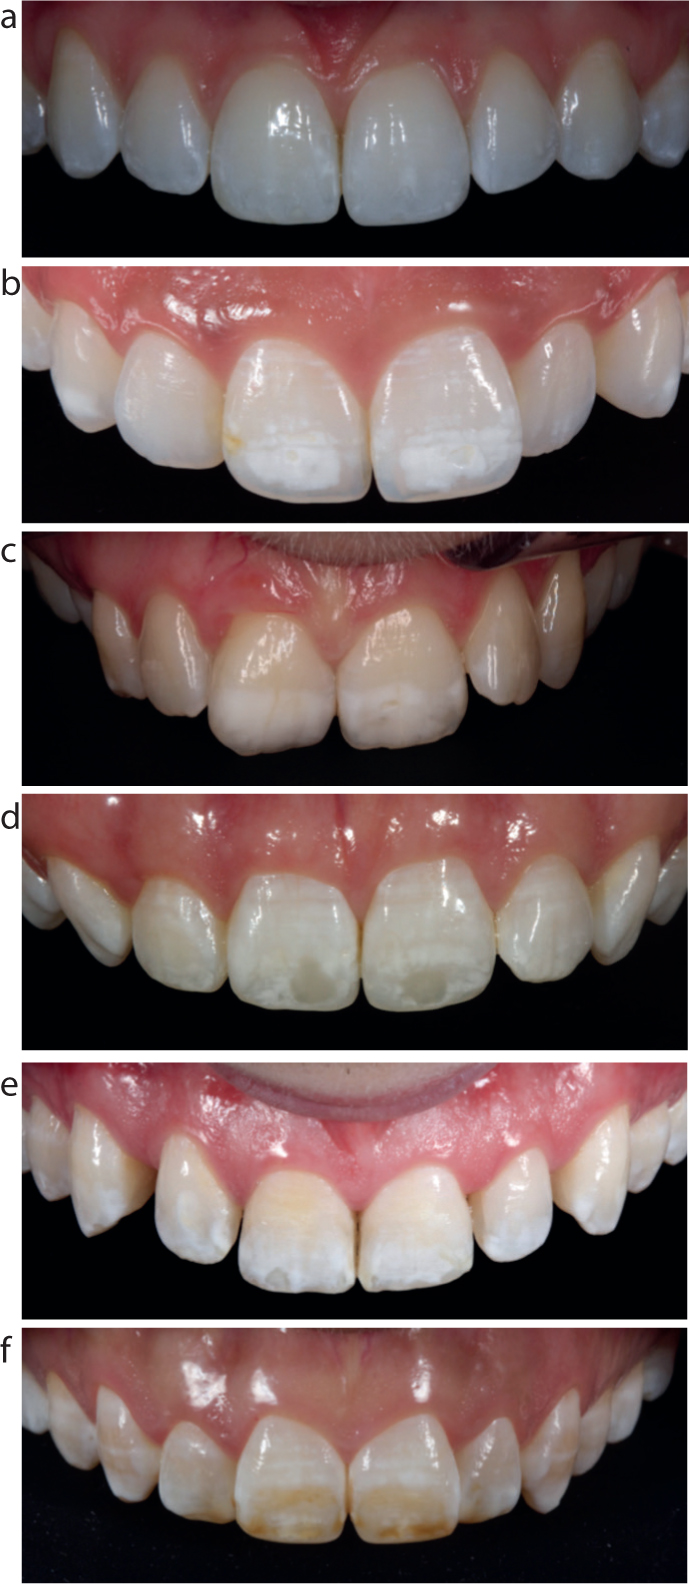
Developmental changes may result from the aetiological conditions listed in Table 1 and are illustrated in Figure 1. Fluorosis: Dental fluorosis is caused by hypomineralization of the enamel resulting from excessive incorporation of fluorides during formation.4 Characteristic features which help lead to a clinical diagnosis of dental fluorosis include symmetrical involvement of groups of the same teeth, with lesions ranging from horizontal banding in less severe cases, to cloudy chalky areas and, in the most severe cases, stippling of enamel sometimes with brown discoloration.
Fluorosis
Molar incisor hypomineralization (MIH)
Traumatic hypomineralization
Prenatal illness
Premature birth
White spot carious lesions
Figure 1.
(a−f) Developmental changes of preeruptive (developmental) lesions which may result from the aetiological conditions listed in Table 1.
Molar incisor hypomineralization (MIH):
MIH is defined as hypomineralization of systemic origin affecting one, two, three or all first permanent molars and the permanent incisors.5 Possible aetiological factors include:
Maternal pyrexia;
Prolonged maternal nausea and vomiting;
Maternal diabetic hypocalcemia;
Respiratory distress and birth anoxia;
Pre-term births;
Antibiotics prescribed during the first year of life.
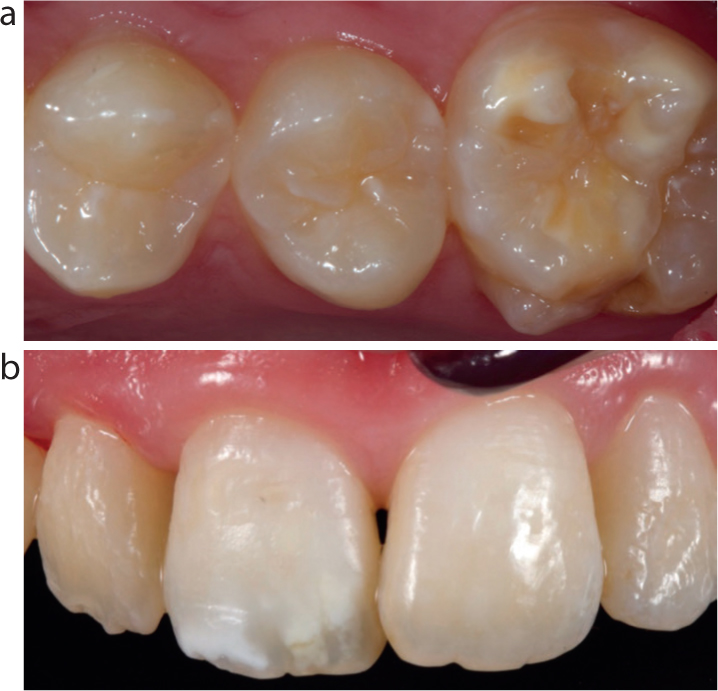
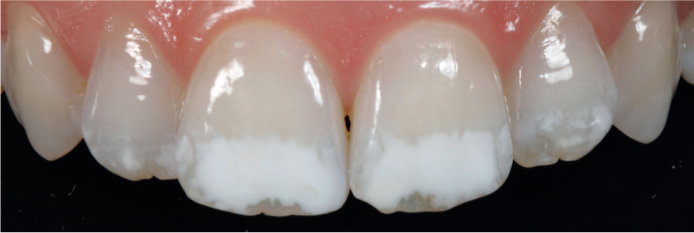
Characteristic signs of MIH include: large, well defined white, yellow or brown opacities affecting the coronal third of an incisor and hypomineralization of one or more of the first permanent molars (Figure 2).
Figure 2.
(a, b) Characteristic signs of MIH: large, well-defined white, yellow or brown opacities affecting the coronal third of an incisor and hypomineralization of one or more of the first permanent molars.
In contrast to fluorosed enamel, which is more resistant to caries, the hypomineralized lesions associated with MIH are more caries prone. The involvement of first permanent molars is traditionally asymmetrical.6 Affected molars may be masked by large restorations, gross caries, or previous extraction, so a detailed history must be taken.
MIH is in contrast to amelogenesis imperfecta, where all teeth are affected and where there is normally a family history.
Traumatic hypomineralization:
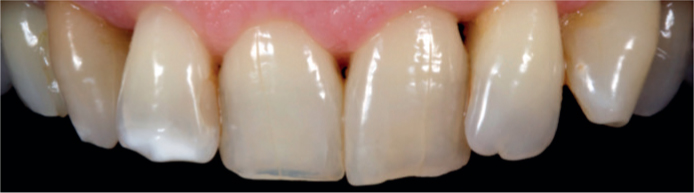
Hypomineralization of the permanent dentition can occur due to the close proximity of the apex of the primary dentition and the developing permanent tooth germ, either as a result of physical disruption or as a result of subsequent periapical pathology. These lesions are generally well defined and white in colour, but can exhibit some brown discoloration where haemorrhage has occurred into the area of hypomineralization. The lesions are mainly found in the coronal third of the affected tooth and are often associated with one or more adjacent teeth (Figure 3). They generally do not affect the contralateral tooth in the same arch, but may be found on the opposing tooth in the mandibular arch.
Figure 3. Lesions are mainly found in the coronal third of the affected tooth, often associated with one or more adjacent teeth.
Post-eruptive (environmental) lesions
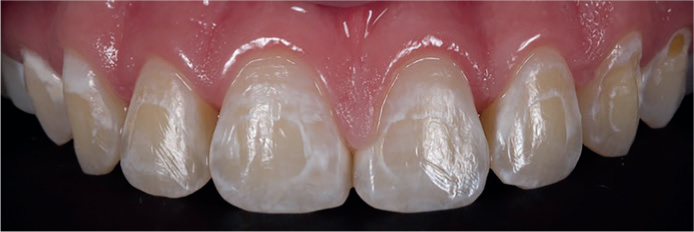
Post-eruptive white lesions may result from early, pre-cavitated carious lesions. On anterior teeth these lesions are generally found in sites where plaque accumulates easily, eg the cervical third of teeth adjacent to the gingival margin or around orthodontic brackets where oral hygiene is more difficult (Figure 4).
Figure 4. Post-eruptive (environmental) white lesions resulting from poor oral hygiene around orthodontic brackets.
Management of white lesions
As with any treatment plan, the patient must be carefully assessed, diagnosed and provided with all management options, which extend from no treatment, through minimally invasive options to indirect restorative options (Table 2).
Tooth whitening
Resin infiltration
Resin infiltration in combination with direct composite
Microabrasion
Macroabrasion (+ direct composite)
Veneers (direct or indirect)
The advantages and disadvantages of each option must be communicated to patients so that their expectations can be managed and so they have all available information to provide valid consent for treatment.
Tooth whitening
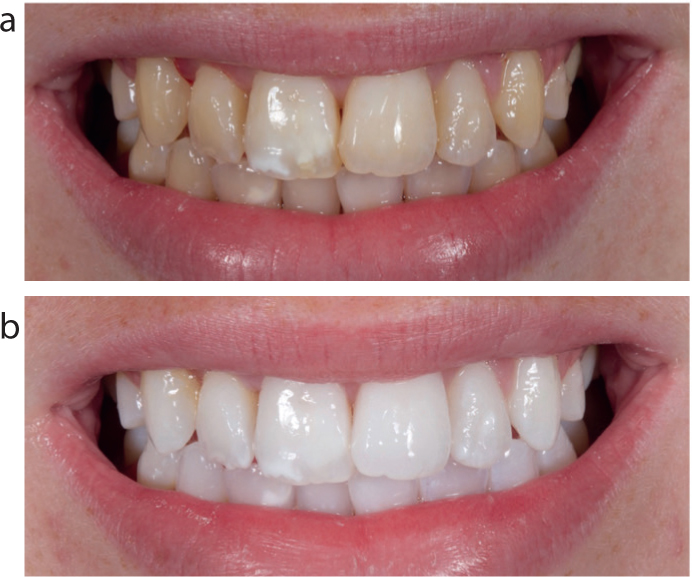
Tooth whitening is the simplest option for the management of white lesions. By whitening the background tooth colour the reduction in contrast can sometimes help disguise white lesions. It must be stressed to the patient, however, that during the period of tooth whitening, and for up to two weeks following cessation of tooth whitening, the white lesions themselves tend to look worse. With this in mind, the author suggests reviewing patients two weeks following completion of the whitening treatment (approximately 5 weeks from the start) in order to assess each case and discuss with patients if they feel that this has resolved their aesthetic needs or if further treatment is necessary. Figure 5 provides an example of an 18-year-old female patient who was treated for one week with 10% carbamide peroxide followed by two weeks with 16% carbamide peroxide (Evo Night, Enlighten®, UK).
Figure 5.
(a, b) An 18-year-old female patient who was treated for one week with 10% carbamide peroxide followed by two weeks with 16% carbamide peroxide (Evo Night, Enlighten®, UK).
Home tooth whitening must also be considered for cases affected with white and brown lesions. Home tooth whitening is the most minimally invasive way to remove brown discoloration from teeth and the options listed later in this article for the removal of white lesions do not apply to the brown lesions, so they must be removed first, to the best of the operator's ability. The protocol is similar to the one listed above, however, the patient is given the instructions to continue with the whitening until there has been complete resolution of the brown lesion, which can take several more weeks than standard home tooth whitening. Figure 6 shows a case after 90 days of home tooth whitening. This traditionally may have been treated by the more aggressive microbrasion treatment.
Figure 6.
(a, b) A case after 90 days of home tooth whitening.
Resin infiltration
The following is a step-by-step guide describing the materials, equipment and clinical techniques that are available for the minimally invasive treatment of white lesions using resin infiltration with Icon™ (DMG Hamburg, Germany). Resin infiltration7 is a technique where the overlying mineralized layer is removed with hydrochloric acid, allowing a low viscosity resin with a similar refractive index to natural enamel to be infiltrated into the more porous and hypomineralized white lesion. As the resin has a refractive index close to that of healthy enamel, when infiltrated it allows the lesions to mimic the translucent properties of healthy enamel better.
Case report
Pre-operative assessment
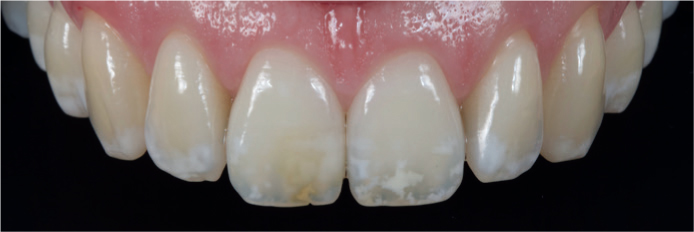
A 33-year-old female patient presented complaining of unattractive brown/yellow and white lesions affecting her maxillary anterior teeth. The management options were explained to the patient and she elected for a minimally invasive approach, first beginning with home tooth whitening, but was cautioned that the white lesions may not disappear and that they would become more obvious in the short term. Pre-operative photographs were taken, which are an important patient communication tool and also form a record of the patient's presenting pre-operative condition (Figure 7).
Figure 7. Pre-operative view.
Tooth whitening
Home tooth whitening was carried out using 10% and 16% carbamide peroxide (Evo Night, Enlighten®, UK). The brown lesion responded positively following 60 days of home tooth whitening showing 100% resolution, however, the white lesions were still visible (Figure 8). The patient wished for a further improvement in aesthetics, and so the next stage in the treatment hierarchy for white lesions was resin infiltration.
Figure 8. Resolution of brown lesion following 60 days of home tooth whitening.
Following whitening, tooth colour was allowed to stabilize for two weeks. This period is also suitable to permit oxygen by-products of tooth whitening to be released from the porous tooth structure. This reduces the risk of inhibition of the polymerization reaction of any resin-based adhesive materials.
Isolation
As Icon™ treatment requires working with the use of hydrochloric acid, it was important to isolate the soft tissues. This was achieved from right to left maxillary first molars with a heavy gauge non-latex dental dam (Unodent, UK), secured with soft clamps (Kerr, CA, USA), rather than metal rubber dam clamps, to obviate the need for local anaesthesia (Figure 9).
Figure 9. Isolation of the soft tissues.
Etching
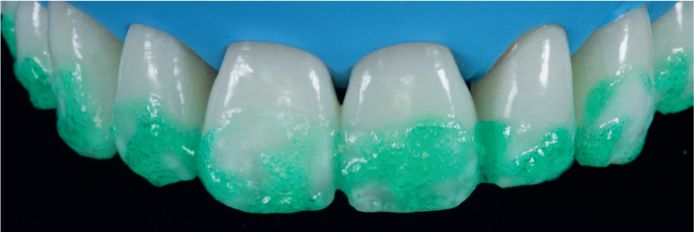
Following isolation, the tooth surfaces were cleaned by air polishing with a sodium bicarbonate powder (AquaCut, Sodium Bicarbonate, Velopex®) to remove the biofilm. The areas to be treated were then coated with Icon™ Etch, 15% hydrochloric acid, (DMG, Hamburg, Germany). This was left in place for two minutes (Figure 10) before being washed off to leave the typical post acid etch ‘frosted’ appearance. Each etch cycle removes approximately 50 microns of enamel.
Figure 10. The areas to be treated were coated with Icon™ Etch, 15% hydrochloric acid (DMG, Hamburg, Germany) which was left in place for two minutes.
Preview
Following rinsing and drying, Icon™-Dry solution (DMG, Hamburg, Germany), which comprises 99% ethanol, was applied and allowed to infiltrate for 40 seconds to ‘preview’ the final result. Because Icon™-Dry has a refractive index significantly nearer to that of healthy enamel than air, once the Icon-Dry™ has been applied to the lesions and is still wet, the clinician can get an idea of the effect that resin infiltration will have on the white spot lesions.
If the lesions disappear, the clinician can be confident that sufficient etch depth has been reached and that there would be resolution of the lesion if infiltration were commenced at this point. If the lesion is still visible, however, this means that there is insufficient depth of etch and further etch cycles are needed. Figure 11 shows the inadequate result at the first preview stage, where the white lesions are still visible.
Figure 11. Lesions still visible when viewed through Icon™-Dry.
The process of etch, rinse and application of Icon-Dry™ was repeated a further four times until the majority of the white lesions were no longer visible when viewed through Icon-Dry™.
Prior to treatment, it was explained to the patient that some of the lesions may prove to be more resistant to resin infiltration. For complete resolution of the white lesions it may be necessary to remove enamel to such depth that layering with composite resin would be necessary following infiltration. The patient did not wish for this and was happy to accept some residual white lesions.
Resin infiltration
Once both patient and clinician were satisfied with the preview stage, the teeth were dried to a ‘frosty’ post-etch appearance and the hydrophobic Icon™ resin infiltrant was then applied to the teeth. It is beneficial at this stage to turn off the operating light and any lights attached to dental loupes as these could prematurely cure the resin. The resin was left to infiltrate for three minutes and excess resin was then removed from the labial surface using a cotton wool roll. Contacts were then flossed to prevent the teeth being bonded together. Each resin application was then light cured for 40 seconds. This resin application process was then repeated. Immediately post cure, the Icon™ treatment leaves the teeth slightly rough due to excess resin being present on the surface of the teeth (Figure 12).
Figure 12. Immediately post cure, the Icon™ treatment leaves the teeth slightly rough due to excess resin being present on the surface of the teeth.
Polishing
After rubber dam removal, all teeth treated with Icon-Resin™ were polished using the same equipment and materials as a direct composite restoration using silicone points and diamond impregnated brushes. This excess resin requires removal to prevent extrinsic staining and to improve patient comfort.
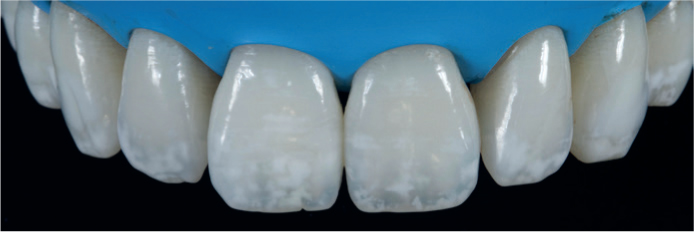
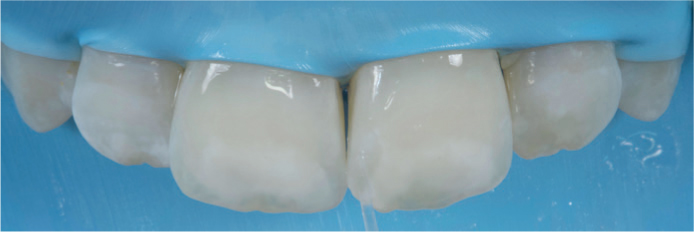
The patient was reviewed after five days and post-operative photographs were taken. Although not all of the white lesions were removed, the patient was pleased with a significant aesthetic improvement (Figure 13).
Figure 13. Post-operative views showing a significant aesthetic improvement.
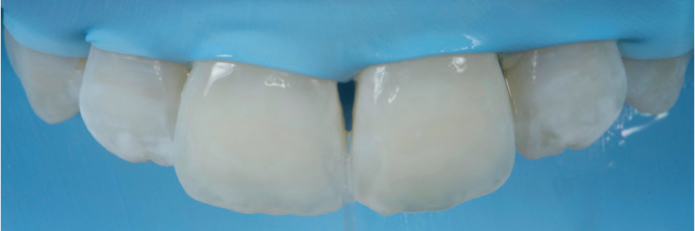
It is important to note that the incisal translucency, previously hidden by white lesions, may be revealed by resin infiltration, as in this clinical case example. It is essential to warn the patient that this natural opalescent phenomenon may appear following treatment of opaque white lesions using resin infiltration (Figure 14).
Figure 14.
(a, b) Natural incisal translucency restored following treatment.
Combined approach
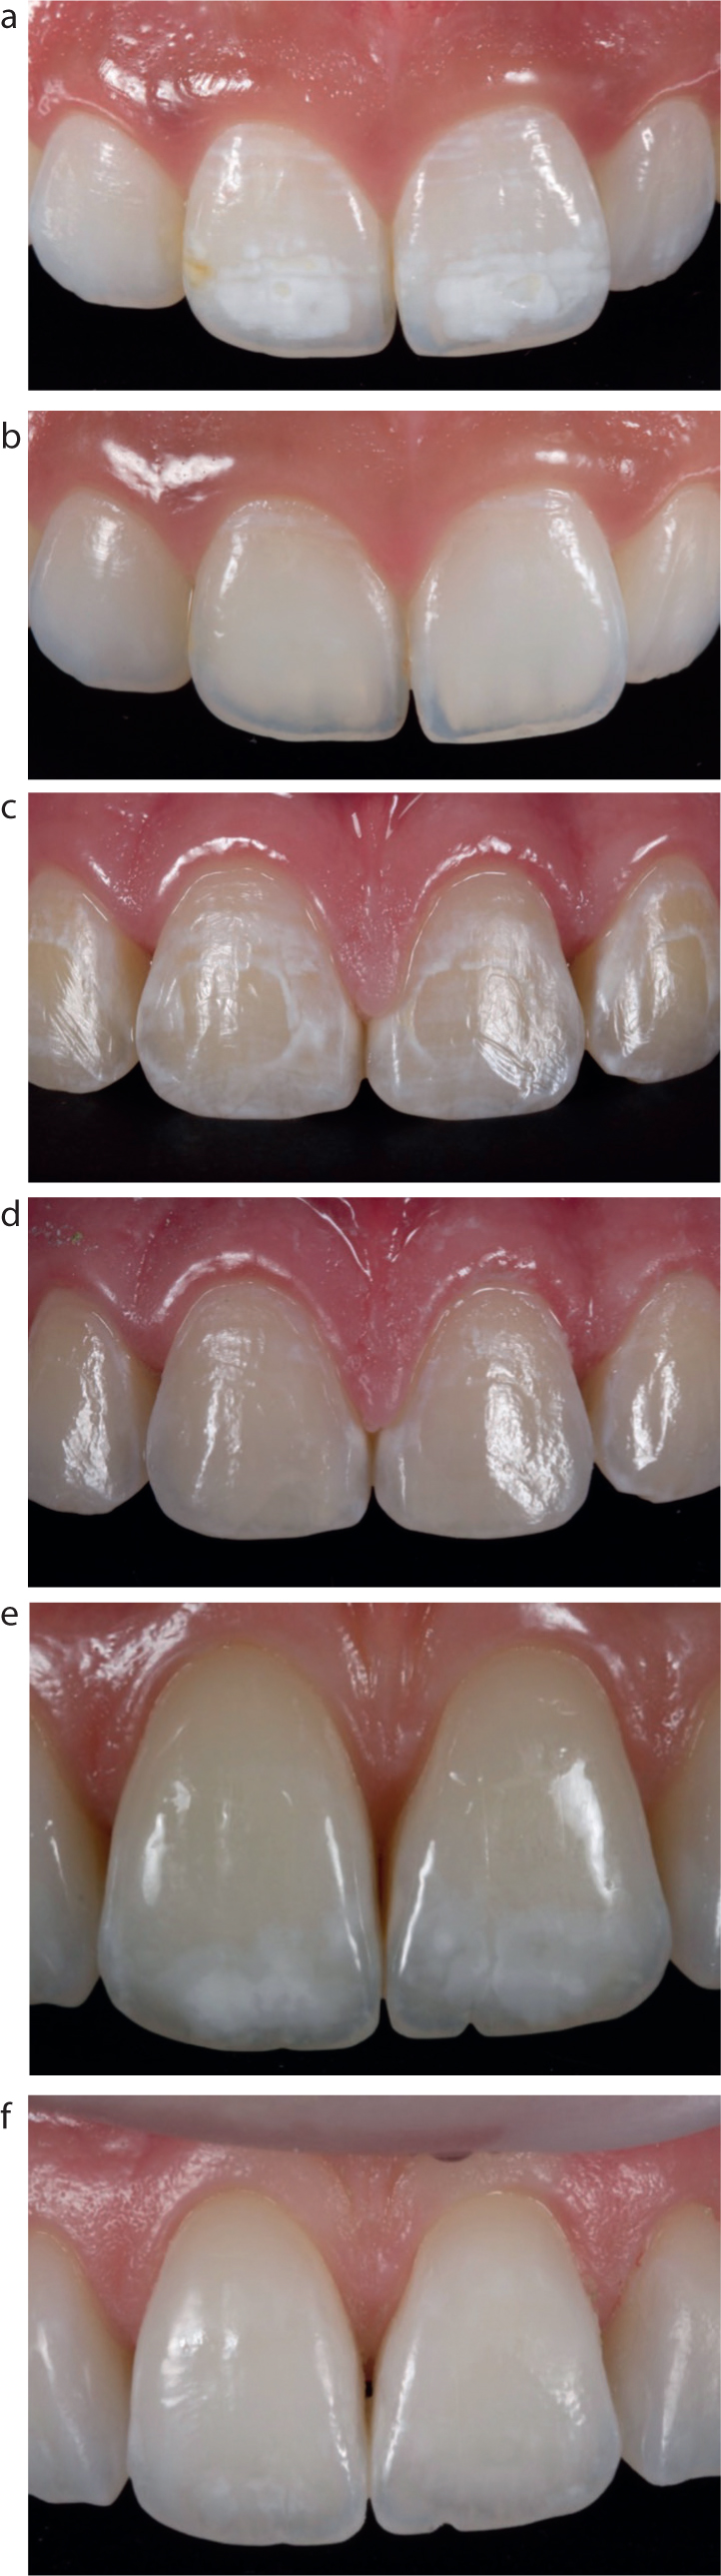
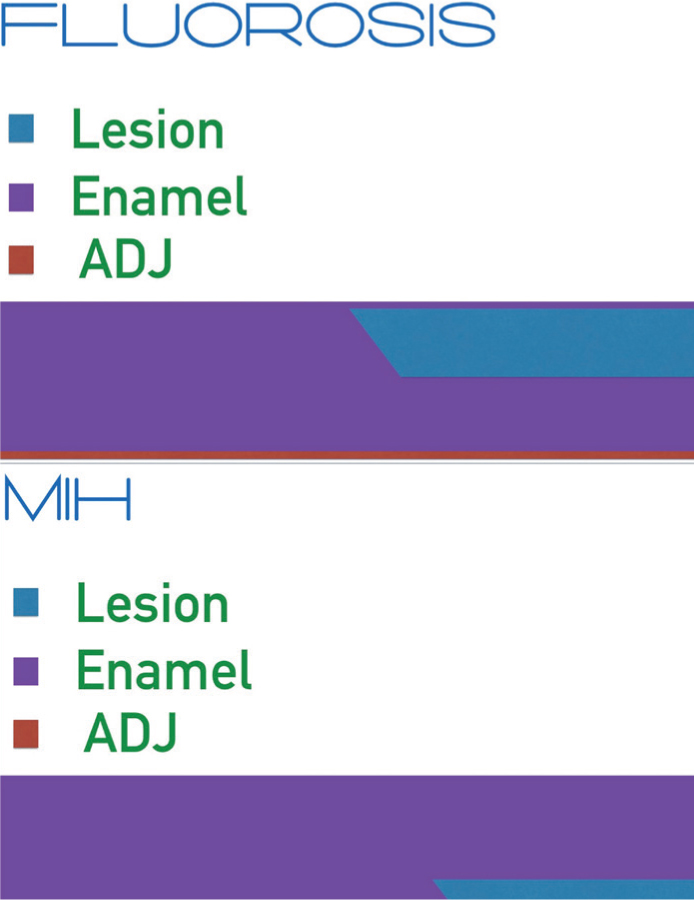
White lesions can be defined additionally as superficial and deep lesions with regards to their histological presentation. Fluorosis lesions and lesions as a result of primary caries are examples of lesions situated histologically close to the surface of the enamel and MIH and lesions of traumatic origin3 are examples of lesions situated deeper within the enamel body, closer to the ADJ.
The superficial lesions (Figure 15) are more readily treated by whitening and resin infiltration and much of the debate as to the effectiveness of resin infiltration comes from operators attempting to treat deeper set lesions with resin infiltration alone.
Figure 15.
(a−f) The superficial lesions are more readily treated by whitening and resin infiltration.
Regarding lesions of MIH origin, histologically they are set deeper within the enamel covered by a thicker layer of unaffected enamel (Figure 16). As such, MIH cases often require the superficial portion of the lesion/enamel covering the lesion to be removed in order for the resin to achieve full penetration.8
Figure 16. Histologically, lesions of MIH origin are set deeper within the enamel.
As treating these deeper lesions requires removal of superficial enamel, a combined resin infiltration/restorative approach is required to restore the overlying enamel defect as this would not be resolved with resin infiltration alone.
Case report
Deep lesion case type
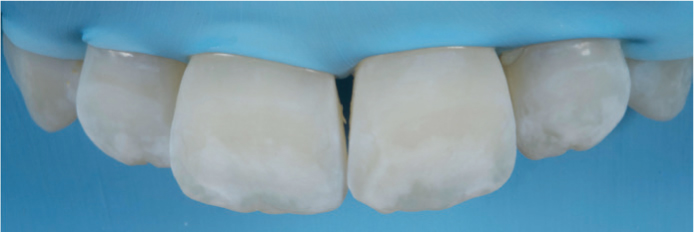
The subsequent case will illustrate the preferred treatment approach for a deep white lesion (Figure 17).
Figure 17. Pre-treatment view.
The patient was satisfied with her current tooth colour so it was decided to go ahead with the resin infiltration treatment without home tooth whitening. It was explained to the patient that resin infiltration would still be possible without whitening the teeth first, but the results with resin infiltration alone would not be as predictable due to the relatively dark shade of her natural teeth.
It was discussed that, if she wished for the best possible resolution, it may be necessary during treatment to remove a thin layer of superficial enamel in order for the resin to be able to reach the full depth of the white lesion. This would result in a shallow labial defect following infiltration, which would need to be restored with a thin layer of composite resin. The patient was happy with this proposed approach.
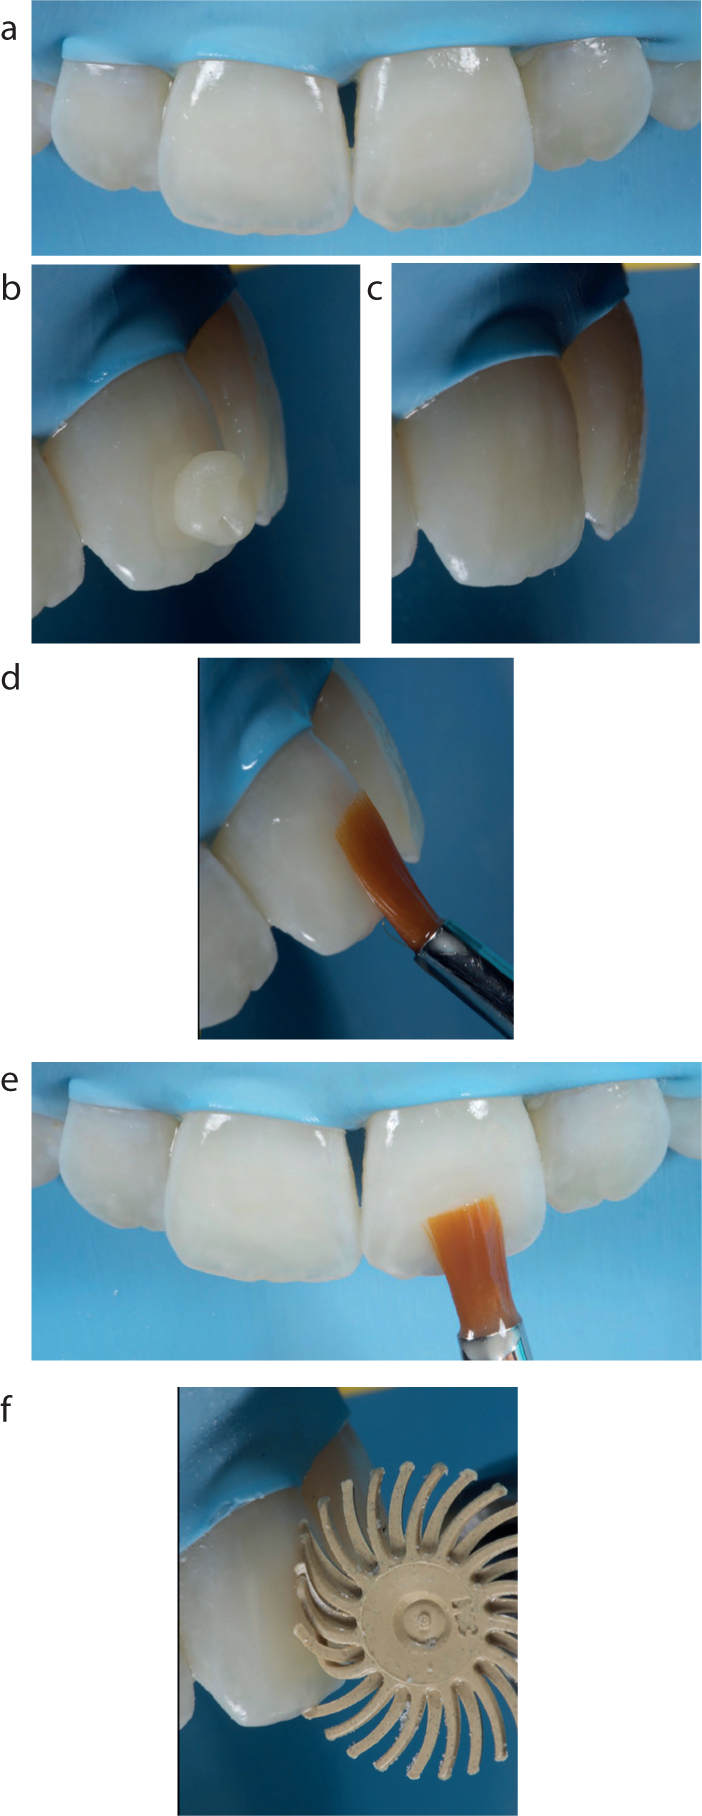
Protocol
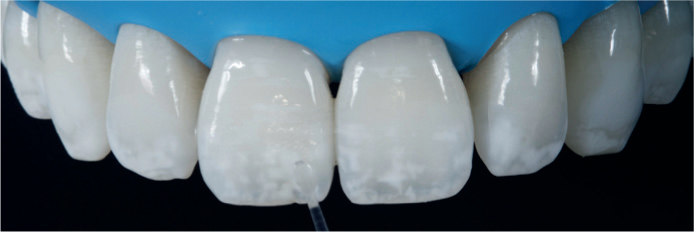
The areas to be treated were coated with Icon-Etch™, for 2 minutes before being washed off to leave the typical post acid etch frosted appearance. Following rinsing and drying, the lesions were then ‘previewed’ using the Icon-Dry™ ethanol solution provided. Initially, the process of etch, rinse and application of Icon-Dry™ was carried out three times with little resolution of the white lesions on the centrals (Figure 18).
Figure 18. The process of etch, rinse and application of Icon-Dry™ was carried out three times with little resolution of the white lesions on the centrals.
This was discussed with the patient and permission was granted to remove a thin layer of superficial enamel in order to access the white lesion to depth. A red band rugby ball bur was used to remove approximately 0.2 mm of superficial enamel (Figure 19). The process of etch, rinse and application of Icon-Dry™ was repeated a further two times until the majority of the white lesions were no longer visible following preview with the Icon-Dry™ ethanol solution (Figure 20).
Figure 19.
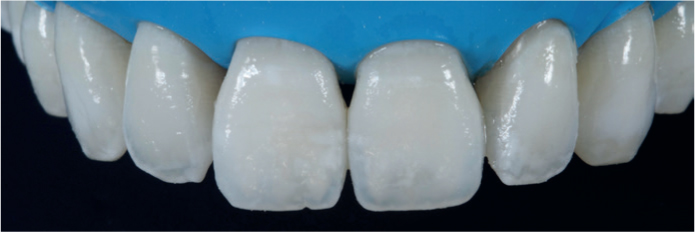
(a, b) Approximately 0.2 mm of superficial enamel removed.Figure 20. The majority of the white lesions were no longer visible following preview with the Icon-Dry™ ethanol solution.
Once satisfied with the preview stage, the teeth were dried to a ‘frosty’ post etch appearance with a further application of the Icon-Dry™ ethanol solution and allowed to evaporate over 60 seconds (Figure 21). Resin infiltration was then performed following the same protocol discussed earlier in this article. Immediately post cure, the Icon™ treatment leaves the teeth slightly rough due to excess resin being present on the surface of the teeth. The defect caused by the removal of superficial enamel is also still present (Figure 22).
Figure 21. The teeth are dried with a further application of the Icon-Dry™ ethanol solution and allowed to evaporate completely over 60 seconds.Figure 22.
(a, b) Immediately post cure. The defect caused by the removal of superficial enamel is also still present.
According to the literature, it is possible to bond to freshly cured Icon-Dry™ resin without further conditioning as it exhibits its own oxygen inhibition layer. In the author's experience, there may be a problem with delamination around the margins of any composite resin added which may cause a problem during polishing and finishing. The literature suggests that the bond can be further strengthened through the addition of a bonding resin prior to composite addition.
A thin layer of FL Bottle 2 (Kerr, CA, USA) was painted over the defects and cured before the addition of a thin layer of achromatic composite Filtek™ Supreme XTE White Enamel (3M ESPE, Seefeld, Germany), which was cured for 40 seconds before being cured again for a further 40 seconds under a glycerine barrier. This final cure under the glycerine barrier serves to remove the sticky oxygen inhibition layer that can clog finishing and polishing instruments, making them less effective (Figure 23).
Figure 23.
(a−f) Steps involved in placing a layer of enamel shade composite to restore the defect.
After rubber dam removal, teeth were polished with the Astropol® (Ivoclar Vivadent, Schann, Liechtenstein) system until the surface of the composite resin was smooth and any excess
Icon-Resin™ had been removed. This excess resin requires removal to prevent staining.
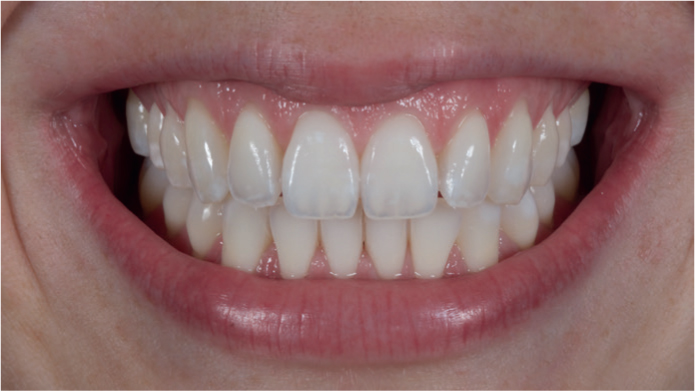
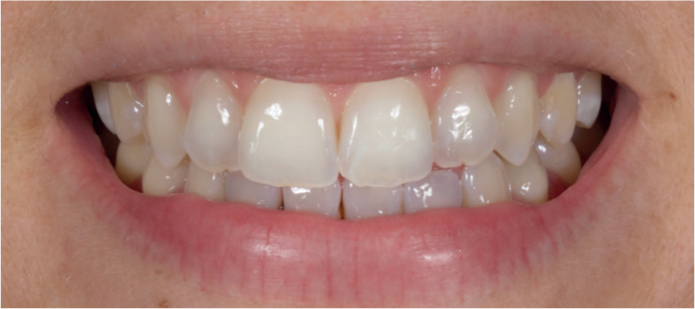
The patient was reviewed one month later and final review photos were taken. The patient was thrilled with the huge improvement that the treatment had made to her smile. She had previously been told that nothing could be done and had accepted that she may need veneers at some stage. She was happy that she was able to get the result that she wanted in such a conservative and biologically respectful way (Figure 24).
Figure 24. Post-treatment view.
Summary
Traditionally, management of unaesthetic, opaque white lesions was challenging as treatment with conventional tooth whitening materials carried the risk of making lesions more visible. When white lesions remain following tooth whitening, and require further cosmetic treatment, the materials equipment and clinical techniques described in this article provide a minimally invasive option that obviates the need for irreversible operative/restorative procedures that may have poorer longevity than resin infiltration treatments.