
Article
The cellulose acetate transparent crown former (also known as a strip crown) has been a popular choice for restoring traumatized and carious anterior teeth for over three decades. Their strong durability and retention success has been reported in the literature when utilized to fabricate bonded resin composite restorations in primary incisors.1 Not only can these simple and effective crown formers be used in Paediatric Dentistry where they have been shown to have a success rate of over 80%,1,2 but they could also be applied for use in the permanent dentition, where appropriate, for patients of all ages. Many of the pre-formed sizes are much larger than the average primary incisor and match on size more appropriately with the permanent dentition.
Classically, they are used for primary full coronal restorations3 when tooth tissue has been lost from multiple surfaces due to, typically, caries or trauma. They are commonly also used in the build-up of microdont incisors. They can provide a relatively straightforward way to achieve a superior aesthetic result, which can then, should they fail in the future, be easily repaired.2
Furthermore, it suggests herein that the ‘humble’ strip crown has a variety of applications when undertaking some simple adjustments that can aid in the restoration of anterior teeth. Also included are some helpful tips that may improve the performance, aesthetics and handling of strip crowns.
Tip 1: Moisture control and size selection
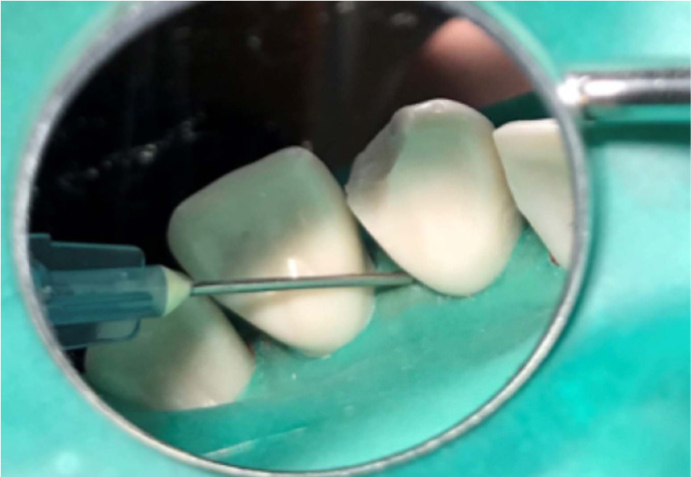
Avoiding moisture contamination for your strip crown restoration is the primary goal. Use of conventional rubber dam or, alternatively, the DryDam® (Directa, Upplands Väsby, Sweden), can help to achieve this. The DryDam® used here has attached elasticated ear loops for ease of use to help secure to the patient. It also has an absorbent outer periphery to improve patient comfort. Particularly when using for children, the dry dam can avoid the use of local anaesthetic and clamps, and be secured as with a conventional dam around the teeth by inversion and use of dam stabilizing cord (Wedjets®, Coltène/Whaledent Ltd, West Sussex, UK) or floss ligatures. It can be helpful to isolate two or more adjacent teeth, and punch only small tooth holes to help keep the dam retracted. Use of light-cured liquid dam (Rubber Dam Liquid, Cerkamed, Poland), which is widely available, can also be syringed at the margins of the dam where it meets the tooth to achieve a greater level of isolation (Figure 1). This is particularly useful in cases where the cavity margin or fracture line is close to the gingival margin. There are also other ways to achieve moisture control, such as cotton wool rolls, dry guards, good suction or OptraGate (Ivoclar Vivadent, UK). Arguably, the cellulose acetate crown itself protects the composite during curing to assist inherently with moisture control, prior to removal.
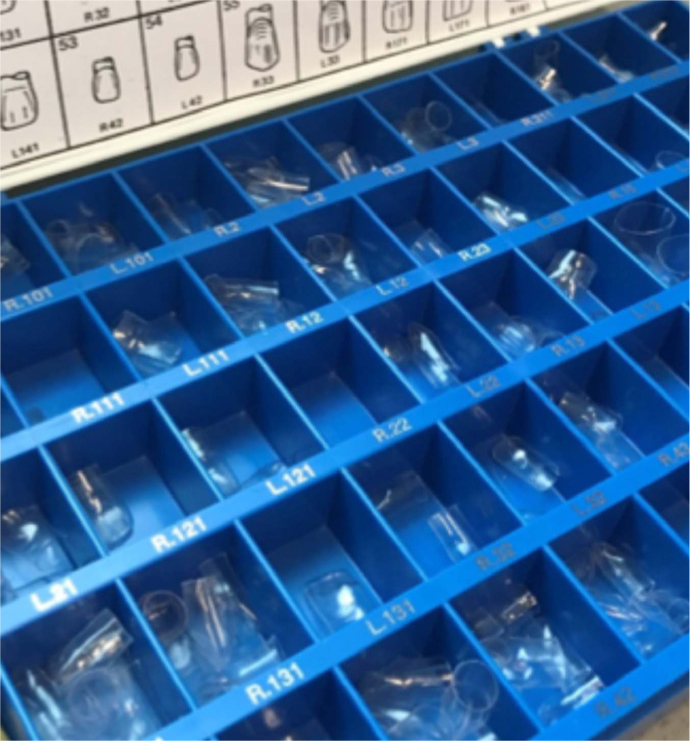
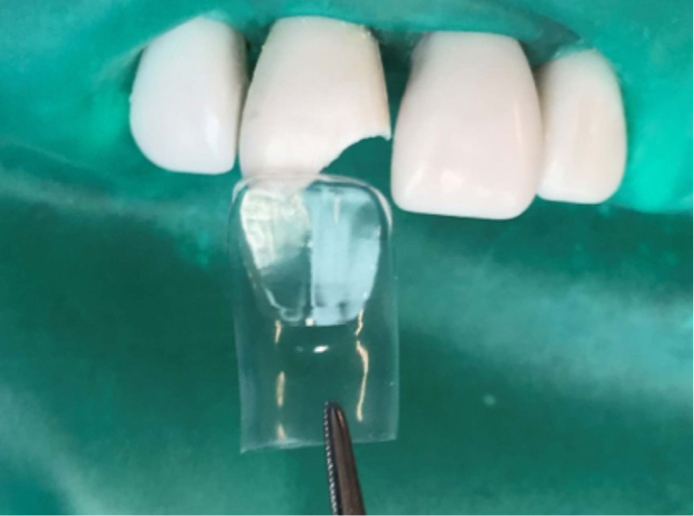
Size selection is crucial when using transparent crowns. It can be helpful to utilize the contralateral tooth to aid with size selection, where available. Where not available, a periodontal measuring probe, endo ruler or calipers can be used to aid measurement of the mesiodistal width. Transparent crowns are sold in multipack boxes (Strip-Off Crown Form, Clear, Box of 60, Henry Schein, UK) (Figure 2) of varying sizes with a corresponding pictorial guide; this is the first point of call for size selection. Odus Pella Crown Forms (EC Moore Co, MI, US) offer an alternative option to the Strip-Off Crowns referred to here. Select a crown to trial with clean tweezers so that it can be replaced if not appropriate. Holding by the cervical rim, position the incisal aspect against the tooth to be restored, if there is sufficient remaining tooth structure available (Figure 3), or the contralateral tooth, if not. Commonly used sizes can be replaced in size-specific batches for convenience, rather than having to purchase an entire replacement box.
Once the size has been selected, the crowns are classically cut using curved-ended scissors from the cervical aspect to adapt to restore the tooth. When it is possible to try in the crown, it is important at this stage, as with any restoration, to check the occlusion. Ask your patient to close together when the strip crown is in place to gauge for any occlusal interference. This preliminary check can avoid any lengthy adjustments at the end; typically some minor palatal adjustment will be required.
Tip 2: Conventional use – full build-up and temporary crown use
The conventional use of the transparent crown is in their ‘whole’ state, with adjustment only in length at the cervical margin. In this way, they can be used to restore the entire crown. It is often necessary to cut notches at the interproximal region to allow for effective seating of the crown. It can be beneficial to make a small air hole with a probe at the incisal edge of the crown to allow for expulsion of trapped air and avoid bubbles. As the composite is placed in bulk after etching and bonding, it can be thick in regions, hence it is important to choose an appropriate composite to ensure depth of cure, as layering is not used here. Due to the transparency of the crowns, however, there is naturally good light penetration from all surfaces. Figure 4 shows some of the stages of conventional use. Strip crowns, hence the name, are always removed with an instrument after the restorative material has set.
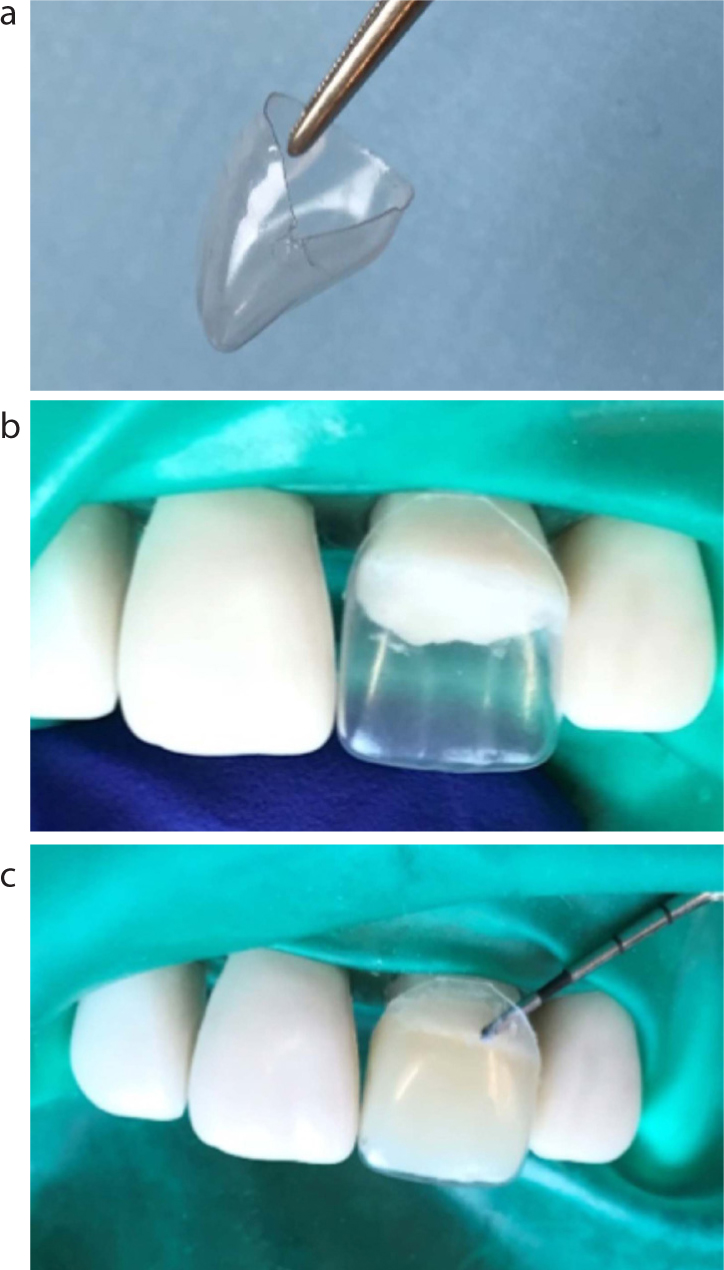
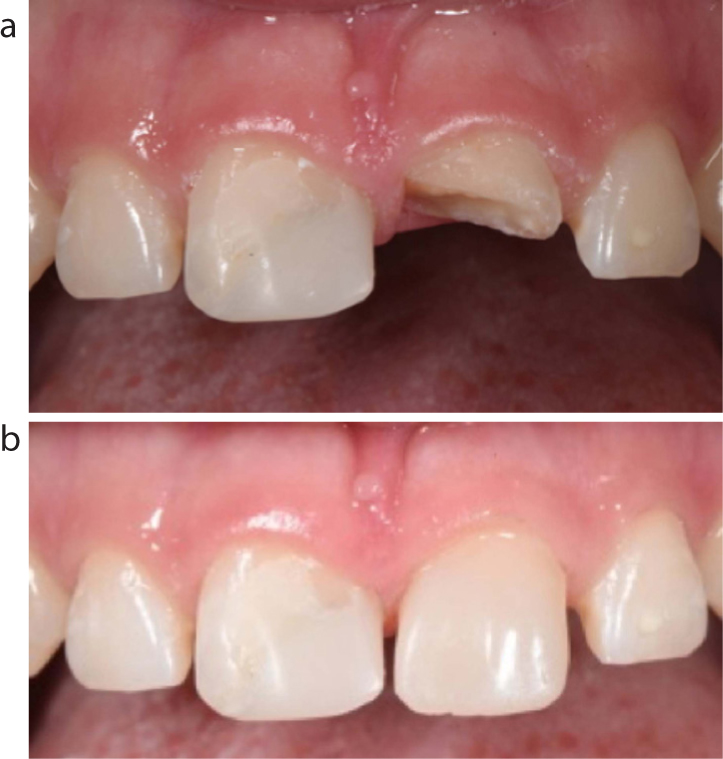
Figure 5 shows the quick result that can be obtained to restore an UL1 after previous trauma in a 15-year-old girl. The tooth had undergone a root canal treatment and was non-vital. This patient also suffered trauma to the UR1 historically. The transparent crown restoration was deliberately placed to retain the midline diastema and spacing at the patient's request, as she was awaiting orthodontic treatment. A fibre post could also be considered in appropriate cases for further retention, though was not used here due to the trauma history. The remaining enamel was bevelled pre-operatively and the composite extended buccally to improve aesthetics and increase the surface area for enamel bonding. Though dentine-bonding agents are improving, the reliability of the enamel bond over dentine has been well documented for decades.4 The straight distal margin and mesial incisal corner was noted clinically (Figure 5b) and could be improved upon for aesthetic reasons if desired with direct composite, to achieve a more natural emergence profile and incisal width to match that of the contralateral tooth.
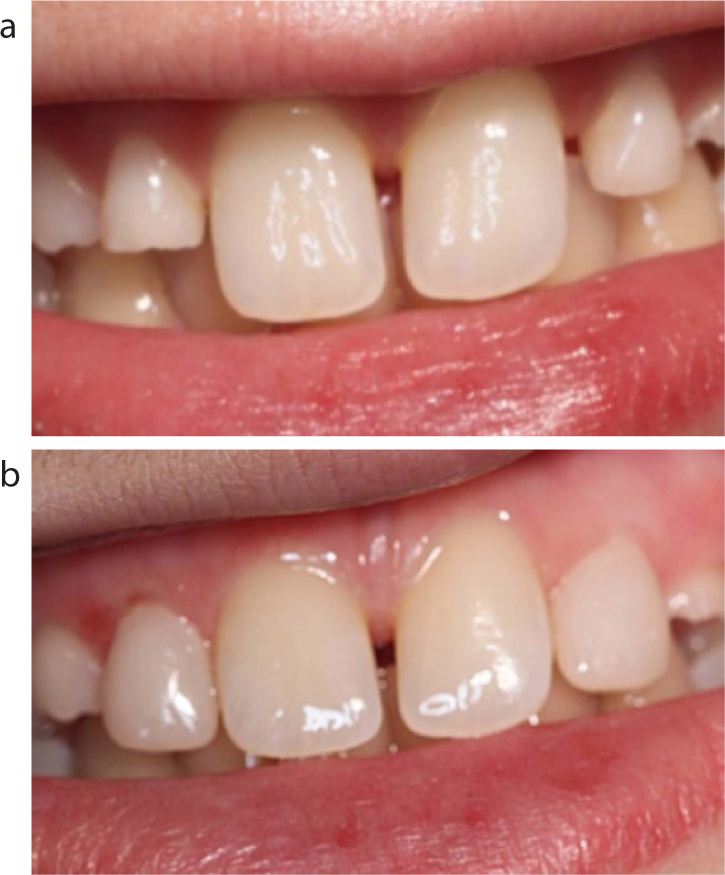
Furthermore, transparent crowns can be used conventionally to restore microdont lateral incisors (Figure 6).
In addition, strip crowns can also be used for temporary anterior crowns after a crown preparation utilizing temporary restorative material such as Protemp™ (3M, ESPE, MN, US).
Tip 3: Modified transparent crown: Class IV lesion
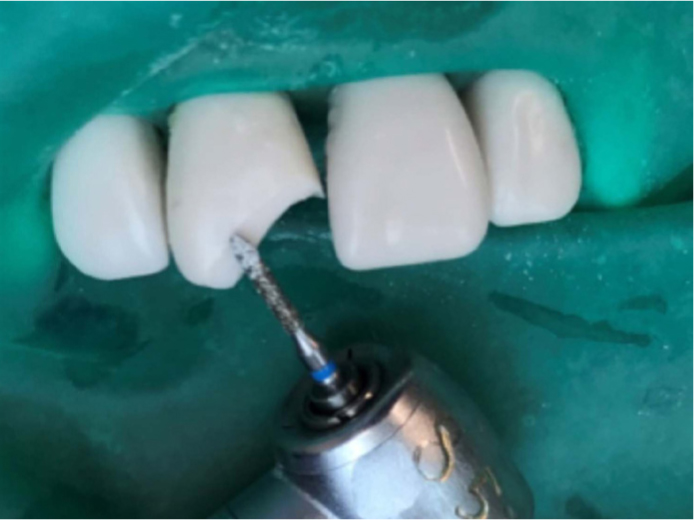
Though all transparent crowns require some level of modification at the cervical margin to fit, the ‘modified’ strip crown, as referred to in this article, demonstrates alternative ways to acquire the full potential from its pre-formed shape. This can allow for wider application and improved aesthetics. Its use when restoring a Class IV incisal-edge cavity helps to give adequate support to the restoration, particularly at the palatal aspect. The crown former is cut so that the crown margins cover the margins of the cavity and adapt well. It is important that margins are bevelled prior to restoring, and excess composite is removed prior to curing (Figures 7 and 8). This will allow for very minimal finishing, a good emergence profile and better aesthetics (though clearly here difficult to achieve with synthetic teeth used for demonstration purposes).
Tip 4: Modified transparent crown: Class III lesion
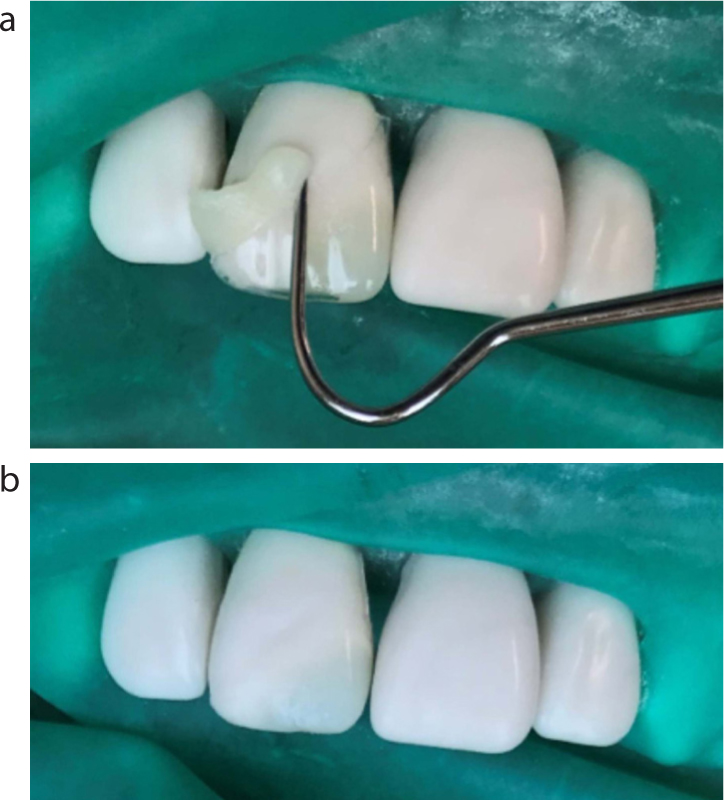
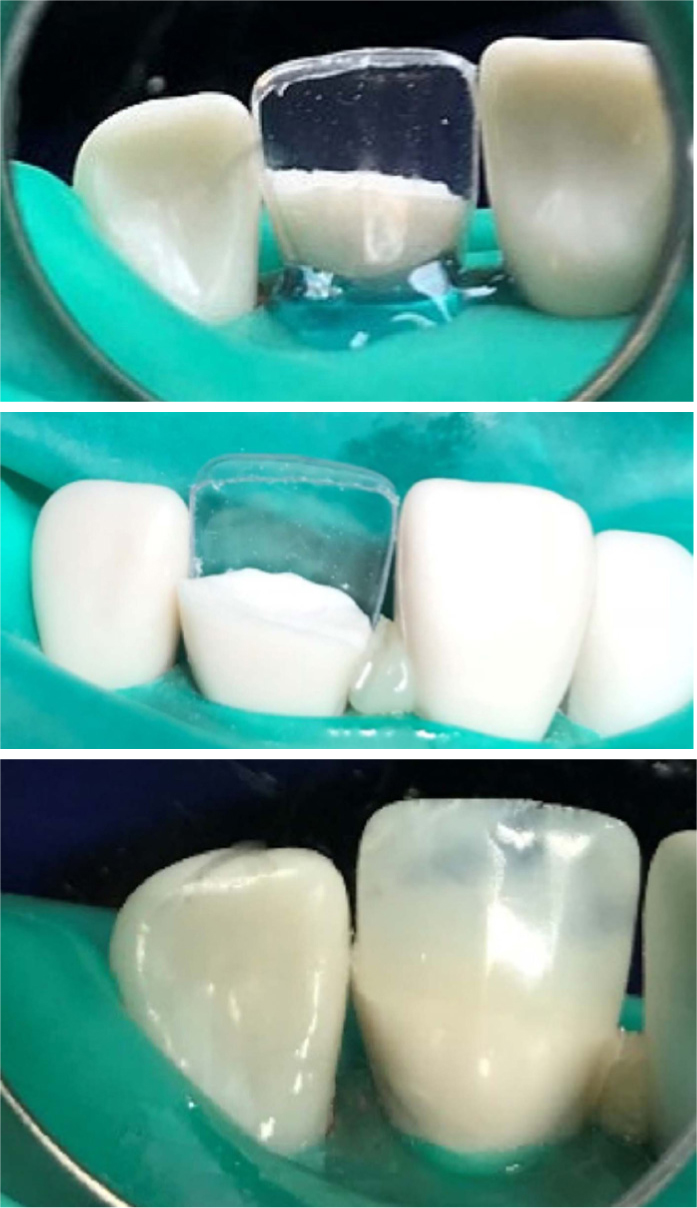
Class III cavities can be difficult to isolate, access and restore effectively without removing overlying sound enamel. Nevertheless, they present commonly in the mouth where tight contacts and caries risk factors coincide. The alternative approach described here may help to prevent unnecessary removal of tooth structure. First, the cavity is prepared, where possible, from the buccal and palatal aspects and margins bevelled. The appropriate size of transparent crown is selected, tried in over the tooth, and then cut along the incisal edge (Figure 9a) to leave a circular band of cellulose acetate. The aim is for this band to fit snuggly around the cavity. Composite is loaded into the cavity – deeper layers can be incrementally cured first if required, and the modified band is placed onto the tooth, forcing excess composite out. This is removed prior to curing (Figure 9b). This technique enables the user to achieve a good contact point, emergence profile and prevents the bonding of adjacent surfaces together.

Tip 5: Modified transparent crown: a palatal matrix
This approach allows for the fact that, in many cases, a bulk, single-shade composite restoration does not mimic the natural translucency of enamel. Here the strip crown is modified such that it provides a palatal matrix on which to build-up and layer composite. It can be adapted well and secured in place with liquid dam, as shown, or alternatively with unbonded balls of composite interproximally, which can be easily removed at the end. Chosen composite shades can then be incrementally layered onto the palatal matrix to restore as desired (Figure 10). When cutting the palatal matrix, it would be advisable to retain the interproximal aspects of the crown, which then avoid the need for Mylar strips or PTFE tape. This technique could be applied in toothwear cases, particularly when the palatal surfaces of the upper incisors are affected.
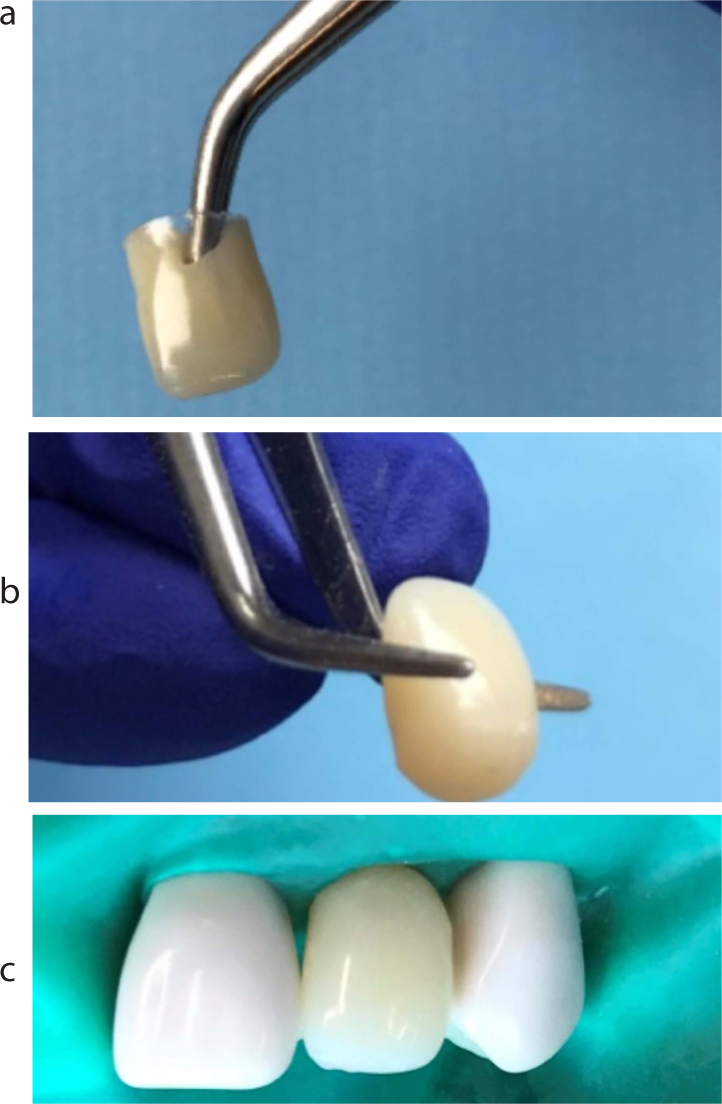
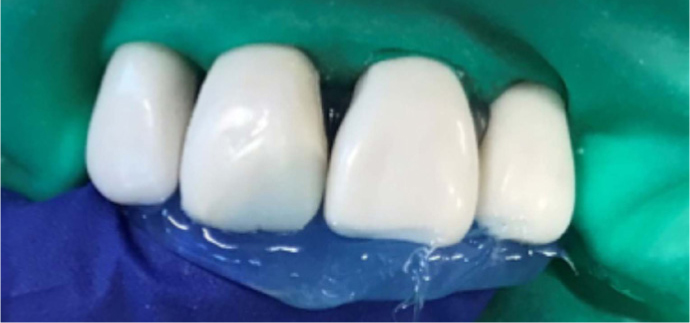
Tip 6: Modified transparent crown: to fabricate a direct adhesive temporary bridge pontic
Transparent crowns can be used in their entirety to create chairside pontics for use in a direct adhesive bridge, on a temporary basis. The crown is selected, filled with composite, cured and removed. The pontic is appropriately contoured as desired at the cervical aspect using a handpiece, eg modified-ridgelap, or the bullet/conical design, as shown here. This composite pontic can then be bonded to the neighbouring tooth palatally using a combination of composite and wire, or composite with fibre reinforcement such as everStick® (GC, Belgium) (Figure 11). This method can be useful for temporary bridges on an emergency basis when the patient wishes for an immediate fix.
Tip 7: Modified transparent crown: for core build-up and use for Memosil 2 matrix
Finally, should the use of the actual strip crown itself to mould your restoration fail to offer the desired approach, the strip crown can be used to restore in a cheaper material first, to provide a guide shape/outline, which is then used to mould an alternative matrix material such as Memosil 2 (Kulzer, Hanau, Germany). Memosil 2 is a transparent (in its set state) vinylpolysiloxane bite registration paste with a two-minute set time. It is applied with a mixer syringe around the teeth and gently adapted so that it engages the palatal, cervical and interproximal regions (Figure 12). After it has set, the Memosil matrix is removed, the temporary restoration removed and the Memosil matrix is replaced to use as an alternative build-up platform. An alternative to Memosil is regular impression putty.
Conclusions
The aforementioned techniques provide the reader with some innovative ways of using the cellulose acetate transparent crown; taking advantage of its valuable pre-formed shape. It can provide a temporary/provisional, or longer term restoration, which can help to save time chairside. The strip crown can be used for the carious, fractured, microdont or even missing tooth, as described here, and and offers welcome relief, especially in an emergency scenario, to achieve a highly acceptable aesthetic result.