Kelleher MK, Ower P. ‘Selfies’-an effective communication aid to solve periodontal and implant diseases. Dent Update. 2019; 46:12-22
Djemal S, Al-Kazemi F, Aryafar M, Tomson R. ‘Selfies’ helping the management of polytrauma. Dent Update. 2019; 46:24-29
Sharland M. Improving your image … then and now. Digital photography in dentistry. Dent Update. 2013; 40:333-336
Terry DA, Snow SR, McLaren EA. Contemporary dental photography: selection and application. Compend Contin Educ Dent. 2008; 29:432-436
Boye U, Walsh T, Pretty IA, Tickle M. Comparison of photographic and visual assessment of occlusal caries with histology as the reference standard. BMC Oral Health. 2012; 12
Goodlin R. Photographic-assisted diagnosis and treatment planning. Dent Clin North Am. 2011; 55:211-227
Shagam J, Kleiman A. Technological updates in dental photography. Dent Clin North Am. 2011; 55:627-633
McLaren EA, Garber DA, Figueira J. The Photoshop Smile Design technique (part 1): digital dental photography. Compend Contin Educ Dent. 2013; 34:772-776
Moncada G, Silva F, Angel P Evaluation of dental restorations: a comparative study between clinical and digital photographic assessments. Oper Dent. 2014; 39:45-56
The use of photography in dentistry is well established. Progressive technological improvements and dedicated training and practice in the use of specialized dental photography equipment enables novice clinical photographers to quickly become as proficient as experienced experts. The range of applications for dental photography continues to grow and may enhance the assessment, diagnosis and management of the majority of patients. Digital single lens reflex (DSLR) cameras, coupled with macro lenses and specialized flashes, may predictably be expected to deliver the highest quality clinical images. As mastery of dental photography requires optimization of equipment, settings and photographic techniques, this article is designed to provide detailed practical guidance for clinicians wishing to incorporate dental photography as a routine component of clinical practice and to provide guidance on optimizing the use of photography to enhance remote patient consultations.
CPD/Clinical Relevance: Dental photography has an important role in optimizing face-to-face and virtual patient care in contemporary general dental practice.
Article
Clinicians worldwide are making increased use of photography to enhance patient care, increase job satisfaction and to grow practices by demonstrating their skills and expertise. The coronavirus pandemic has necessitated widespread adoption of remote consulting techniques and the diagnostic benefit of virtual patient/clinician communication can be significantly enhanced with the use of dental photographs.
In contemporary clinical practice there is a mandatory requirement for precise, accurate contemporaneous documentation of patient assessments, diagnoses, clinical decision-making, and patient management based on those decisions. High-quality dental photography should be an essential component of modern dental care as there are almost no patients whose long-term management would not benefit at some stage from the judicious use of clinical photographs. Optimal equipment selection and the principal benefits of clinical photography to patients and clinicians are well documented,1,2,3,4,5,6,7,8,9,11 and are outlined in Table 1.
Communication
Patient and peer-to-peer communication is advanced to an unprecedented level
Images may be viewed immediately on the camera's LCD display or transferred digitally to a suitable monitor or as part of an electronic referral
Images may be used to enhance the quality of virtual patient consultations
Consent
A higher level of valid consent can be expected with the use of clinical photography
Photographic records may also reduce the risk of dento-legal problems1
Clinical skills
Detailed reflective study of clinical images may be expected to help enhance patient care and increase technical skill to an advanced level
Increased professional knowledge, understanding and satisfaction should be guaranteed
Business
Practice teams will find numerous opportunities for practice growth by adopting the routine use of dental photography
Education
High-quality clinical images are an integral component of undergraduate and postgraduate training and mentorship programmes, and form the cornerstone of advanced clinical qualifications
Like all new skills in dentistry, high-quality training and dedicated practice are essential components for the successful integration of photography as a routine component of contemporary patient care.
This article provides a practical guide to the photographic equipment and techniques that are suitable for dental photography. It is designed to help clinicians optimize all aspects of clinical photography in dental practice and provide guidance on teaching patients how to take diagnostic quality ‘selfies’ using camera phones to enhance virtual consultations. Before focusing on technical aspects, the dento-legal requirements of clinical photography are discussed.
Consent
Without patient consent, no clinical images should be taken. The Institute of Medical Illustrator's code of practice (1986) advises that informed consent is required for any clinical images from which the patient may be recognized, eg face/eyes.10
For dental photography the authors strongly recommend that written consent is obtained before any clinical images are taken, whether a full-face portrait or a close-up of a fissure system.
As they form part of a patient's confidential records, clinical images should be used, stored and archived in accordance with data protection guidelines.
Higher levels of consent should be obtained if images are required for additional purposes. While there are no universal rules, there are considered to be three general levels of consent. Where the patient may be easily identified from images in levels two and three, it is important that he/she is informed of this and consents to their specific use. These consent levels may be used to create personalized digital or hard copy photographic consent forms, which patients should sign to authorize the use of dental photography (Table 2).
Level
Description
Example details for consent form templates
1
Confidential record
For use as part of patient's confidential clinical records only
2
Restricted
Images will be shown to appropriate clinicians, eg for referrals
For use on a restricted-access website
For use in education/research
3
Open publication
Images may be used for publication in a journal or textbook, or as part of a display or information leaflet
Images may be published on an open-access website, which may be seen by members of the public as well as clinical professionals
Patients should be informed that it may not be possible to withdraw consent subsequently, following publication
When using camera phone photography to enhance patient communication, the patient's own mobile phone may be used to capture images in the surgery, with permission, or in the patient's own home to support virtual consultations. In doing so, the patient is providing consent for the clinician to use the images, as long as they are kept safely and not shared without permission.1
Dento-legal records
Clinical images should be considered subject to the same dento-legal requirements as radiographic images, with regard to quality control, labelling, storage and reporting. Table 3 lists the information that should be recorded in the clinical notes when taking clinical photographs.
Signed photographic consent form
Record in the clinical notes that photographs have been taken
Record of the date the images were taken
Record of any discussions with patients based on the images
Video conferencing
Duty of care is identical for both live and virtual patient consultations and covers a range of areas, including obtaining consent, confidentiality, record-keeping, diagnosis, advice, treatment planning, provision of treatment and post-operative care and instructions. Secure transfer of patient information, including photographic images, must be maintained at all stages and therefore, during remote patient video consultations, closed platforms must be used, eg Microsoft teams.11
RAW and JPG images
Dental photography should provide high-quality, accurate and measurable clinical images. Where suitable settings are available, cameras should ideally be configured to produce both a RAW and JPG (Joint Photographic Group) image each time a picture is taken. JPG images can be readily used in the patient records and the RAW images should be securely archived separately. RAW format images are recommended as they most accurately record clinical situations with minimum loss of information. RAW files may be considered as digital negatives, because, like negatives in film photography they are not directly editable like JPG images. As they may be used to demonstrate whether any modifications have been made, they have a high level of integrity in the event that the photographs are needed for evidential purposes. The unmodified RAW images have comparatively large file sizes (20MB compared to 3MB). It is therefore recommended to label and archive RAW files separately as a permanent dento-legal record.
Applications for clinical photography
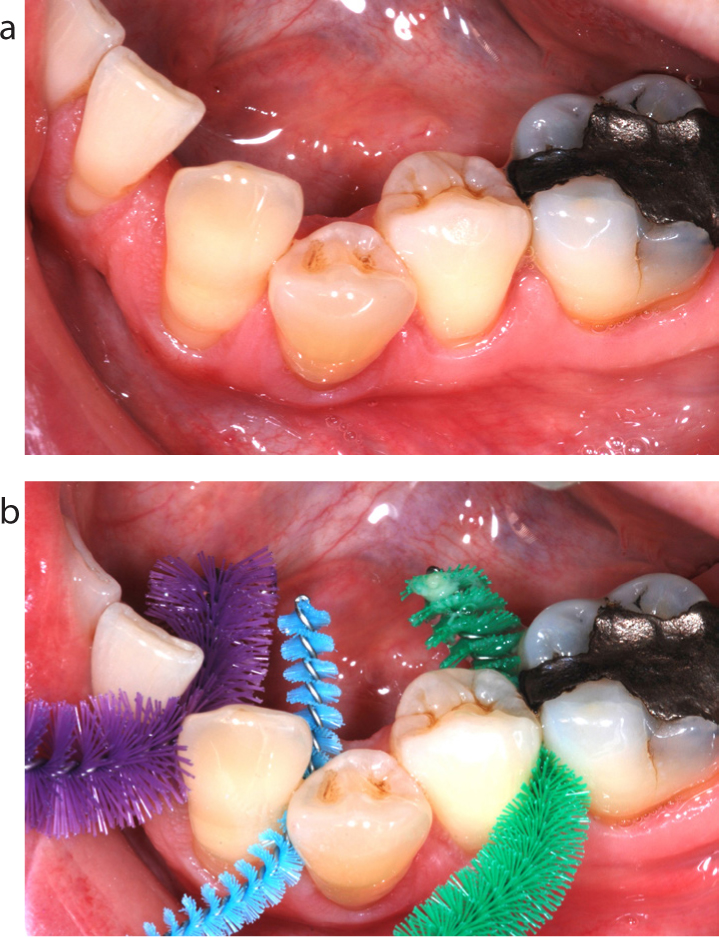
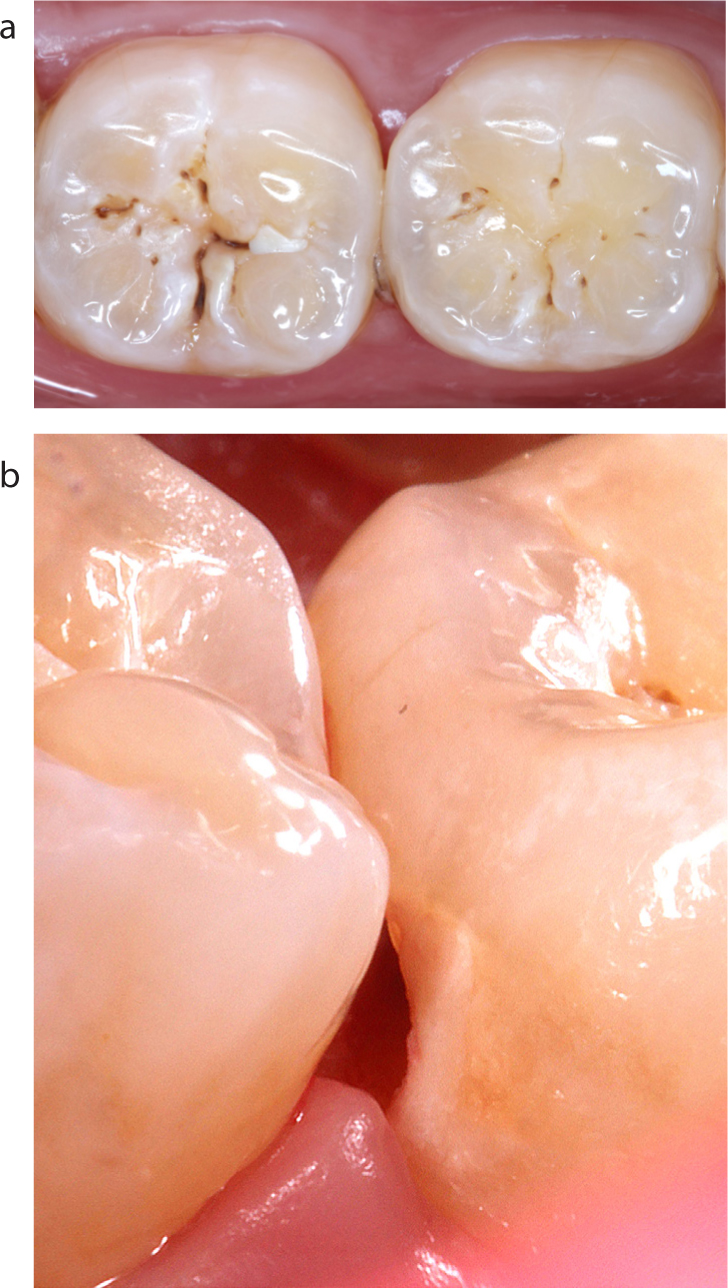
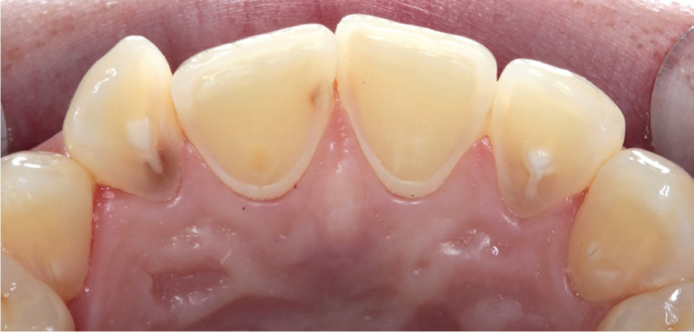
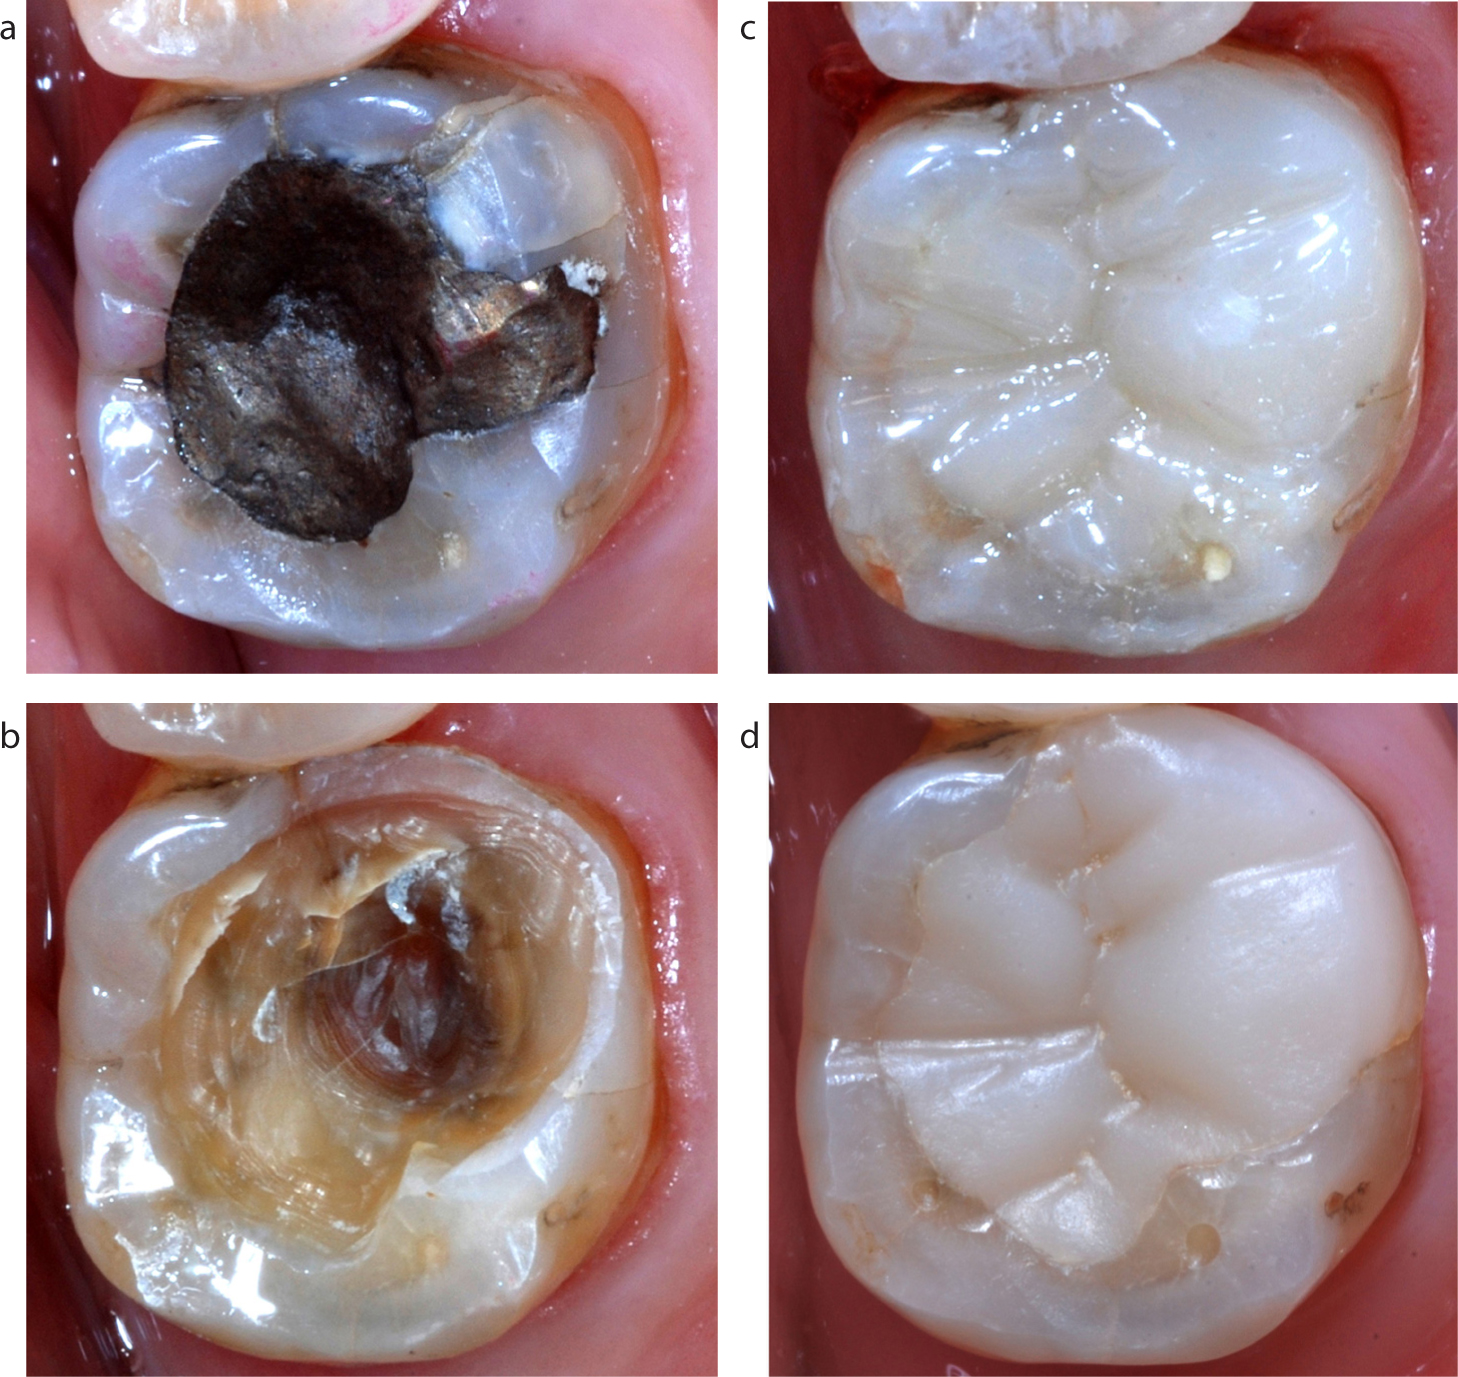
There are virtually no clinical conditions for which patient assessment, diagnosis and management will not benefit from the use of clinical photographs.1,2,3,4,5,6,7,8,9 Examples of the wide-ranging applications for dental photography are listed in Table 4 and illustrated in Figures 1–7.
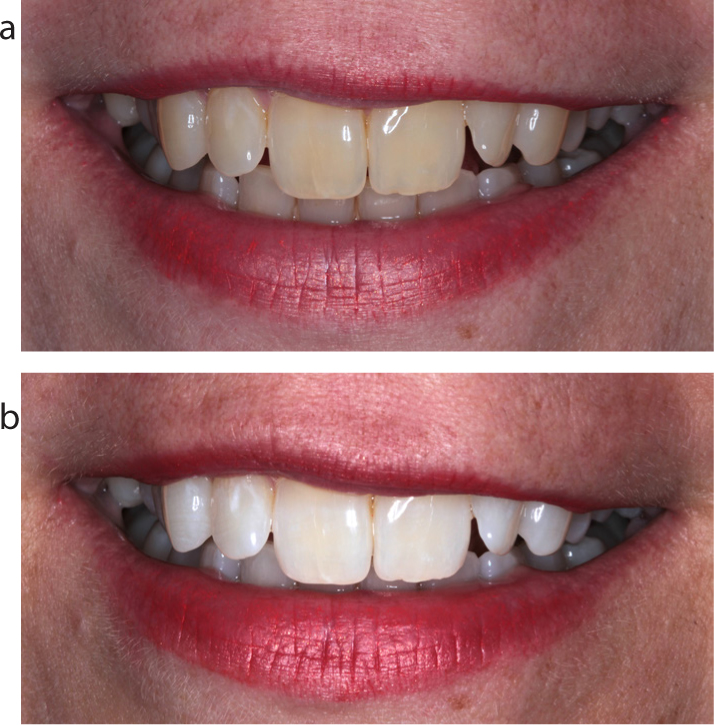
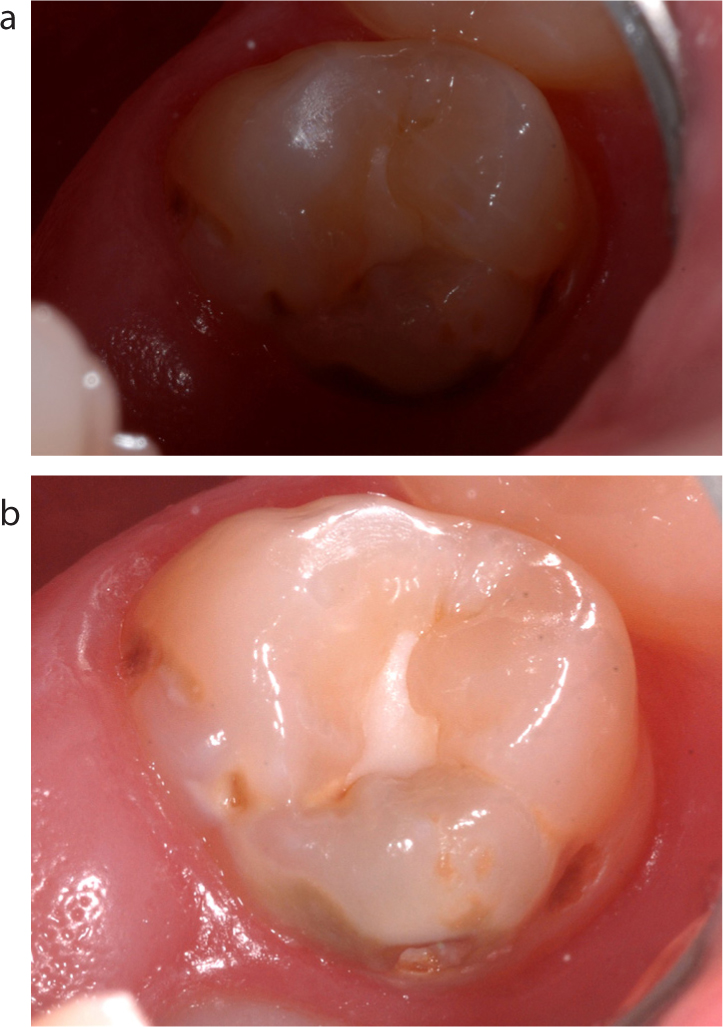
Figure 1. Photographs with (a) and without (b) different size interdental brushes, used to support oral hygiene instruction.Figure 2. Occlusal (a) and distal close-up (b) images used to demonstrate a cavitated class II carious lesion.Figure 3. Photographic demonstration of erosive tooth wear on the palatal surfaces of maxillary anterior teeth.Figure 4. (a) Clinical image to demonstrate longitudinal root fracture of a mandibular molar. (b) Photograph of tooth following extraction.Figure 5. Photograph of early mouth cancer on the tongue's lateral border (photograph taken with an early-version intra-oral camera to support immediate referral).Figure 6. Photographic documentation of the direct restorative treatment of a fractured mandibular molar: (a) pre-operative condition; (b) cavity preparation complete (photographic record of crack lines); (c) immediate post-operative appearance; (d) long-term review.Figure 7. Before (a) and after (b) anterior smile images taken to document cosmetic bleaching treatment.
Communication
Patient education
Illustrated prescriptions to technicians
Referrals to specialists/secondary care/medical referral/peer-to-peer case discussions
Pre- and post-operative shade documentation (with shade tab)
Before and after images (patient communication) (Figure 7)
Practice building
Portfolio creation
Website illustration
Patient information leaflets
Marketing
Team portraits
Education
Self-directed study (personal reflection)
Undergraduate and postgraduate qualifications
Academic publications/lectures
DSLR clinical photography
For high quality, predictable, efficient and enjoyable in-surgery clinical photography a DSLR (Digital Single Lens interchangeable Reflex mirror system) camera is recommended.3,7 The advantages are listed in Table 5.
Consistently high image quality
Ability to focus quickly and easily on the exact area of interest
Predictable exposure, magnification and colour
No distortion
Standardized views allow accurate communication with patients and other dental professionals
Equipment should last for at least 10 years
Although an expensive initial purchase, bulky and associated with a significant learning curve, DSLR photography will very quickly bring rewards to enhance patient care and professional satisfaction. With DSLR photography, the subject area is viewed through the viewfinder and the LCD display screen is only used to confirm that the captured image is optimal.
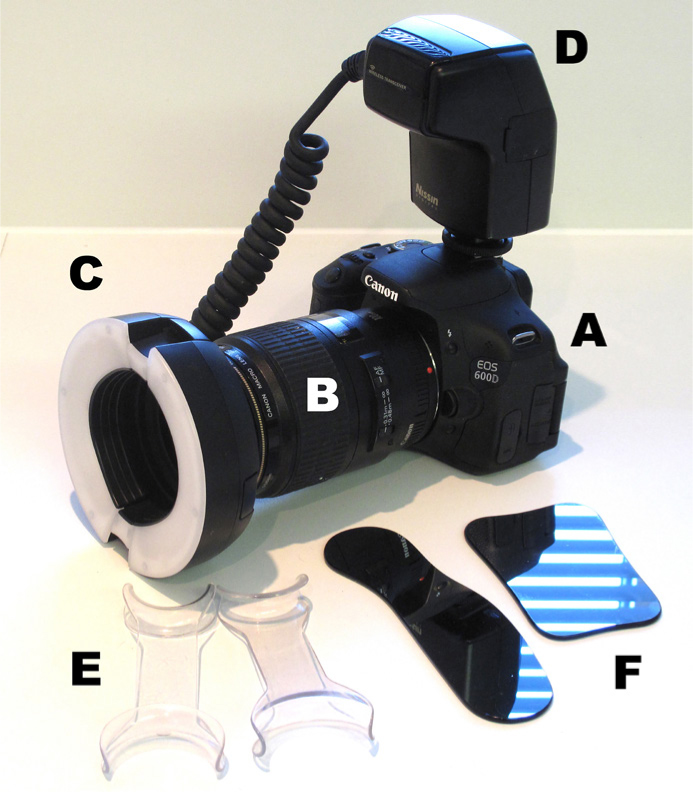
The main components of a clinical photography set-up are listed in Table 6 and demonstrated in Figure 8.
Main components
Specialized accessories
Camera body
Macro lens
Ring flash
Ring flash power supply
E. (essential)
F. Mirrors (essential)
Contraster Retractors (optional)
Figure 8. Dental photography equipment.
Camera body
Dental photography requires consistent, high-quality results from one patient to the next and for the same patient photographed at different appointments. To achieve this, the automatic features of the cameras, lenses and flashes are not used. Therefore, DSLR camera bodies do not have to be expensive or complicated and may be used with interchangeable lenses for a wide range of personal photography projects.
As mentioned above, cameras should be capable of capturing RAW and JPG images and may be configured to upload images to preferred computer platforms via wired or wireless image transfer.
DSLR camera batteries are usually rechargeable and are capable of powering the camera for hundreds of photos. Practitioners should check that camera batteries are sufficiently charged for clinical sessions. Batteries take a few hours to recharge, but should not be left on the charger permanently.
Macro lens
The lens is the most important piece of equipment and it is essential to purchase a true macro lens.
A prime telephoto macro lens
A macro lens is characterized by the ability to produce 1:1 life-size images. A macro zoom lens or wide angle lens should not be used as they will not give a true rendition of the teeth and images will be distorted. The ideal focal length for the lens is in the range: 90–105 mm.
This will enable photographers to remain at a comfortable distance from the patient, even when focusing for 1:1 close-ups of posterior teeth.
Depending on the type of lens, magnification is adjusted by turning the lens barrel internally or externally and viewing the levels in the magnification window, which is calibrated as a ratio or a distance from the subject. The most commonly used ratio is 1:3, at which the macro lens will be at a 0.5 m working distance.
A connection ring is also required to allow the attachment of the macro flash. A clear protective filter may be purchased and screwed to the front of the lens.
Macro flash
The oral cavity is a challenging environment to photograph and conventional built-in camera flashes are not powerful enough to illuminate the dark mouth. Lighting difficulties are eliminated with the use of a specialized flash called a macro ring flash.
Macro ring flash
This essential purchase comprises two flash tubes that are attached to the connector ring on the front of the macro lens. The powerful flashes have an extremely short duration that eliminates the variable quality of ambient light. This allows the camera to photograph oral structures in clear detail without the blurring or ghosting that is seen with continuous light sources.
The two flashes are routinely used to fire together but, if desired, one side may be switched off, eg to reduce the risk of shadowing on facial profile images.
Macro flashes with wider positioning are also available. These are called twin flashes and can be orientated to provide even lighting for outstanding clinical images, especially of anterior teeth. Twin flashes are more expensive and more technique sensitive, eg with mirror views of posterior teeth and close-ups, repeated views may be required due to overcome shadowing.
The ring flash power supply slides onto the unit at the top of the camera body and is usually powered by four AA batteries, which should enable 100–200 clinical photographs. Rechargeable batteries may be used, but it is recommended to keep a plentiful supply of spare batteries in the surgery, just in case, and not leave flashes on standby mode as they may continue to drain the batteries.
NB: LED flashes are not suitable for clinical photography as they are not bright enough.
Retractors
Soft tissue retraction is essential to allow the photographer to focus easily on the subject area and admit sufficient light from the flash. Specialized cheek/lip retractors must be used as fingers and mirrors are not suitable and will waste time. Equipment suitable for moisture control may also be used to control field of view.
Practical tip: light blue rubber dam isolation gives an excellent contrasting background when photographing restorative procedures.
Mirrors
Mirrors are the final equipment requirement for predictable clinical photography. Illuminating the back of the mouth is extremely difficult using conventionally sized dental mirrors (although they are occasionally useful when trying to capture tricky posterior views) (Figure 9).
Figure 9. (a, b) Use of a dental mirror to optimize photographic exposure of a maxillary third molar.
Specialized wide mirrors are available in a range of sizes and shapes made from plated reflective glass or metal. The widest mirrors enable full-arch occlusal images to be captured, but can be uncomfortable and may not fit small mouths. Medium-sized dental photography mirrors are more comfortable for patients and give better control when capturing quadrant or posterior close-up images. The side of the mirror may also be used to supplement soft tissue retraction. All-in-one mirrors are also available with wide and narrow ends.
Mirror images will of course be reversed, and JPGs should be flipped horizontally before viewing to enable effective communication and reduce the risk of diagnostic/charting errors. A range of image manipulation processes are available to rotate photographic images.
Mirrors should be handled, sterilized and stored carefully as they are easily scratched.
Settings for clinical photography
Automatic camera systems are designed to help photographers capture pictures in a wide range of situations, but will not offer the consistency and quality essential for clinical photography. Images taken on automatic settings will often be blurred by small camera or patient movements, or be out of focus in key areas.
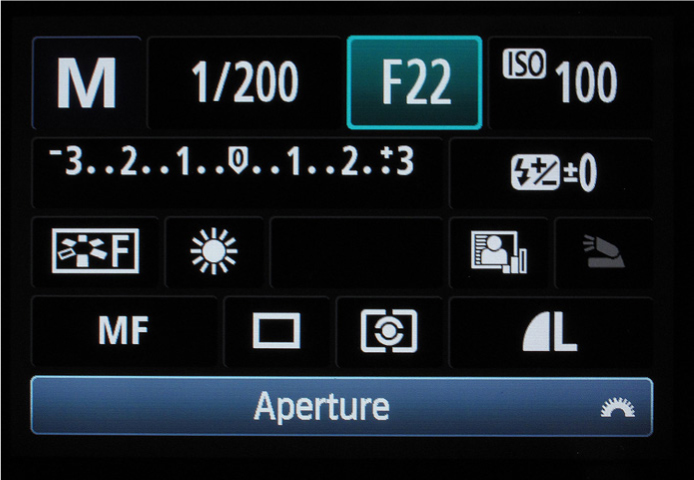
For DSLR dental photography, a range of optimal camera, lens and flash settings are used to enable clinicians to get the images that they want and not the images that the camera wants to give them. The time taken to configure equipment correctly will be rewarded with fast, efficient, predictable and enjoyable clinical photography (Figure 10).
Figure 10. Recommended camera settings for clinical photography.
Some specialist suppliers of dental photography equipment will configure cameras prior to dispatch. However, it is important to learn how to re-set the camera if the settings are changed accidently or by other camera users. By following the 10 steps listed in Table 7, camera equipment will be immediately ready for first-time clinical photographers to take high-quality clinical images, comparable to those of experienced professionals.
Step
Details
Setting
1
Set camera to manual focus
(M on command dial)
2
Set the lens to manual focus MF
(AF/MF switch)
3
Set lens to maximum magnification limit
eg 0.31 m-infinity
4
Adjust the diopter to your own eye (This should be done for each photographer using the camera)
+/- wheel next to eyepiece (Like focusing binoculars)
5
Set shutter speed to a fast setting(Determines image sharpness and ensures that only flashlight falls on the sensor)
1/200th second
6
Set the ISO to the lowest setting(determines camera's sensitivity to light)
100/200Depending on model of camera
7
Set the image quality
RAW and JPG (fine)
8
Set white balance
Natural daylight (Canon)Direct sunlight (Nikon)
9
Set picture style to achieve consistent colours
Neutral (Canon)Normal (Nikon)
10
Set the flashFlashlight will override all other light sourcesThe operating light is not needed, unless for focusing
Set mode to manualSet flash power (expressed as a fraction of one, which is full power)
Aperture and magnification
Once the camera is set up, there are only two settings that will need adjustment, depending on the clinical image that is required: 1. Aperture: (f:stop/f:number): This is the width of the lens opening and it precisely controls the amount of light entering the camera to reach the camera's sensor for conversion into a digital image (Table 8). 2. Magnification: Depending on the type of clinical view required, different magnifications will be needed and may be selected by rotating the lens barrel to the appropriate setting. For most anterior and posterior dental views magnification ratio (eg 1:1,1:1.5,1:2;1:3, etc) is the most useful scale; for portrait views, distance is a more convenient guide. Experienced users will be able to dial magnifications automatically, only using the calibrations as a back-up reference guide.
Aperture (lens opening) controls the amount of light recorded in the image
The larger the f:number the smaller the opening of the lens
A range between f:8 and f:32 is used for clinical photography
f:22 will be suitable for the majority of clinical images
Smaller f:numbers, eg f:8, will let more light in for extra-oral images, eg portraits
Aperture also controls the depth of field/depth of focus
This controls the number of teeth that are in focus from the front to the back of the mouth
The higher the f:number (eg f:32) the more teeth will be in focus
Photographic techniques
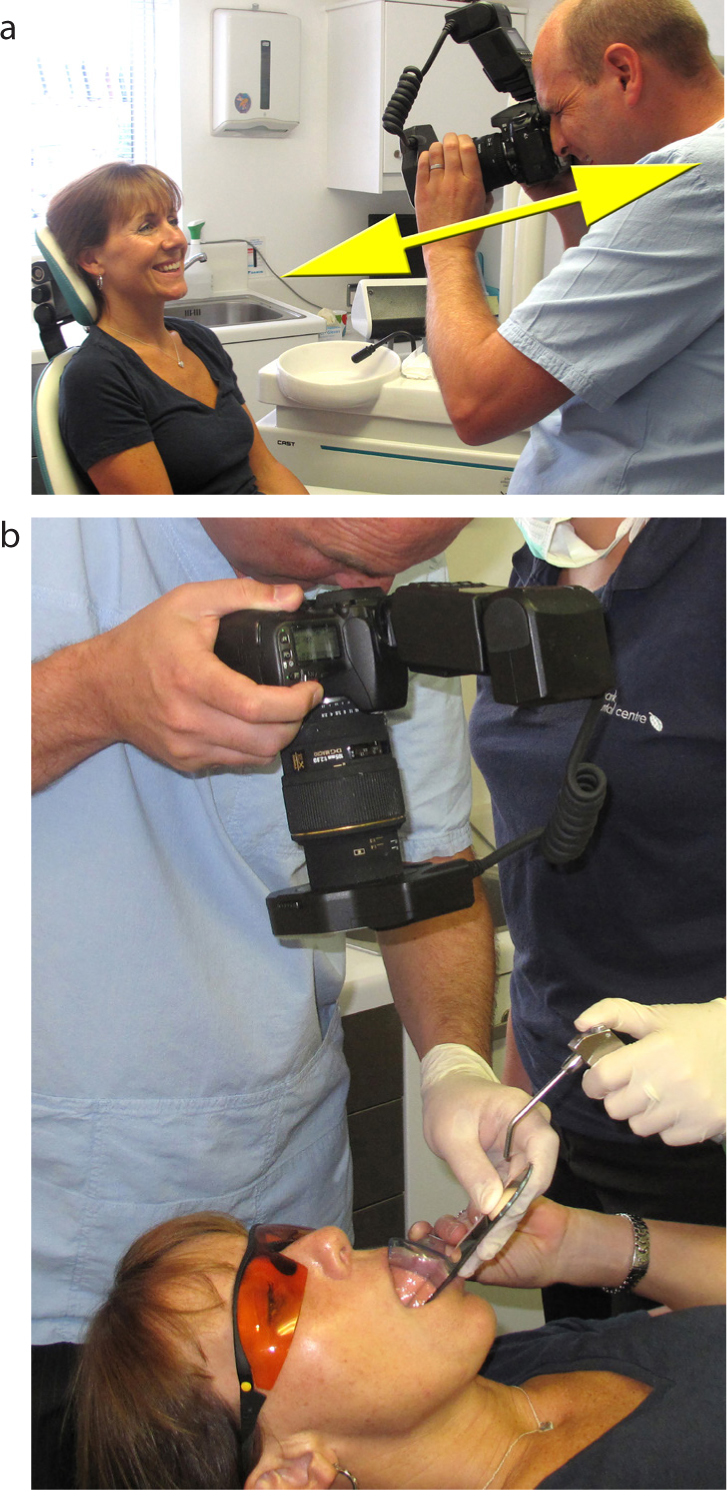
When first using cameras, it is recommended to begin by practising outside clinical sessions, choosing a friend, relative or work colleague as a subject. This will allow repeated views to be taken at multiple sittings while techniques are perfected. Table 9 lists some general technical tips for all types of clinical images (Figure 11a, b).
Have camera equipment and accessories easily accessible at all times
Position the patient so that their head is stabilized on the headrest
Set the dental chair at a comfortable height and angle to enable easy camera positioning
For many views the patient may remain supine
Dry the teeth to optimize diagnostic information
Use an assistant to supplement retraction and assist moisture control of the subject field and the mirror surface
Hold the camera steady and hold your breath (briefly!) while taking the image
Routinely take pre-operative images from a number of angles before carrying out restorative procedures to assist matching with the ideal post-operative view
Practice photographic techniques to minimize the impact on surgery time
A range of other cameras may be used for dental photography. Intra-oral cameras are popular and are very useful for patient education, but ‘freezing’ the video picture results in lower-quality still images. Compact cameras, tablets and camera phones can capture usable images of anterior teeth, portraits, and other extra-oral photographs, but present significant disadvantages compared to DSLR clinical photography (Table 10).
These cameras are not designed for detailed close-up photography
Camera phones are not dedicated cameras, therefore images are not high quality
It is difficult to focus on the teeth consistently
Underexposure is common (the dark oral cavity limits the amount of light that will reach the small camera sensor and images may be too dark to be diagnostic)
In-built flash position commonly causes shadowing
Magnification is inconsistent
Colour reproduction is often poor
Distortion is common
Increasing the camera's exposure setting may over-expose images (too bright for diagnosis)
While anterior teeth may be easy to photograph, photographing posterior teeth may be difficult and time consuming and may require additional lighting
Dental photography using camera phones
The British Dental Association's data protection advice states that ‘mobile devices such as phones, tablets and iPads are not secure and should not be used for taking images of patients’.12
The Data Protection Act of 2018 stipulates that appropriate security must be in place to prevent any confidential personal patient data from being compromised.13 Any images taken on a camera should be downloaded onto a password-protected computer system and not stored on the card or device.
Regardless of equipment, the use of personal devices to record and store patient data is not recommended. In clinical practice (and for domiciliary visits) it is advised that camera equipment (including camera phones) should be dedicated for dental use only and kept securely locked away when not in use.
Image storage creates additional data protection challenges. It may be necessary to deactivate cloud-based sharing services or use equipment without a subscriber identification module (widely known as a SIM card). The National Cyber Security Centre (NCSC) provides guidance on how to configure, deploy and use cloud services securely.14 Reputable cloud storage providers will have a freely available independent audit of their physical, technical and organizational security.
A potential legacy of the coronavirus pandemic may be a significant increase in the use of digital technology for virtual patient consultations. During the enforced absence of face-to-face patient contact, the use of video conferencing (often supplemented by camera phone photography) has been widely used for:
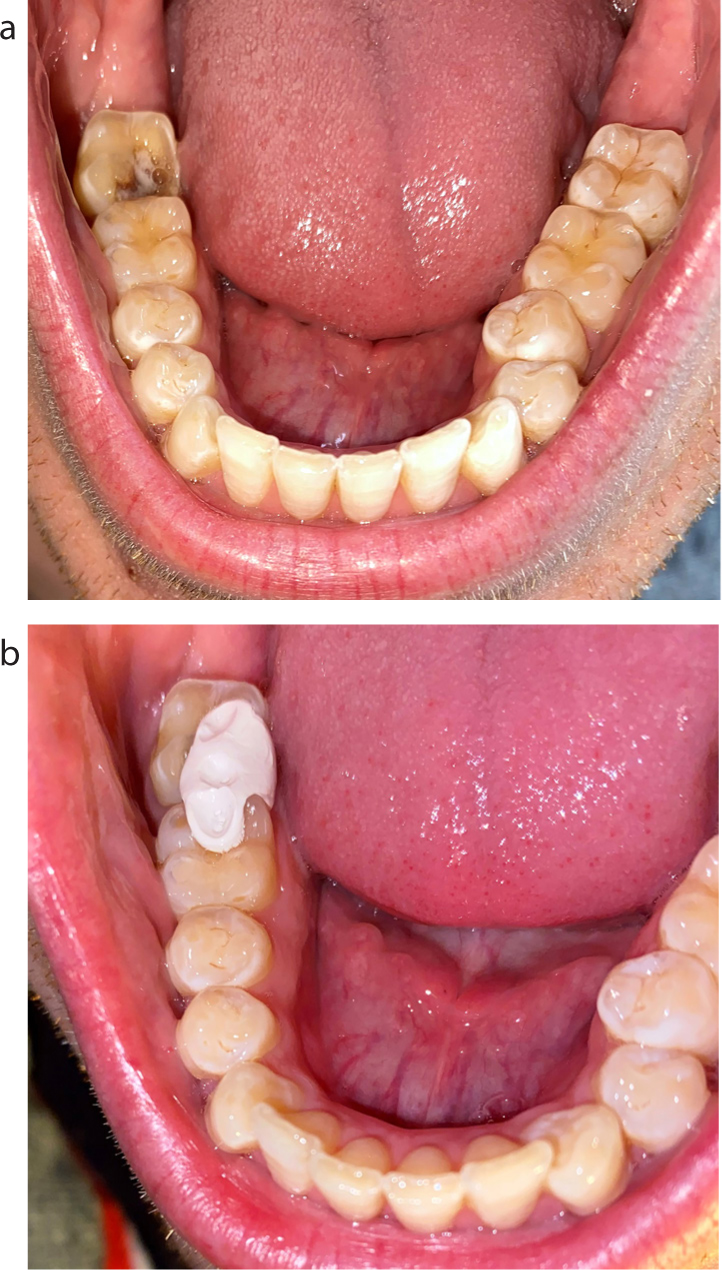
Figure 12. (a, b) Temporary restoration of a fractured lower molar, guided by patient camera phone photographs during virtual consultations.
In certain circumstances, it may be useful for patients to photograph their own mouths and share images to improve the diagnostic quality of a video conference call. Camera phones are the most obvious method of taking and sharing clinical photographs, because most patients have access to them and are familiar with inbuilt photography apps and the images are easy to export. Photography of extra-oral lesions is straightforward but intra-oral photography using a camera phone is challenging.
While resultant camera phone images may be underexposed, out of focus and lacking in detail, they may be of sufficient diagnostic quality to allow discussion of management options. Table 11 lists instructions that may be given to patients to help them optimize dental camera phone ‘selfies’ as part of virtual consultations.
Ideally use someone else to take the photograph, guiding them to the area of interest
Choose a brightly lit area that allows as much light as possible to enter the mouth, eg sunlight
The subject should ideally be seated/reclined with a suitable headrest to minimize movement
A torch may be useful to illuminate the subject area
Inbuilt torches may be used for some camera phones, eg Android (NB: when using iPhone photography, the currently available camera apps automatically deactivate the torch function)
Do not get too close (≥10 cm will allow focusing)
The photographer should remain as still as possible when taking the photograph
Landscape mode is useful for most dental ‘selfies’
To activate the camera's telephoto lens, tap X2
‘Pinch’ the screen outwards to increase magnification, eg up to X10
Tap the screen to focus on the area of interest (focus box appears on the screen)
Slide the sun symbol at the side of the focus box up/down to adjust the exposure (amount of light that will hit the sensor) (Beware – very easy to over-expose using this function)
Tap the flash symbol to activate the camera's in-built flash
Focus and exposure may be locked by maintaining pressure on the yellow focus box. (‘AE/AF Lock’ will appear on the screen)
Once the image is composed, and the focus and exposure are optimized, the shutter release button may be pressed
When in landscape mode, the +/- volume buttons may be used as the shutter release button
Innovative lighting equipment (MDP: Mobile Dental Photography, Smile-Line, St-Imier, Switzerland) has been developed to overcome some of the limitations of camera phone photography in clinical settings and is described in the technique tip at the end of this issue of Dental Update.15
Conclusion
Dental photography has the potential to enhance the care of most patients. Use of DSLR cameras and peripheral equipment with predictable settings will deliver the highest quality diagnostic clinical photographs. Other photography equipment, such as camera phones, may be useful in emergency situations and for remote consulting. Integration of photography into routine dental care is well worth the effort and will be professionally rewarding for clinical teams.