Rubber dam isolation is generally considered to be the optimal method of moisture control in dentistry and is taught at the vast majority of dental schools worldwide. Unfortunately, undergraduate training does not always translate into use in dental practice, with the majority of clinicians never using a rubber dam, even for endodontic procedures, where its use is regarded as the standard of care nationally and internationally. The COVID-19 pandemic has increased interest in the use of rubber dam as a highly effective infection control barrier. As professional and patient experience of rubber dam isolation is extremely limited, this paper, and the preceding one, are designed to support the practical training of clinical teams in the confident, skilful use of rubber dam. Part two provides a practical guide to rubber dam isolation techniques for endodontic and operative/restorative procedures.
CPD/Clinical Relevance: Mastering rubber dam isolation will enhance patient care and be professionally rewarding for clinical teams.
Article
Isolation techniques
The wide range of rubber dam materials and equipment described in part one1 is accompanied by a range of placement techniques. However, there are only three principal options for rubber dam placement:
Placement of the rubber dam and (winged) retainer as one unit;
Placement of the retainer on a tooth, followed by placement of the rubber dam over the retainer;
Placement of the rubber dam, followed by placement of the retainer.
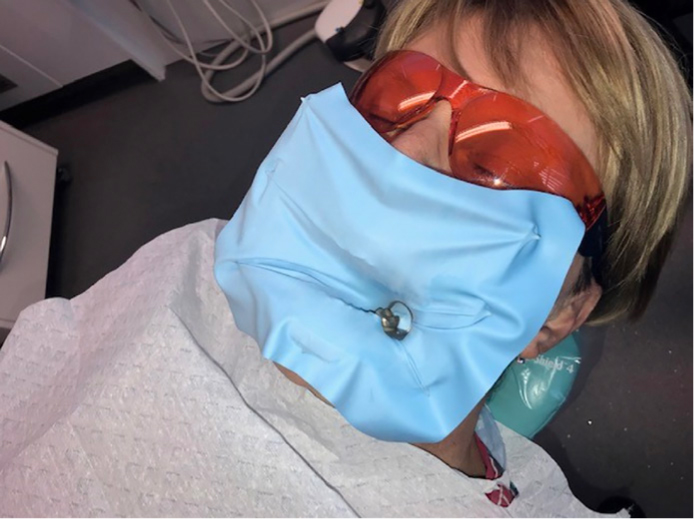
The authors recommend technique 1 for simplicity and practical convenience. Also, as an infection control barrier, this technique may be expected to be more user friendly for immediate, effective respiratory isolation of both mouth and nose (Figure 1).
Figure 1. Isolation of a single mandibular molar carried out by applying the rubber dam, retainer and frame as one unit. NB Isolation is extended to cover the patient's nose to optimize respiratory isolation.
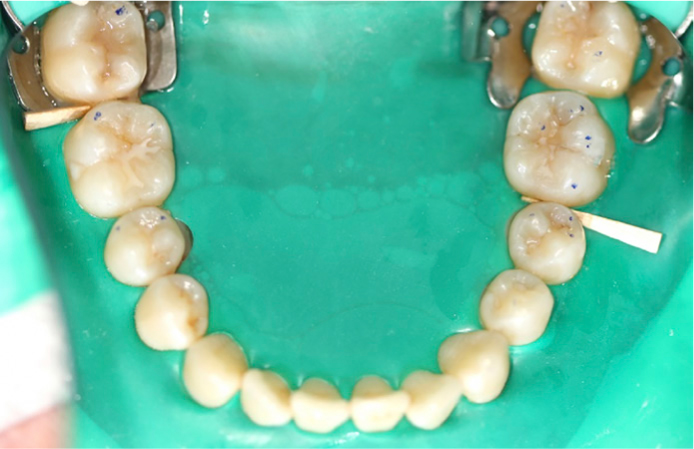
With practice, it is possible to quickly isolate a complete dental arch using a rubber dam (Figure 2) and, although more challenging, to simultaneously isolate maxillary and mandibular teeth.
Figure 2. Isolation of a complete mandibular arch. NB. Occlusal contacts have been marked prior to rubber dam placement.
However, it is usually more practical and convenient to isolate specific teeth and, by minimizing the number of rubber dam holes, moisture and infection control are optimized.
The following clinical case examples are designed to provide practical guidance for the versatile and predictable isolation of single and multiple posterior and anterior teeth for endodontic and restorative treatment.
Single tooth isolation
For most endodontic procedures and for restorative treatment not involving proximal surfaces, only a single rubber dam hole is required. When learning rubber dam techniques, before progressing to more complex procedures, it is recommended to start with single tooth isolation using the following step-by-step sequence:
A suitable winged retainer is selected, eg 13A for a mandibular left molar (wide arc orientated buccally) (Figure 3a);
A single hole is punched in a suitable position on the rubber dam (as described in part one);1
The rubber dam retainer bow should always be orientated distally so that it does not obscure visual/operative access;
The rubber dam hole is stretched over the retainer wings (Figure 3b);
The rubber dam frame may then be applied to the rubber dam;
All the above stages may be carried out in advance of patient attendance;
If rubber dam napkin is used for patient comfort, it is easier to apply at this stage than after dam placement;
The tips of the rubber dam forceps are placed into the retainer holes (Figure 3c);
The rubber dam forceps may be held with an overhand grip if placing the rubber dam from in front of the patient (Figure 3d) (or an underhand grip if sitting behind the patient);
The forceps are squeezed to widen the dam hole;
The subject tooth must be viewed through the hole on approach (magnification and illumination facilitate this process);
The rubber dam retainer must be stretched widely enough to pass over the maximum bulbosity of the tooth;
It can often be useful to place one jaw of the rubber dam clamp onto the most easily identified undercut, either buccal or lingual, and then allow the opposing jaw to ‘slide’ into the opposite undercut as the forceps are closed;
Care must be taken not to overstretch and permanently deform metal rubber dam retainers;
Once in place, the tips of the rubber dam forceps are removed (this can be challenging, and tips may be modified with discs/burs to expedite their removal);
The rubber dam is then flicked off the wings of the rubber dam retainer, using an instrument without sharp edges, eg a flat plastic instrument;
The rubber dam is now free to seal the tooth under the retainer;
Once the retainer has been checked for stability, the operator or assistant can ‘floss’ the rubber dam through the mesial contact point (a long, double thickness of dental floss optimizes this process);
It is usually necessary to omit distal ‘flossing’ of the rubber dam, due to interference with the retainer bow;
Rubber dam tension may then be adjusted to optimize the visual field;
The rubber dam is reflected to optimize the cervical seal, eg using a flat plastic instrument;
The subject teeth and adjacent rubber dam may then be disinfected, eg using 3% sodium hypochlorite or 1.5% hydrogen peroxide solutions;
The operative site may then be washed and dried using high volume suction ready for treatment (Figure 3e);
Once restorative treatment is complete, the operative site may be thoroughly washed and dried again to eliminate debris prior to rubber dam removal;
Rubber dam forceps may then be re-engaged into the retainer holes and the retainer, dam and frame removed as one unit;
It is often easier to apply the rubber dam forceps inside the retainer bow as hole location can be challenging;
The areas of the patient's face that were covered by the rubber dam may then be cleaned using an appropriate antimicrobial wipe.
Figure 3. Single tooth isolation: (a) winged molar retainer 13A and a single rubber dam hole; (b) rubber dam stretched over the retainer wings; (c) rubber dam frame applied and rubber dam forceps engaged in the retainer holes; (d) overhand grip to apply the dam assembly from the front of the patient as one unit; (e) rubber dam in place, reflected off retainer wings and mesial contact flossed.
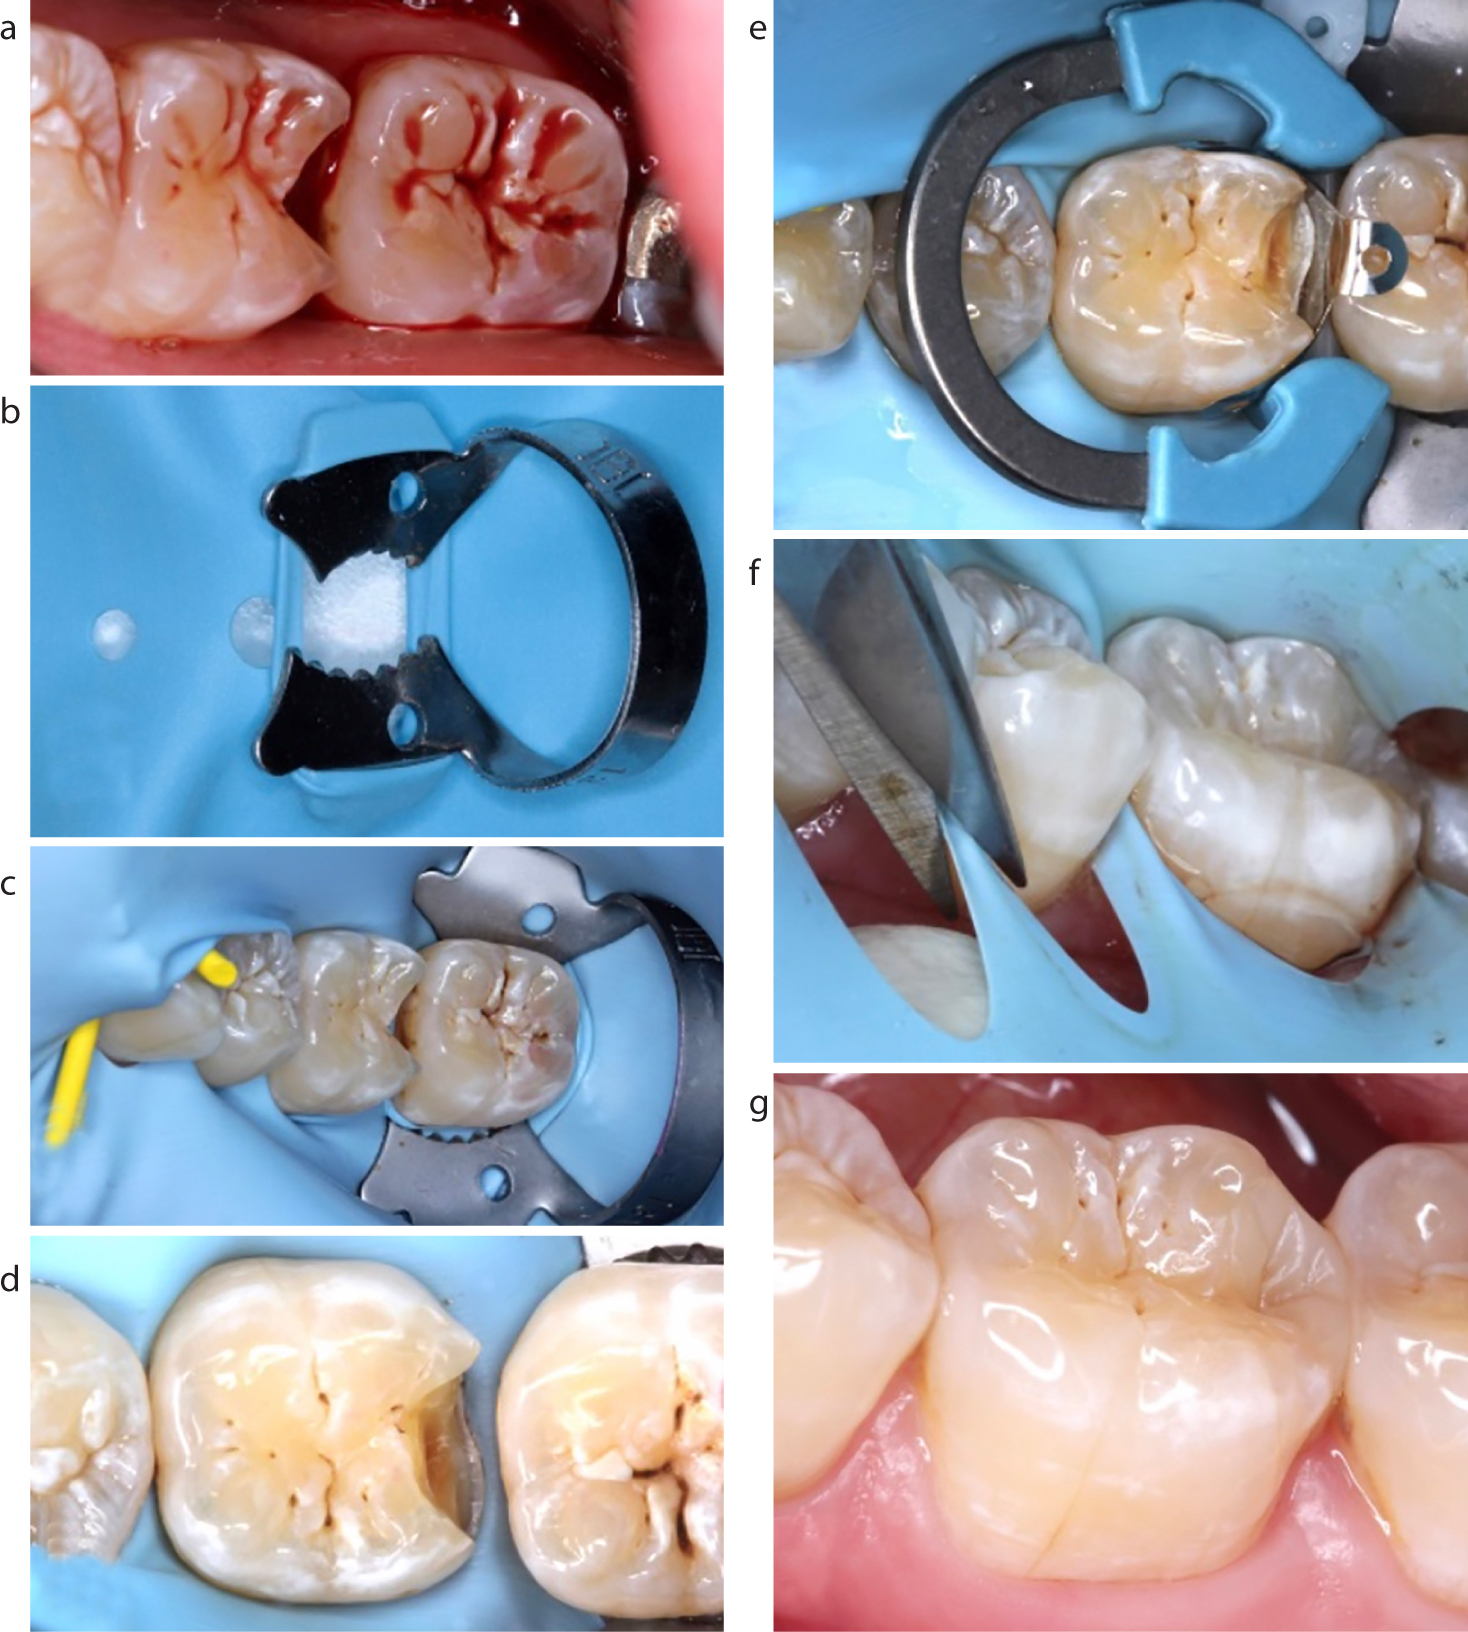
Isolation of multiple posterior teeth
Once confidence and skill are attained with single teeth, more complicated multiple tooth isolation procedures may be practised.
When carrying out procedures likely to involve proximal surfaces, rubber dam isolation may be expected to bring increased benefit because:
The risk of contamination with saliva, blood and gingival crevicular fluid is greater (especially with mandibular posterior teeth) (Figure 4a);
The need for soft tissue retraction is often greater;
Time saving benefit is greater with more complex procedures.
Figure 4.
(a) Moisture control and soft tissue retraction needed. (b) A minimum of three holes are punched in the rubber dam and the retainer placed into distal rubber dam hole. (c) Rubber dam in place, secured with dam stabilizing cord. (d) Dam reflected into sulcus to optimize seal. (e) Sectional matrix system in place. (f) Rubber dam stretched laterally, interdental septa cut with scissors. (g) Restoration complete.
When isolating multiple teeth, two trained clinical team members are essential and a minimum of three dam holes are necessary. The following step-by-step sequence may be used:
Traditionally, for deep Class II cavities, rubber dam application may be carried out after cavity preparation to optimize visual access;
In the COVID era, it is recommended that the rubber dam is placed prior to cavity preparation as best practice to maximize infection control;
A minimum of three dam holes are punched (four in this clinical example. Increased number of holes improves access);
The distal hole of the rubber dam is stretched over the winged retainer as in single tooth isolation (Figure 4b);
The rubber dam is then applied to a predetermined tooth that is distal to the subject tooth;
The dam is then reflected off the retainer wings;
One clinician (operator or assistant) stretches the dam mesially, while the other flosses the dam through a mesial content (use of occlusal, buccal and lingual pressure helps expedite this challenging stage);
The dental floss may be temporarily left in the most mesial contact area prior to placement of dam stabilizing cord, eg Wedget® (Coltène-Whaledent, Altstatten, Switzerland);
The short (≤2.0 cm) piece of dam stabilizing cord is firmly stretched and flossed through the contact area;
The floss is then removed laterally to complete the isolation (Figure 4c);
Dam stabilizing cord may be substituted by leaving the dental floss or using a piece of rubber dam that has been cut from the corner of the dam and rolled into a cord-like shape;
The rubber dam is reflected to optimize the cervical seal (Figure 4d);
Floss ligatures may also be used to optimize the cervical seal;
Sectional matrix systems are recommended for small proximal box composite resin restorations2 and have the added benefit of assisting retraction of the rubber dam and the underlying soft tissues (Figure 4e);
Before rubber dam removal: the stabilizing cord is removed (laterally), the dam is stretched laterally, and interdental septa are cut with sharp, blunt-ended scissors (Figure 4f);
Rubber dam forceps are then used to re-engage retainer holes and remove retainer, dam and frame as one unit. (Figure 4g).
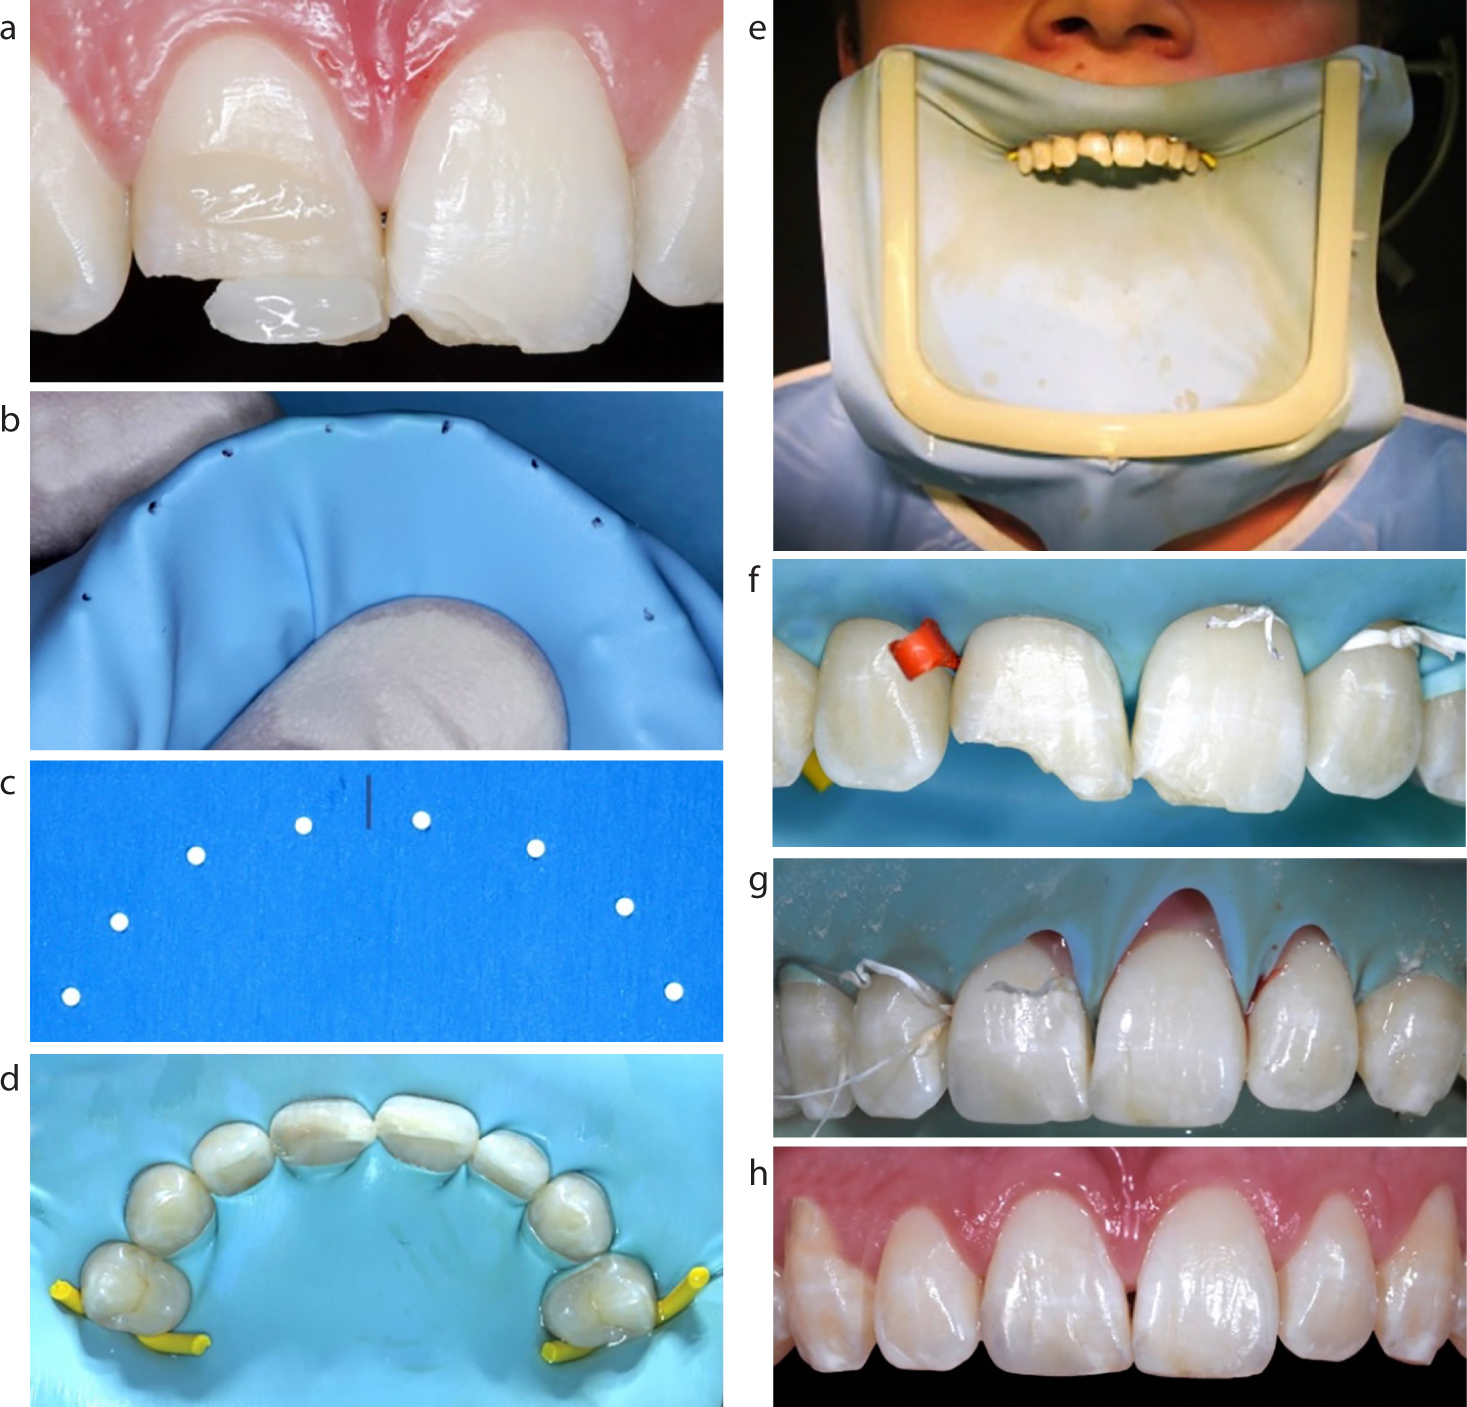
Isolation of anterior teeth
As previously stated, rubber dam isolation is a considered best practice for endodontic procedures for reasons of safety and infection control.1 While the position of anterior teeth intrinsically reduces the risk of contamination, enhanced outcomes, patient comfort and operator enjoyment can be expected by the routine use of rubber dam for most anterior restorative procedures.
For endodontic procedures, optimum isolation may be achieved with the use of a single hole and a double bow retainer, as described in part one.1 The clinical stages for multiple tooth anterior restorative isolation are illustrated in Figure 5 and practical tips include the following:
For anterior aesthetic restorative procedures, a symmetrical number of teeth (eg first premolar to first premolar) may be isolated to allow visualization of tooth proportions, relationships, shapes and surface texture;
Shade selection should be carried out immediately and prior to isolation as teeth dehydrate and lighten rapidly2 (Figure 5a);
Hole position may be mapped by marking the dam while held over the patient's teeth or a study model (where available) (Figure 5b);
The appropriate number of holes are punched in the rubber dam (Figure 5c);
The centre line may also be marked to help orientation during placement;
Using two clinicians, the rubber dam is stretched labio-palatally across the incisal edges and flossed through the contact points;
Floss may be temporarily left between the terminal contacts before replacement with retainers on distal teeth, eg premolars;
Dam stabilizing cord may be used instead of retainers, obviating the need for anaesthesia of posterior teeth/soft tissues (Figure 5d);
If not already in place from the outset, the rubber dam frame is then applied, and tension adjusted to optimize access (Figure 5e);
The rubber dam frame may be placed on top of or beneath the rubber dam, depending on operator preference;
If the rubber dam has not been placed to cover the patient's nose, a piece of disposable, fluid resistant material may be used to maximize respiratory isolation;
Once stable, the rubber dam may be inverted around the teeth to maximize cervical seals with combined use of a flat plastic instrument and dental floss (some clinicians also use gentle air flow from a triple syringe);
Stability and isolation may be further enhanced with dam stabilizing cord, wedges or thin pieces cut from the corners of the rubber dam and by the knotting of floss ligatures around anterior teeth (Figure 5f);
A range of step-by-step instructional videos demonstrating techniques for tying dental floss slip knot ligatures is available on YouTube;3
To maximize patient comfort (and infection control), it is recommended to complete all restorative stages (including polishing) with the rubber dam in place;
The recommended rubber dam removal sequence is described in Table 1 and illustrated in Figure 5g;
Following rubber dam removal, occlusal and aesthetic adjustments may be minimized/eliminated with careful planning, placement, shaping, finishing and polishing (Figure 5h).
Figure 5. Multiple tooth anterior isolation: (a) shade selection; (b) rubber dam hole mapping; (c) dam holes; (d) rubber dam secured with dam stabilizing cord instead of retainers; (e) rubber dam frame placement; (f) dental floss ligatures tied while rubber dam stabilized with a plastic wedge; (g) rubber dam removal; (h) restorations complete.
1. Removal of retainers (where used)
2. Removal of dam stabilizing materials (by pulling labially/buccally not incisally occlusally)
3. Cutting of floss ligatures (and labial removal)
4. Stretching of the dam labially
5. Cutting of interdental septa of the rubber dam with blunt-tipped scissors
6. Removal of rubber dam and frame as one unit
7. Ensure that no rubber has been retained once the dam is removed
Advanced isolation techniques
In some clinical situations, the traditional rubber dam isolation techniques described above may need modification using advanced techniques, for example:
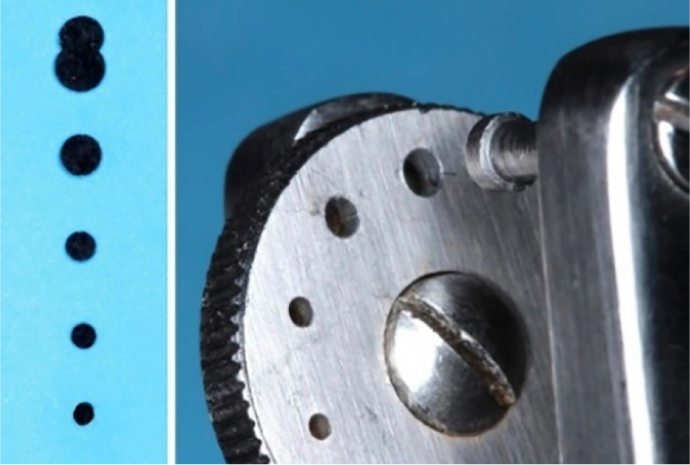
For large teeth, double/overlapping holes may be cut in the rubber dam (Figure 6);
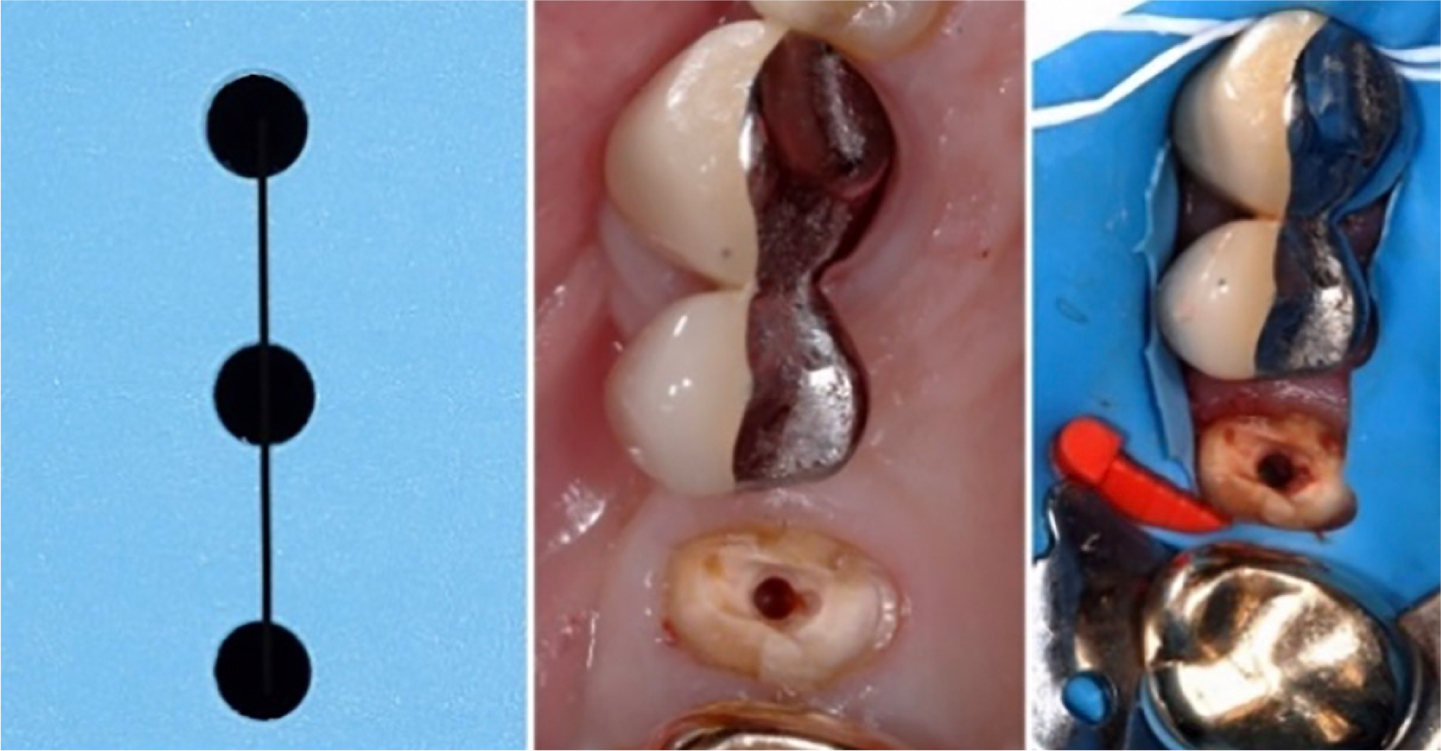
For endodontic or restorative procedures involving complex restorations, eg fixed bridges and multi-unit, implant-retained restorations, the split dam technique may be used (Figure 7);
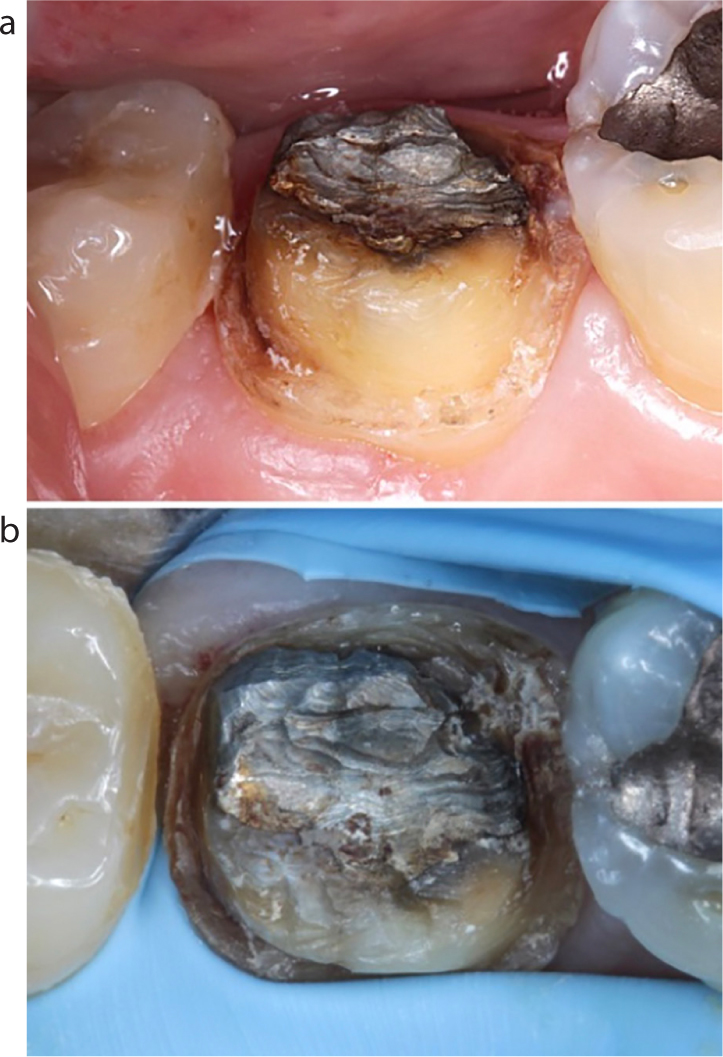
The split dam technique may also be used where unimpeded gingival access is required, eg management of root caries, Class V restorations, crown preparations and digital impressions (Figure 8);
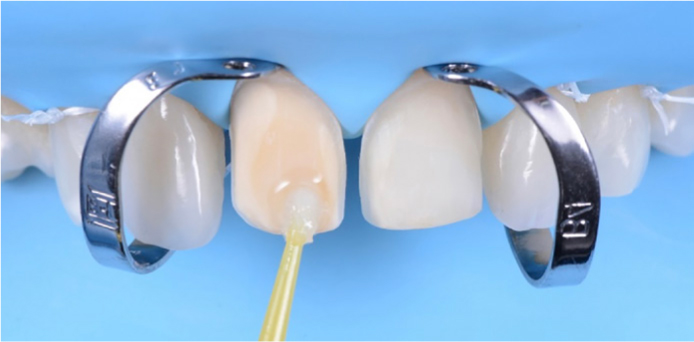
To optimize moisture control during the cementation of adhesively bonded indirect restorations (Figures 9 and 10).
Figure 6. Rubber dam punch and a range of rubber dam hole sizes. Double/overlapping rubber dam holes may be punched to assist the isolation of large teeth.Figure 7. Split dam technique. Initial rubber dam placement prior to endodontic and restorative treatment of a failed fixed/movable bridge. Rubber dam isolation stabilized with a plastic FlexiWedge™ (Optident, Ilkley, Yorkshire) and dental floss prior to caulking.Figure 8.
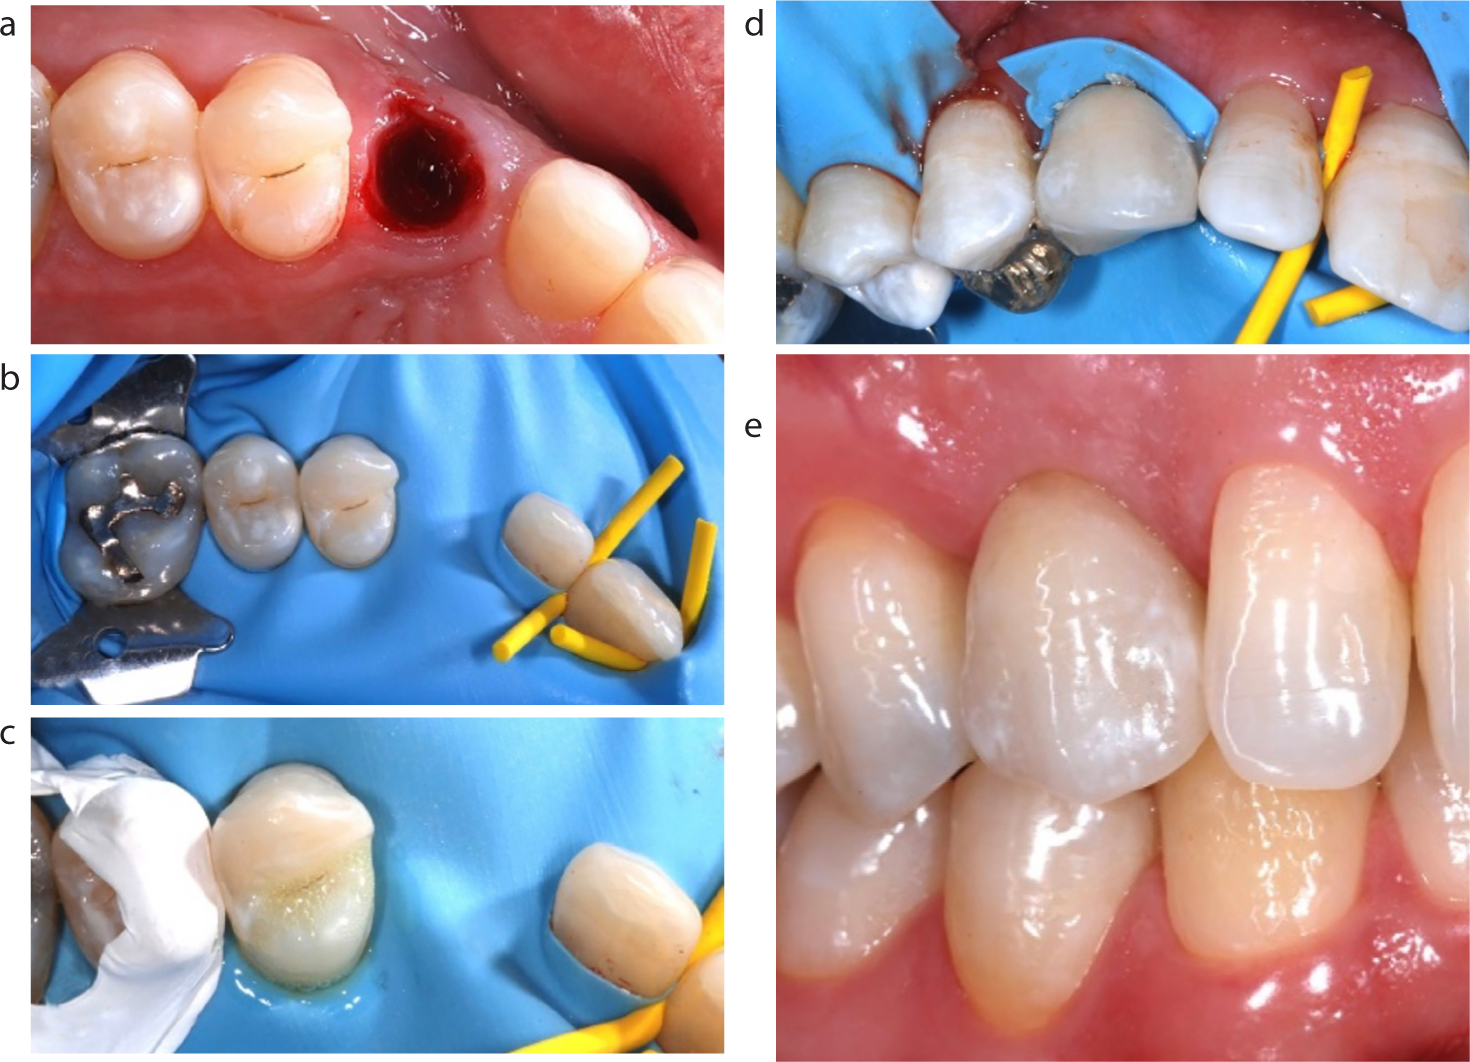
(a, b) Split dam technique. To promote soft tissue retraction during re-preparation following crown failure.Figure 9. Rubber dam isolation of maxillary teeth to optimize moisture control prior to etching, adhesive application and cementation of porcelain veneers on central incisor teeth. (Image courtesy of Dipesh Parmar).Figure 10. Metal-ceramic resin-bonded-bridge (RBB) cementation. (a) Socket following extraction of a fractured/retained deciduous canine prior to immediate replacement RBB cementation. (b) Rubber dam isolation, holes spaced to minimize tension in the pontic area. (c) Enamel etching of the abutment tooth, with adjacent tooth further isolated using PTFE tape. (d) Cutting the rubber dam removal facilitates its removal from under the bridge pontic. (e) Completed RBB at review.
Summary
Mastering rubber dam materials, equipment and clinical techniques will optimize the outcomes of endodontic and restorative procedures and maximize infection prevention and control. Once rubber dam isolation becomes a routine part of everyday dental care, patients will find dentistry a more comfortable experience and dentists and clinical teams will find operative and restorative treatments more enjoyable and rewarding.