Loomans B, Opdam N, Attin T, Bartlett D, Edelhoff D, Frankenberger R, Benic G, Ramseyer S, Wetselaar P, Sterenborg B, Hickel R, Pallesen U, Mehta S, Banerji S, Lussi A, Wilson N. Severe Tooth Wear: European Consensus Statement on Management Guidelines. J Adhes Dent. 2017; 19:111-119
Green D, Mackenzie L, Banerjee A. Minimally invasive long-term management of direct restorations: the ‘5 Rs’. Dent Update. 2015; 42:413-426
Dietschi D, Argente A. A comprehensive and conservative approach for the restoration of abrasion and erosion. Part I: concepts and clinical rationale for early intervention using adhesive techniques. Eur J Esthet Dent. 2011; 6:20-33
Wassell RW, Steele JG, Welsh G. Considerations when planning occlusal rehabilitation: a review of the literature. Int Dent J. 1998; 48:571-581
Dietschi D, Argente A. A comprehensive and conservative approach for the restoration of abrasion and erosion. Part II: clinical procedures and case report. Eur J Esthet Dent. 2011; 6:142-159
Eliyas S, Shah K, Briggs PF. Interactive treatment planning in toothwear: are we doing it right?. Dent Update. 2014; 41:206-216
Grütter L, Vailati F. Full-mouth adhesive rehabilitation in case of severe dental erosion, a minimally invasive approach following the 3-step technique. Eur J Esthet Dent. 2013; 8:358-375
Loomans B, Opdam N. A guide to managing tooth wear: the Radboud philosophy. Br Dent J. 2018; 224:348-356
Magne P, Magne M, Belser UC. Adhesive restorations, centric relation, and the Dahl principle: minimally invasive approaches to localized anterior tooth erosion. Eur J Esthet Dent. 2007; 2:260-273
Milosevic A, Burnside G. The survival of direct composite restorations in the management of severe tooth wear including attrition and erosion: a prospective 8-year study. J Dent. 2016; 44:13-19
Mizrahi B. A technique for simple and aesthetic treatment of anterior toothwear. Dent Update. 2004; 31:109-114
Opdam N, Skupien JA, Kreulen CM, Roeters J, Loomans B, Huysmans MD. Case report: a predictable technique to establish occlusal contact in extensive direct composite resin restorations: the DSO-technique. Oper Dent. 2016; 41:(S7)S96-S108
Ramseyer ST, Helbling C, Lussi A. Posterior vertical bite reconstructions of erosively worn dentitions and the “Stamp Technique” – a case series with a mean observation time of 40 months. J Adhes Dent. 2015; 17:283-289
Spreafico RC. Composite resin rehabilitation of eroded dentition in a bulimic patient: a case report. Eur J Esthet Dent. 2010; 5:28-48
Vailati F, Belser UC. Full-mouth adhesive rehabilitation of a severely eroded dentition: the three-step technique. Part 3. Eur J Esthet Dent. 2008; 3:128-146
Vailati F, Belser UC. Palatal and facial veneers to treat a case of severe dental erosion: a case report following the three-step technique and the sandwich approach. Eur J Esthet Dent. 2011; 6:268-278
Wassell R, Naru A, Steele J, Nohl F. Applied Occlusion.London: Quintessence; 2008
Mackenzie L, Parmar D, Shortall AC, Burke FJ. Direct anterior composites: a practical guide. Dent Update. 2013; 40:297-308
Tjaderhane L. Dentin bonding: can we make it last?. Oper Dent. 2015; 40:4-18
Trujillo M, Stansbury JW. Thermal effects on composite photopolymerization monitored by real-time NIR. J Dent Res. 2003; 82:(special issue A)
Vailati F, Vaglio G, Belser UC. Full-mouth minimally invasive adhesive rehabilitation to treat severe dental erosion: a case report. J Adhes Dent. 2012; 14:83-92
Historically, patients presenting with tooth wear were commonly managed with partial or full coverage cement-retained indirect restorations according to traditional restorative protocols. Conventional rehabilitations are biologically and financially expensive, time consuming and rely heavily on precise laboratory collaboration. Recent advances in adhesive technology and materials have enabled direct composite resin to be used as a minimally invasive alternative in the management of non-carious tooth tissue loss. As extensive direct composite restorations remain technique sensitive and can be time-consuming, this paper describes an innovative, simplified placement technique that uses a progressive diagnostic wax-up, transparent silicone templates and heated composite resin.
CPD/Clinical Relevance: The predictable, conservative method of full mouth rehabilitation described in this article is cost-effective and time efficient and can deliver an excellent aesthetic outcome.
Article
The prevalence of tooth wear is increasing1 and, as a result, dental professionals are repeatedly faced with demanding diagnostic, planning and restorative challenges. When first line preventive and non-operative strategies have reached their limits, the clinical decision to intervene operatively must be taken carefully, as patients will enter a restorative cycle of restoration repair/replacement that may ultimately increase the risk of tooth loss.1 It is widely recognized that dental restorations do not last very long,2 and that the likelihood of failure is greater in patients with parafunction. Patients must be informed of the need for monitoring, maintenance requirements and that the possibility of occasional restoration replacements will incur further biological and financial costs. Since intervention will initiate the ‘restorative cycle’, it is imperative that initial operative techniques preserve as much tooth structure as possible. With improvements in adhesives and advancements in the physical and aesthetic properties of composite resins, these materials are increasingly considered to be optimal for the rehabilitation of the worn dentition.1, 3, 4, 5, 6, 7, 8, 9, 10, 11, 12, 13, 14, 15, 16
Multiple international studies have demonstrated successful medium to long-term outcomes for extensive composite restorations, even in complete rehabilitations.1 However, the direct restorative approach is demanding both technically and aesthetically. Using the materials, equipment and step techniques described in the following clinical case report, it is possible, even for inexperienced clinicians, to restore worn dentitions directly in a predictable cost-effective way whilst not compromising the aesthetic outcome.
Step-by-step technical guide
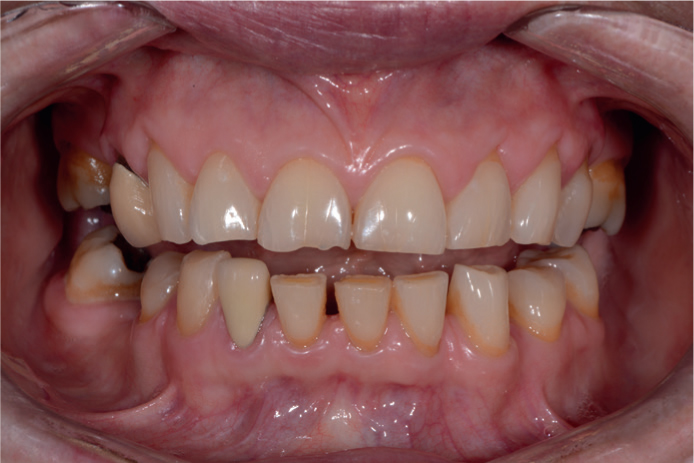
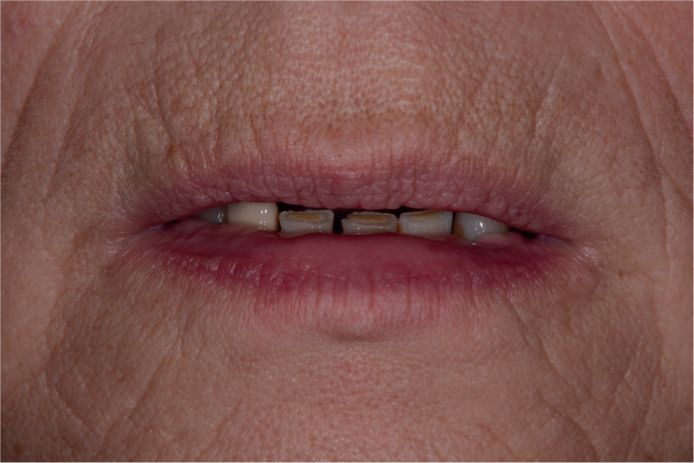
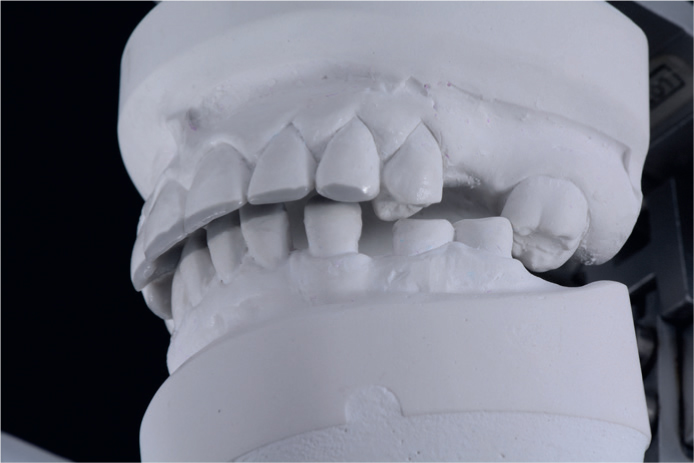
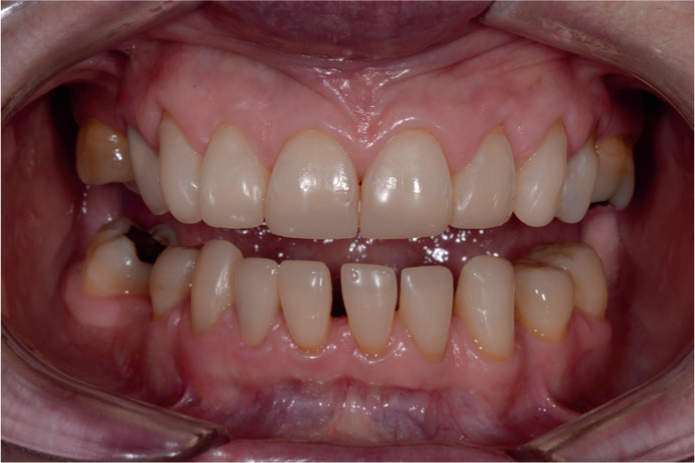
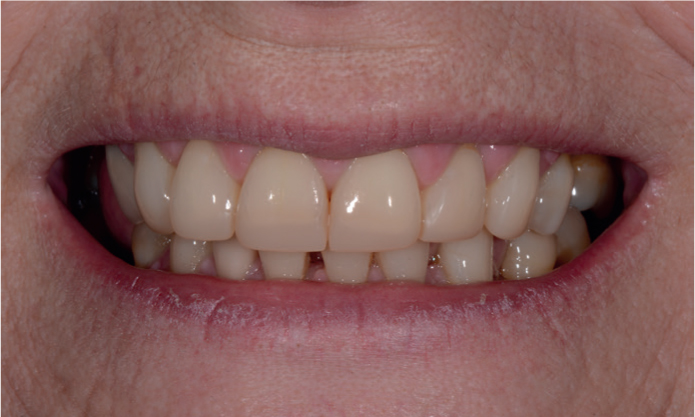
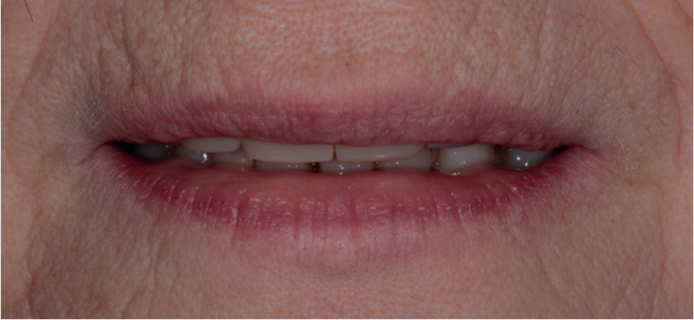
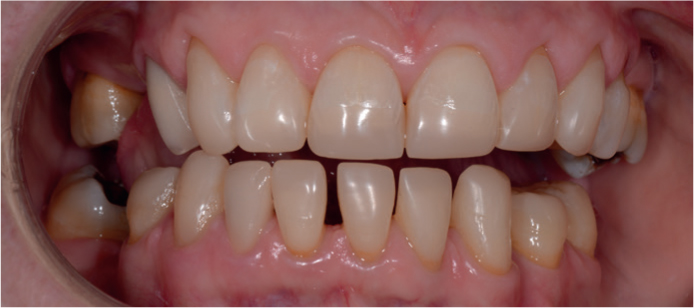
A 63-year-old female patient presented complaining of chipping of her maxillary anterior teeth, aesthetic concerns regarding her worn mandibular incisors and of sensitivity to thermal stimuli. She also disliked the appearance of the metal-ceramic crown on her maxillary right first premolar (Figure 1). On resting, the patient showed none of her upper anterior segment but had increased visibility of worn lower incisors (Figure 2).
Figure 1. Pre-operative anterior retracted view. Patient presented with moderate tooth wear, attrition being the major contributing factor, with erosion and abrasion being secondary factors.Figure 2. On resting, the patient showed none of her upper anterior segment but with increased visibility of worn lower incisors.
Pre-operative assessment
Occlusal records
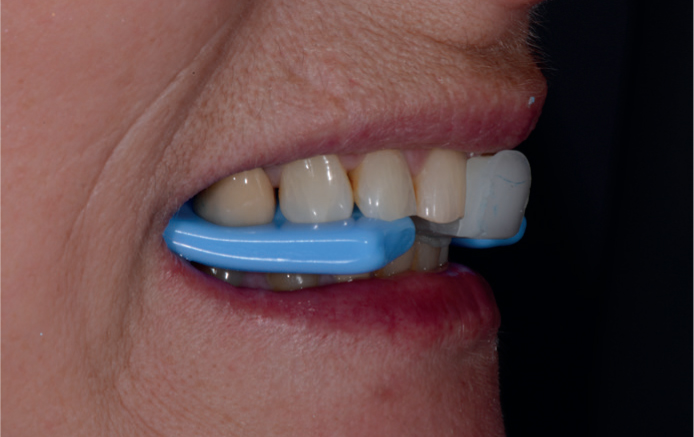
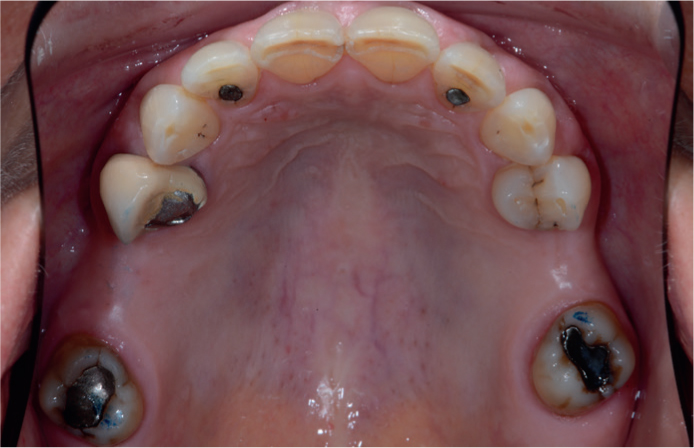
Upper and lower silicone impressions, a facebow transfer and occlusal records in centric relation (CR) were taken to allow mounting of study models on a semi-adjustable articulator. Initial contacts in CR were checked on the articulated models to verify that they conformed to the articulating paper marks captured with pre-operative clinical photographs (Figures 3 and 4). Unless the maximum intercuspal position (MIP) occurs in CR, which occurs around 10−15% of the time,4 mounting models in CR often results in an increase in the vertical dimension of occlusion (VDO). The anterior space created may be sufficient to restore the worn teeth to their natural dimensions.
Figure 3. Modified Lucia jig created to separate posterior teeth, deprogramme the muscles allowing release of the lateral pterygoid which in turn allows seating of the condyles.17 Inter-occlusal space recorded using a preformed wax wafer (Denar Bite Registration Wax, Whipmix).Figure 4. Upper occlusal view showing first contacts in centric relation being on palatal cusp tooth UR7 and mesial buccal cusp tooth UL7.
In this clinical case, the anterior opening needed to be sufficient to allow lengthening of the lower incisal edges, with restoration of the maxillary palatal contours to their natural shapes and restoration of the posterior teeth at a new tolerable VDO. If the anterior space generated by placing the condyles in CR is excessive, occlusal equilibration may be necessary to reduce the vertical dimension and bring the teeth back in occlusion. If this is necessary, then a mock equilibration should be performed on a duplicate set of articulated models to determine the effects of occlusal adjustments.9 If there is insufficient space when the teeth occlude in CR it will be necessary to open the articulator pin to a desirable VDO.
Traditionally, a splint was recommended to test the articulatory system at the increased VDO. A recent review concluded that increasing the VDO by up to 5 mm is acceptable to most patients without the advance wearing of a splint.1 In common with other restorative procedures, symptomatic parafunctional activity must be treated before planning reorganized cases.
One of the main advantages of using composite resin when increasing the VDO is the ability for post-operative occlusal adjustments and re-polishing, which is much more challenging with ceramic materials.
Wax-up
The technician was instructed first to wax-up the lower anterior sextant to the prescribed proportions. The palatal contour of the maxillary anterior teeth was to be determined by the incisal edge positions of the mandibular teeth, aiming to share excursive guidance amongst as many anterior teeth as possible. The upper anterior sextant was then waxed-up according to the functional requirements and to well established principles of smile design (Figures 5 and 6).18 Once the maxillary and mandibular anterior teeth were waxed-up, this was then transferred intra-orally using a silicone putty stent and a bis-acrylic composite resin temporary material to allow a functional and aesthetic mock-up assessment. The patient was tested to confirm that it conformed to the fundamental requirements for occlusal stability:19
Stable, equal intensity contacts on all teeth in centric relation;
Anterior guidance in harmony with envelope of function (no interferences);
Disclusion of all posterior teeth during protrusion;
Disclusion of non-working side teeth during lateral excursions;
Disclusion of working side during lateral excursions.
Figure 5. Mounted stone models on a semi-adjustable Denar articulator reproducing initial contact in CR with opening of the VDO. In this case, the degree of opening was sufficient to allow reconstruction of the lower incisors to normal size and achieve occlusal contact with the reconstructed upper anterior teeth, negating the need for occlusal equilibration. Models are marked with a pencil to illustrate to the technician how far to extend the diagnostic wax-up to avoid excess composite resin during the fully-molded matrix technique.Figure 6. Diagnostic wax-up of the upper and lower anterior segments to the new VDO. The technician is instructed to achieve canine guidance on lateral excursions, shared protrusive guidance where possible, with equal intensity stops.
Once confirmed to be correct, the anterior teeth were ready to be definitively restored. When using a diagnostic wax-up as a prototype, the operator has a choice of:
Fabricating a lingual/palatal silicone template to guide restoration of lingual/palatal surfaces, followed by free-hand build-up of the labial surfaces;
Fabricating a transparent silicone template to allow a full-contour molding technique (as used in this clinical example).
The advantage of using technique 1 is that it enables stratification of different shades of composite resin allowing for improved optical integration of the restorations. Disadvantages of this technique are that it is more technically demanding and time consuming.
The full-molding, transparent silicone template technique, which was used with heated composite resin in this example, was comparatively quick and easy and is particularly useful for restorations of multiple teeth. This technique has the aesthetic disadvantage that only a single shade of composite can be used.
Template construction
The silicone template was made by taking an impression of the diagnostic wax-up using a transparent silicone material (Rapid Simplified Veneer Provisionals, Cosmedent Inc, USA). A transparent, non-perforated, non-rim-lock impression tray was used (Clinicians Choice, Optident Ltd, UK) as this tray design allows easy separation of the impression from the tray. On removal the impression often separates from the tray and can then be carefully removed to allow trimming. The transparent silicone was trimmed using a scalpel to leave the teeth to be restored plus 1−2 teeth either side to allow for stabilization. It was trimmed 1−3 mm beyond the planned buccal and lingual preparation margins and holes were made in the mid-incisal/palatal area of each tooth to vent excess composite resin during the molding process.
Isolation
Complete upper arch isolation was carried out using rubber dam, floss ligatures and rubber dam clamps on the most distal molars. Although considered to be good practice in adhesive dentistry, rubber dam is not mandatory when placing composite restorations.12 Following isolation, the fit of the silicone template was checked and modified accordingly to ensure complete seating.
Tooth preparation
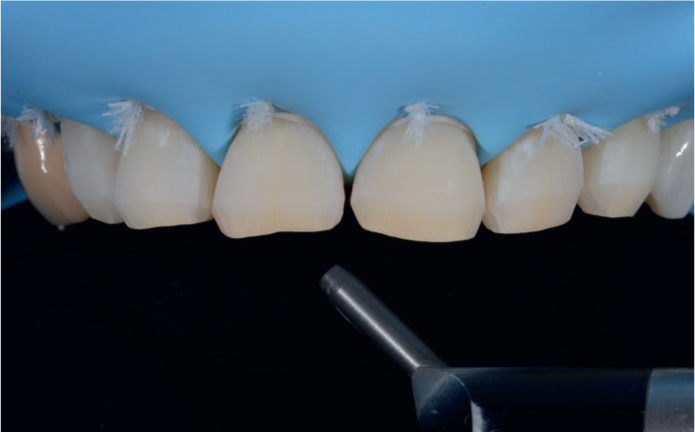
The teeth to be treated were prepared with a 2 mm bevel on the labial and interproximal surfaces extending to a flat preparation on the palatal surface, ensuring that centric stops are not at the margin. The preparations were then cleaned using a mixture of pumice and water, followed by air abrasion with 37 micron aluminum oxide (Figures 7 and 8). This removed the acid-resistant, aprismatic enamel surface layer, optimizing its bonding potential. The teeth were then thoroughly washed and dried.
Figure 7. Pre-operative status of upper anterior segment.Figure 8. Full arch rubber dam (Rubber Dam Non Latex Blue Heavy, Perfection Plus, UK) placement with floss ligatures. Intra-enamel bevel margin on buccal and interproximal surface prepared to improve adhesion and optical outcome of restorations. Prepared teeth were then cleaned by micro-sandblasting using 37 micron aluminium oxide.
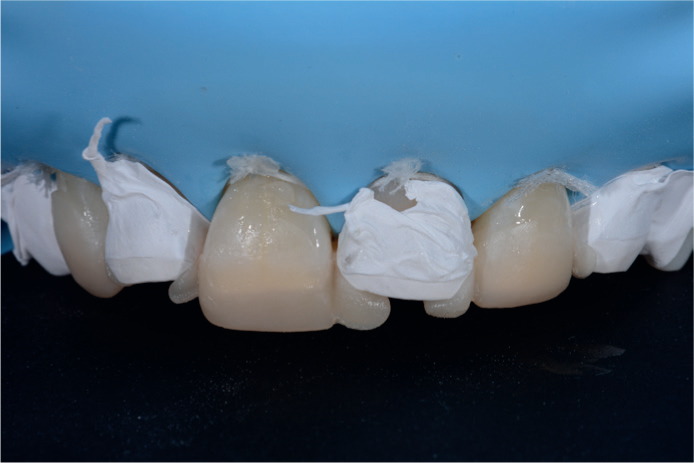
One of the disadvantages of using the fully-molded technique over the free-hand technique is the lack of separation when treating adjacent teeth. To overcome this problem, it is recommended that alternative teeth are treated. This will ensure restorations are not bonded together and also allows easy removal of excess material. The transparent silicone can be trimmed in the interproximal gingivae areas to facilitate insertion of wedges. In this case, alternative teeth were isolated using PTFE tape.
Adhesion
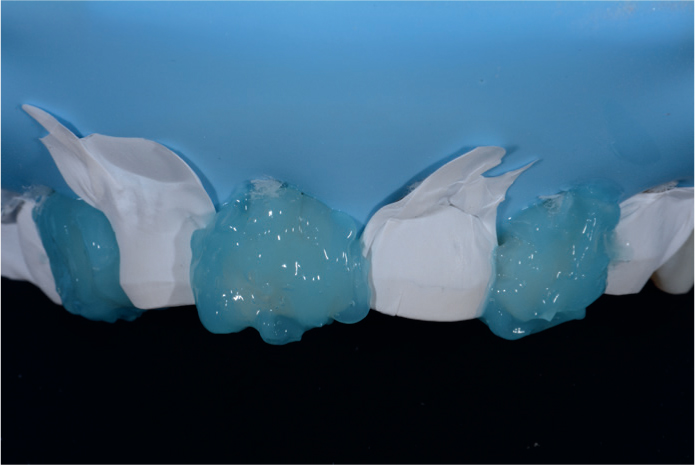
The prepared teeth were etched with 37% phosphoric acid for 15–20 seconds, thoroughly washed and then dried. Exposed dentine was re-wetted where necessary to ensure full hydration and therefore support of the etched collagen matrix (Figure 9).20
Figure 9. Alternative teeth were isolated using PTFE tape. Remaining three teeth were etched with 37% phosphoric acid. It is advised to etch the entire tooth surface.
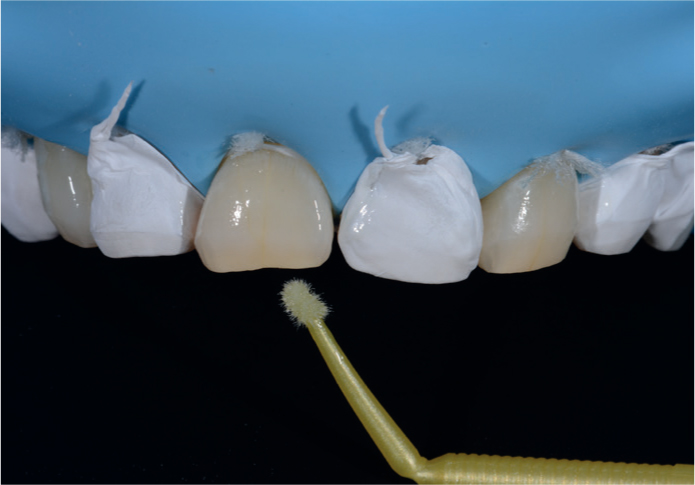
As the bonding substrate was mainly in enamel, a more convenient, single bottle adhesive system was used. It was applied with a microbrush, air-dried and photopolymerized for ten seconds (Figure 10).
Figure 10. Following the etching process, the substrates were thoroughly washed and dried. A single bottle, one-step bonding agent was used (Optibond™ Solo, Kerr. Bioggio, Switzerland).
Restoration of anterior teeth
During the bonding process, a nano-hybrid composite (G-aenial, GC Corporation, Japan) was heated in a composite heater set to 37 degrees centigrade. Studies have shown that heating the composite resin may result in improved physical characteristics, such as elastic modulus, wear resistance and flexural strength.21 It has also been demonstrated that warmed composite requires less energy for photopolymerization. The warm composite flows and adapts better, resulting in fewer voids.
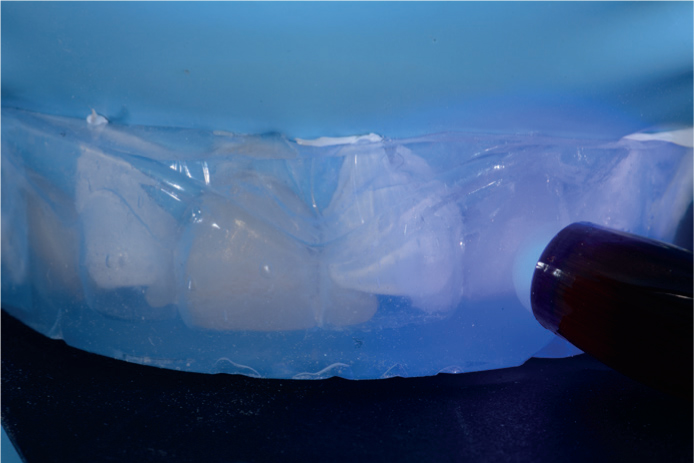
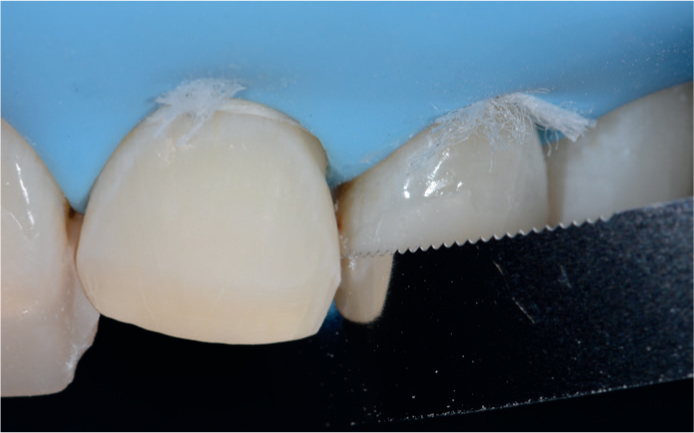
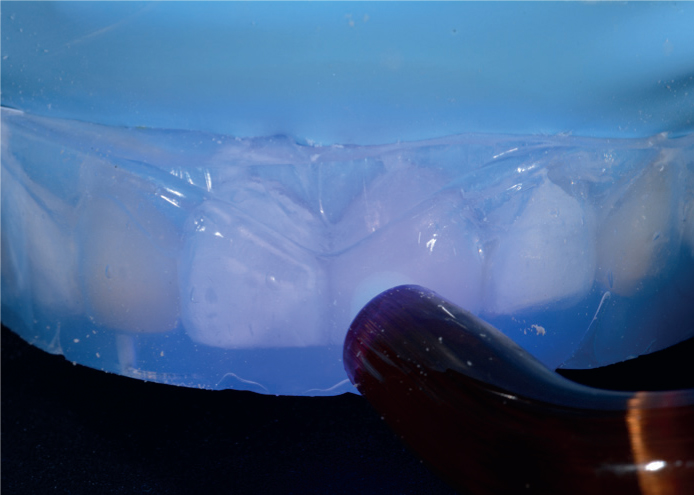
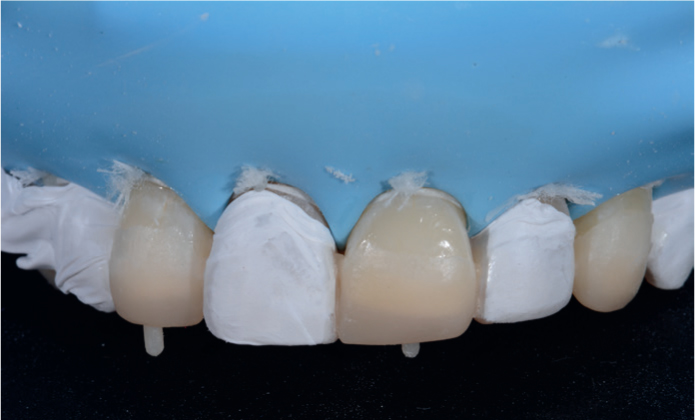
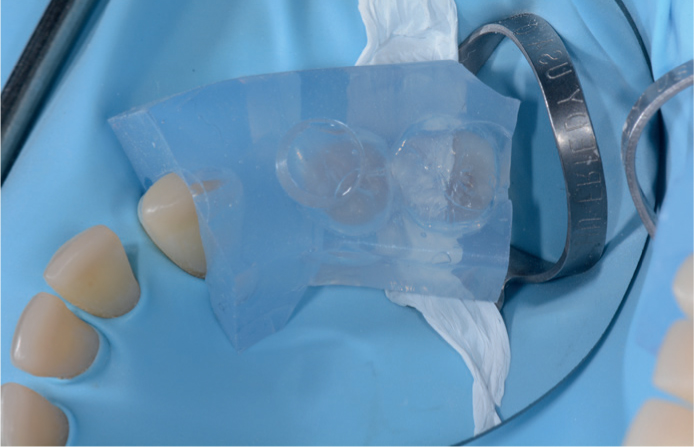
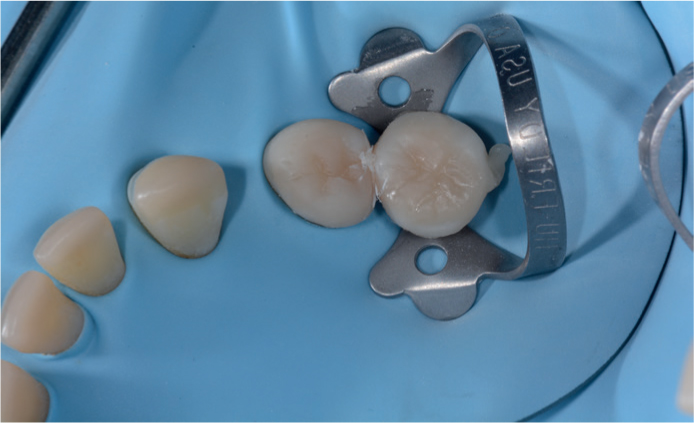
To limit excess composite, the heated material was inserted into the transparent silicone template in an amount slightly more than that of the wax added to the stone models. The silicone template with heated composite resin in alternate teeth was then positioned intra-orally with pressure being applied to ensure complete seating. Uncured excess resin was carefully removed using a probe before light-curing for 30 seconds through the transparent silicone. The index was then carefully withdrawn and excess material was removed using abrasive interproximal strips and a scalpel (number 12 blade), with care not to open interproximal contacts. PFTE tape was removed from the unrestored teeth and used to isolate the newly restored teeth. The process was repeated to restore the remaining alternate teeth. On completion of the fully-molded technique, the restorations were then light cured again under a transparent air-block material (Oxygone™, Cosmedent. Chicago, USA) to eliminate the oxygen inhibited surface layer.
As the contour of the restorations was predetermined by the diagnostic wax-up, only minimal polishing was required, using a goat's hair rotary brush and aluminium oxide paste. The opposing mandibular anterior sextant was then restored using the same technique. The static and dynamic occlusion was checked and adjusted to ensure equal intensity anterior stops with shared guidance on protrusion and canine guidance on lateral excursions.
With the presence of anterior stops at the desired VDO and the condyles in CR, a stable tripod was created prior to restoration of the posterior teeth (Figures 11–15).
Figure 11. Heated nano-hybrid composite resin was inserted into the transparent silicone matrix that was then inserted intra-orally and photopolymerized. Note the excess material in adjacent teeth when vent holes are not created.Figure 12. Appearance without silicone index. Excess material must be removed prior to proceeding to the next step.Figure 13. Serrated metal strips (Flexisaw, Cosmedent Inc, USA) are excellent at removing excess material followed by fine interproximal abrasive strips.Figure 14. The newly restored teeth were then isolated using PTFE tape, and the process was repeated for the remaining three teeth.Figure 15. Note how the excess composite resin is more favourably positioned for removal in the presence of vent holes drilled in the silicone matrix.
Restoration of posterior teeth
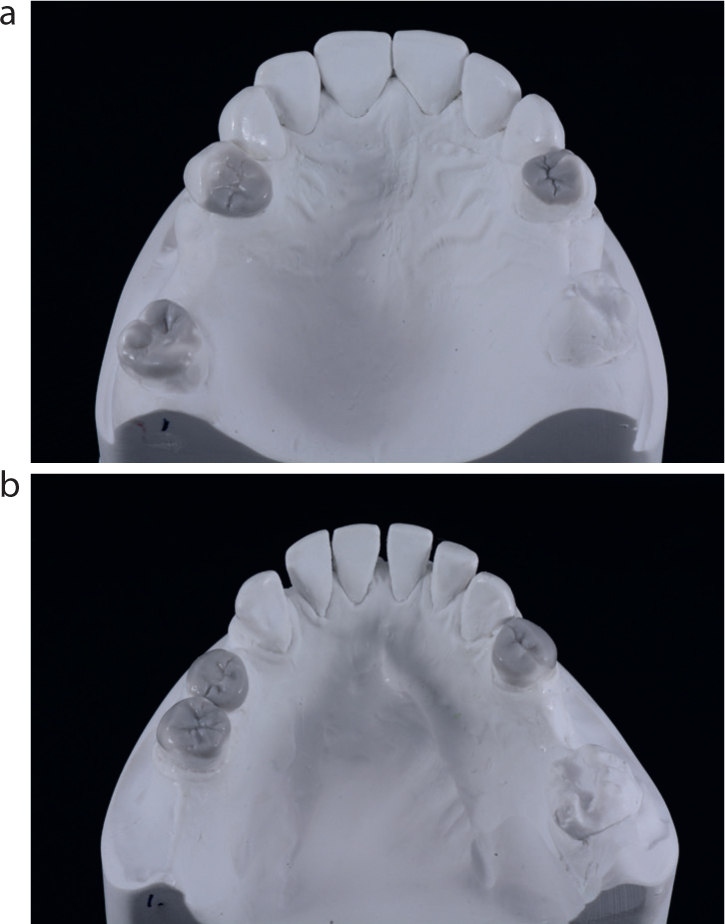
A new set of upper and lower silicone impressions, facebow and posterior interocclusal registrations were taken for mounted models to allow waxing-up of the posterior teeth. It is recommended to wax-up the maxillary posterior units first, consistent with the principles of smile design, before restoring the functional anatomy of the mandibular teeth. The technician should aim for cusp-to-fossa contacts, mutually protected occlusion with no interferences in protrusive and lateral excursions and equal intensity stops.
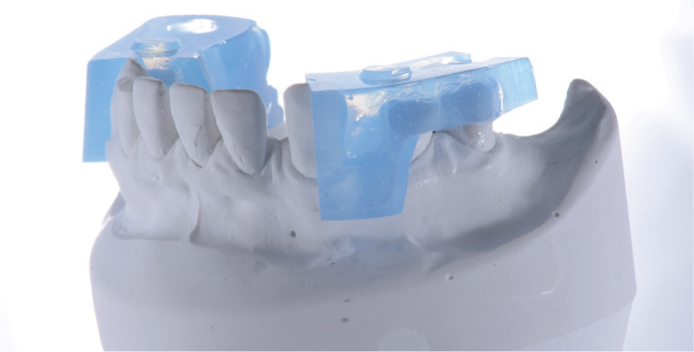
Restoration of the posterior teeth followed the same principles as the anterior, however, in this case, the posteriors were easier to restore due to multiple missing units. Transparent silicone templates were made in the same way as before. For the teeth without adjacent ones, the templates were made simply by injecting the material over the wax-up without a tray and allowing it to cure chemically.
Often, posterior silicone templates can interfere with rubber dam clamps on the last standing teeth and, in such instances, the gingival half of the silicone index on the last distal tooth can be cut using a scalpel to allow complete seating without interfering with the rubber dam clamps. Once again, following isolation, the posterior teeth were cleaned and prepared with air abrasion. Adjacent teeth were isolated with PTFE tape, and the tooth surfaces were etched with phosphoric acid before application of a bonding agent following the manufacturer's instructions. Heated composite was injected into the silicone template before intra-oral insertion and light-curing through the template and repeated for all the remaining posterior teeth.
Following restoration of all teeth, the static and dynamic occlusion was checked to ensure that it conformed to the prescribed occlusal scheme. In this particular case, the patient presented with two existing crowns, which were subsequently changed to conform with the reorganized CR occlusion. All restorations were polished and dualarch occlusal B-Splints were made to protect the patient's new restorations during nocturnal parafunctional activity (Figures 16–24).12
Figure 16. (a, b) Once upper and lower anterior teeth were restored, new full arch silicone impressions were taken with posterior occlusal registration records and models mounted. The technician was then instructed to wax-up the remaining posterior units into occlusion.Figure 17. Once again full lower arch rubber dam was placed with clamps on the most distal teeth. Teeth to be restored were treated in exactly the same way with sandblasting and acid etching.Figure 18. Lower transparent silicone indices made in a clear, non-perforated, non-rimlock impression tray. Note how they are trimmed at the distal-cervical area to prevent contact with the rubber dam clamps.Figure 19. The adjacent tooth was isolated using PFTE tape. Heated nano-hybrid composite resin was injected into the silicone matrix, which was then positioned intra-orally and photopolymerized through the silicone matrix.Figure 20. Following removal of the silicone index, excess resin was removed carefully using a scalpel and interproximal serrated strips. If possible, avoid using interproximal abrasive strips to ensure tight contacts between teeth.Figure 21. Post-operative frontal view following direct composite rehabilitation of the worn dentition.Figure 22. Post-operative frontal smile view showing improved aesthetics and restoration of the patient's smile line and the proportions of her teeth using minimally invasive techniques.Figure 23. Increased upper incisal tooth display at rest following rehabilitation.Figure 24. Re-establishment of canine guidance during lateral excursion to protect remaining dentition.
Maintenance
In the medium-to long-term, the composite restorations may be expected to show signs of wear, chipping or fracture and will require maintenance. However, due to the conservative nature of the treatment and the accessibility of composite resin for renovation, repair and minimally invasive replacement, these issues can be easily addressed. When carrying out composite repairs, adhesive bonds may be improved by roughening of the surface of existing composite restorations using particle air abrasion with aluminium oxide (sandblasting) or with tribochemical silica-coated particles, followed by the use of a silane and adhesive resin.
Patients with parafunctional activity should be monitored regularly due to increased risks of wear-related failures, and supplemental protection with an occlusal guard is recommended.
Summary
With advancements in the physical and optical properties of composite resin, its use has extended to the rehabilitation of the worn dentition, bringing advantages over indirect restorations. One of the challenges when increasing the VDO with a direct method is the ability to restore the morphology of lost dental tissue accurately whilst controlling the occlusal scheme. The technique described in this case simplifies the restoration of functional anatomy and aesthetics. This method reduces clinical time and is less biologically and financially expensive.