Paravina RD, Westland S, Kimura M, Powers JM, Imai FH. Colour interaction of dental materials: blending effect of layered composites. Dent Mater. 2006; 22:903-908
Baratieri LN. Inspiration: People, Teeth and Restorations.London: Quintessence Publishing; 2012
Edelhoff D, Kruger-Janson U. 3D Composites, Natural Shading and Shaping, 1st edn. Frankfurt, Germany: TW Media GmbH;
Munsell AH. “A Pigment Color System and Notation”. Am J Psychol. 1912; 23:236-244
Manuata J, Salat A. Layers: An Atlas of Composite Resin Stratification, 1st edn. London: Quintessence Publishing; 2012
Krishnan V, Daniel ST, Lazar D, Asok A. Characterization of posed smile by using visual analog scale, smile arc, buccal corridor measures, and modified smile index. Am J Orthod Dentofacial Orthop. 2008; 133:515-523
Burki Z, Watkins S, Wilson R, Fenlon M. A randomised controlled trial to investigate the effects of dehydration on tooth colour. J Dent. 2013; 4:250-257
Settembrini L, Gultz J, Kaim J, Schere W. A technique for bleaching non-vital teeth: inside/outside bleaching. J Am Dent Assoc. 1997; 128:1283-1284
Barbosa CM, Sasaki RT, Flório FM, Basting RT. Influence of time on bond strength after bleaching with 35% hydrogen peroxide. J Contemp Dent Pract. 2008; 9:81-88
Fahl N. Achieving life-like anterior composite restorations. Considerations and technique concepts. J Cos Dent. 2013; 28:60-72
Dietschi D. Optimising aesthetics and facilitating clinical application of free-hand bonding using the ‘natural layering concept’. Br Dent J. 2008; 204:181-185
The philosophy and procedure of functionally guided anterior restorations is not a new one. The concept does, however, require small points of explanation and detail that the General Dental Practitioner needs to consider in order to secure success in such restorations. This article aims to explore, identify and explain such details with application of a clinical case carried out in general practice.
CPD/Clinical Relevance: Functional and aesthetic evaluations required to conduct direct anterior restorations in a logical and predictable method. Employment of systems within a procedure can help to rule out and prevent erroneous errors and inconsistencies that complicate the procedure as well as potentially disappoint the clinician and/or patient.
Article
The restoration of anterior teeth poses challenges due to aesthetic and functional considerations. When attempting to assess and diagnose anterior teeth that are in need of restoration, clinicians are required to make important decisions regarding tooth shape, surface texture and shade, to name but a few, and must also aim to replicate the surrounding natural dentition in a time span that is suitable for both patient and clinician.
Historically, restoring the complicated optical properties of anterior teeth were solely within the realm and skillset of the dental technician. Indeed, the clinical application of modern composite resin systems has led to the clinician having to scrutinize the natural dental form more than ever, just like the dental technician. Recent innovations in composite resin materials and adhesives, and improvements in the teaching of minimally invasive operative techniques, have enabled dentists to place highly aesthetic direct restorations, that functionally integrate seamlessly with the patient's residual dentition, routinely at a much lower biological and financial cost.
When planning aesthetic restorative procedures, a detailed pre-operative assessment is essential to allow accurate diagnosis of functional and aesthetic features and to determine which areas may be improved using direct restorative techniques. This is where the concept of layering composite resins of varying opacities, hue, chroma and value can begin to mimic the layers contained within the natural tooth.1
Other aspects that should be considered include:
Static and dynamic occlusion;
Tooth shape (morphology);
Proportions of individual teeth;
Relationships of tooth sizes;
Primary surface texture features, eg line angles and transition lines;
Value (brightness/amount of light reflected from tooth surface;
Translucency/opacity;
Incisal effects, eg translucency, opalescence;
Dentinal morphology;
Relative thicknesses of enamel and dentine layers;
Interproximal contacts;
Embrasure forms;
Soft tissue factors;
Material selection;
Placement techniques;
Shaping, finishing, polishing requirements.
A wide range of references are available on the subject of the aesthetic properties of anterior teeth.1,3,4,5 One of the most useful diagnostic tools is clinical photography. It is recommended that dentists build their own photographic ‘catalogue’ to allow detailed study of the anatomical forms and optical properties of anterior (and posterior) teeth to act as a reference when carrying out restorative procedures.
The following clinical case report describes the materials, equipment and evidence-based clinical techniques that may be used for the aesthetic restoration of anterior teeth using contemporary polychromatic composite layering techniques.
Step-by-step clinical case report
Patient assessment
A female patient, aged 23 years, presented complaining of discoloured maxillary central incisors. These teeth had a history of trauma, had been endodontically treated and presented with significant loss of coronal tooth tissue that had been restored with direct composite restorations. The patient had no history of orthodontic intervention and consequently was not concerned with the current alignment.
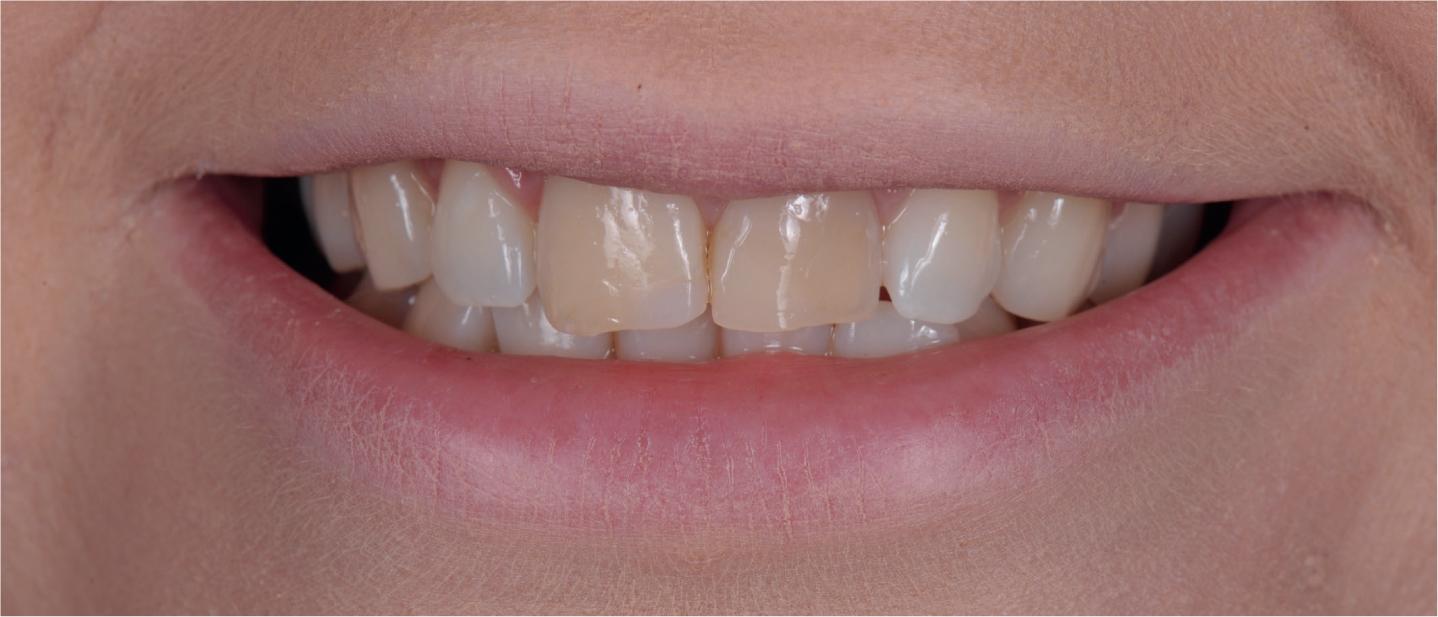
More recently, the central incisors had continued to discolour and the patient was suffering a lack of confidence in the appearance of her smile as a result (Figure 1). The primary request was to manage these teeth to reflect a natural and indistinguishable outcome.
Figure 1. Extra-oral full smile.
Initially, the patient was unable to give a full spontaneous smile to enable diagnosis of the aesthetic zone6 and to determine the maximum vertical extent of lip mobility. Effective communication and the establishment of a professional rapport helped to break down barriers and demonstrated that the patient had a low lip line revealing the incisal three-quarters of the restored maxillary central incisors.
Radiographic examination revealed satisfactory endodontic treatment outcomes for both central incisors.
Aesthetic diagnosis
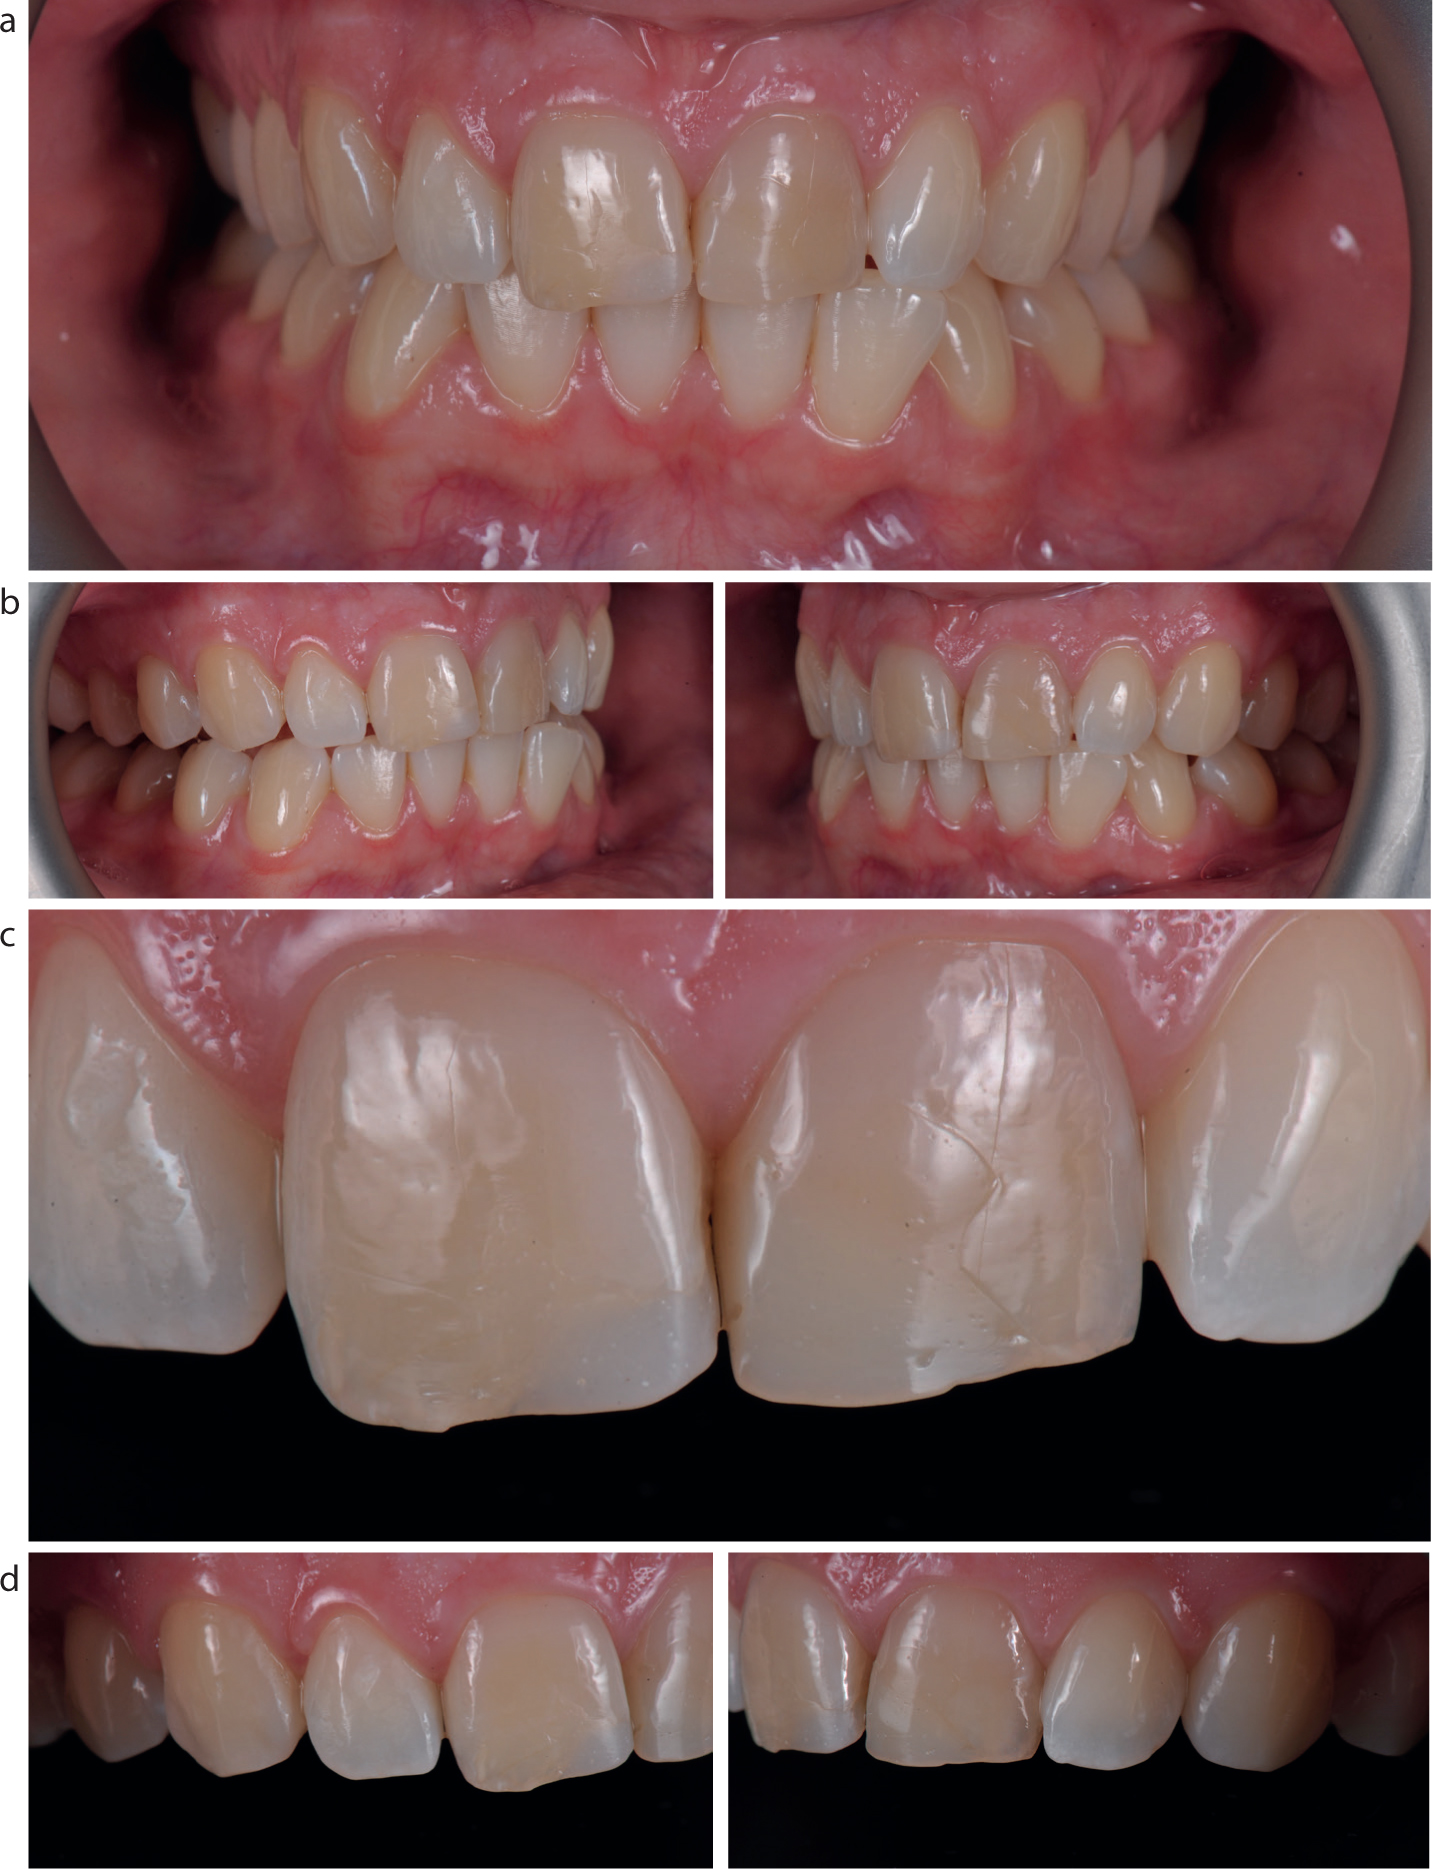
Written consent was obtained for a series of diagnostic clinical photographs (Figure 2). Close-up views of the anterior teeth were obtained using a contrastor that acts as a black background enabling incisal edge detail to be accurately assessed, eg translucency/incisal halo and white or amber coloration. It is important to capture these images immediately as dehydration rapidly masks incisal effects.7
The following diagnostic findings were recorded and presented to the patient:
Asymmetry between central incisors;
Crowding to both upper and lower anterior teeth;
Mild attritional tooth wear (no dentine exposure);
Uneven central incisal edges;
Poor colour match between central and lateral incisors;
Suboptimal restorative shape, surface texture, colour, translucency, line angles and transition lines;
Visible restorative margins;
Gingival zenith asymmetry;
Asymmetry in tooth proportions.
Management options
The patient's main concern related to the colour of her maxillary central incisors. She was not concerned about the asymmetry and crowding of her teeth and refused orthodontic treatment options. The following management options were presented to her so that she could make an informed decision regarding treatment options:
No treatment (monitoring only);
Bleaching (internal and/or external);
Replace existing restorations using direct composite;
Replace existing restorations with indirect veneers or crowns.
Treatment plan
Considering the patient's age, a recommendation was made to carry out internal and external bleaching and replace the existing restorations with new direct composites using polychromatic layering techniques. This minimally invasive treatment plan was accepted by the patient.
Step-by-step treatment stages
Pre-operative treatment
Impressions were taken and models used for the construction of:
A palatal silicone template to allow conformative restoration of the anterior guidance on the existing restorations;
A simple anterior ‘Essix retainer’ appliance was constructed to facilitate the ‘walking bleach’ technique for internal and external tooth whitening;8
A conventional home whitening tray for the maxillary and mandibular teeth.
The fit of the ‘Essix’ style limited arch tray was checked to ensure that the retention was adequate for continuous day and night wear. The existing composite restorations were removed from the palatal access cavities with care not to overextend the preparations and to retain a sealed restorative barrier above the underlying endodontic filling material. A preparation of 10% carbamide peroxide gel (NiteWhite, Philips, Amsterdam, Netherlands) was prescribed and demonstrated to the patient for insertion into the patent access cavities every six hours. The rigid, sectional tray was then to be worn continuously, to reduce the risk of gel leaching out and of food impaction, for a five-day period. Conventional full-arch whitening trays were also provided for night wear for two weeks following restoration of the palatal access cavities.9
It must be noted that a stated time-frame of around 2 weeks is usually required when teeth are bleached to conduct any form of enamel or dentine bonding due to inhibition of composite polymerization. In the case of internal bleaching, this can be difficult given that the exposed access cavities require immediate closure following successful colour change.10
Patient consultation determined that she was feeling more confident with the lighter tooth shade and gave consent for the restorative phase.
Shade selection
This was carried out immediately, before the teeth had the opportunity to dehydrate, using the proprietary composite shade tab matched to the composite system chosen in this case (Inspiro, Optident, Yorkshire, UK). The shade tabs were photographed using a calibrated light source (5100k) with a Nikon R1C1 twin light flash system.
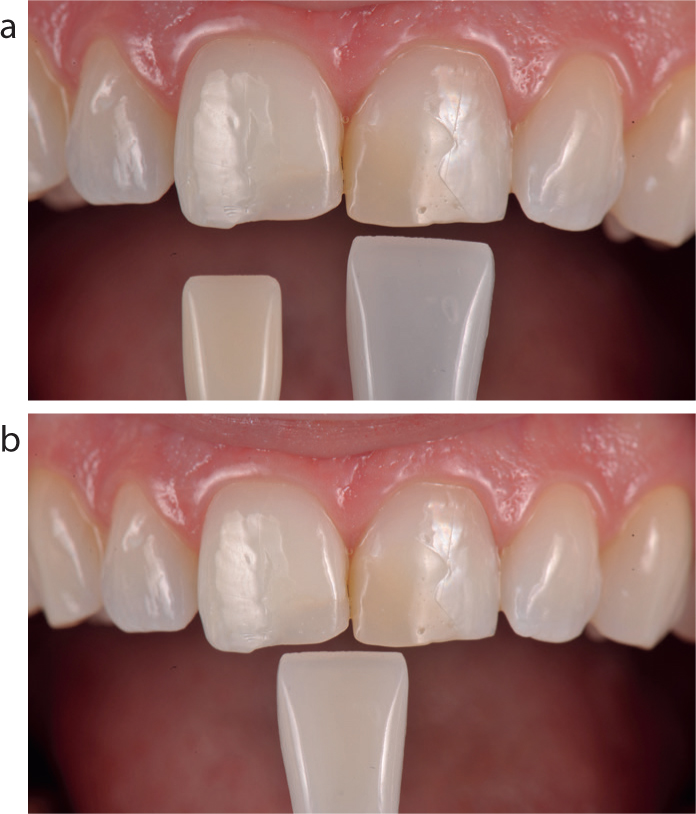
The chosen shade system allowed a combination of enamel and dentine shade tabs to be viewed simultaneously, with a layer of glycerin to allow the hue and chroma of the dentine to be visualized inside the translucent enamel tab (Figure 4).
Figure 4.
(a, b) A layer of glycerin allows the hue and chroma of the dentine to be visualized inside the translucent enamel tab.
To enhance shade-taking accuracy still further, a colour-corrected light source was used (Trushade™, Optident, Yorkshire, UK) which provides a constant light output at 5000 Kelvin. This corresponds to natural daylight and negates the effect of any ambient light conditions.
Isolation
Rubber dam is the author's preferred method of moisture control by physical blockage of the tongue and breath vapour. Isolation is obtained by applying anatomically punched rubber dam (Unodent, heavy gauge, latex-free), which was secured with waxed floss ligatures and dam stabilization cord (Wedgets™, Altstätten, Switzerland) (Figure 5).
Figure 5. Rubber dam secured with waxed floss ligatures and dam stabilization cord.
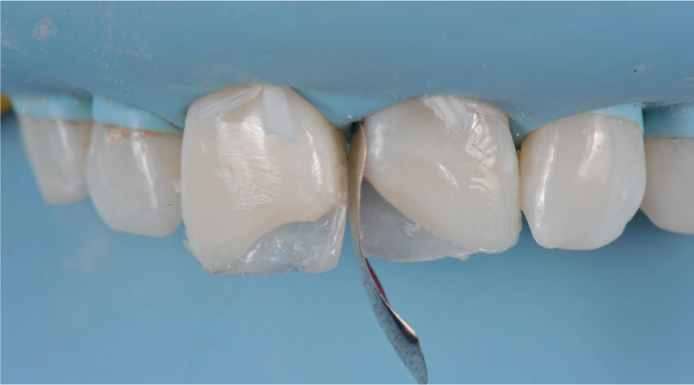
Tooth preparation
The existing restorations were carefully removed and the cavity margins were bevelled using a coarse composite finishing disc (Cosmedent Inc, Chicago, USA). The 2.0 mm labial bevel increased the surface area for bonding and allowed the subsequent restoration to blend more easily with the residual tooth tissue.11 The bevel was then smoothed and rounded to eliminate any sharp line angles that could act as points of stress or result in detectable margins.
The cavity surfaces were further prepared using particle air abrasion (Alumina 27 μm at 4 bar pressure). This increases the surface area for adhesion and allows visualization that the existing restoration had been completely removed. Isolation and high-volume suction were employed to reduce the risk of particle inhalation.
Adhesion
The preparations were then etched using 36% phosphoric acid (Kulzer-Mitsui Chemicals, Hanau, Germany), being careful not to over-etch the dentine, contaminate adjacent teeth with etch gel, or extend etchant too far beyond the restorative margins.
The etch was then thoroughly washed away with water spray. Adhesive (iBond® Universal, Kulzer-Mitsui Chemicals, Hanau, Germany) was then applied to the etched surfaces and light cured for ten seconds. This bonding agent was chosen as its near transluceny would not affect the prescribed shade plan.
Palatal shelf
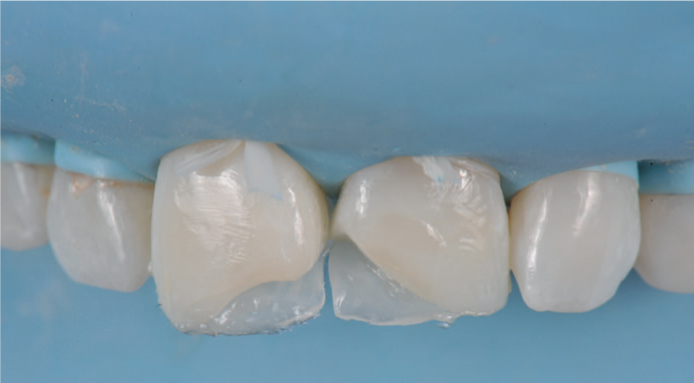
Following adhesive application, the pre-operative palatal silicone template (Provil®FS, Kulzer, Hanau, Germany) was used to place the initial thin palatal shelf of translucent ‘enamel’ composite (Figure 6). This achromatic layer forms the base for subsequent placement of the incisal edge characteristics. Based on the appearance of the natural adjacent teeth, the palatal shelf material may also require opalescent optical properties, eg amber or blue. As the palatal shelf was shaped by the pre-operative template, occlusal adjustments were minimized. A diagnostic wax-up may be employed to create the template when the pre-operative occlusal scheme is unsatisfactory.
Figure 6. The pre-operative palatal silicone template (Provil®FS, Kulzer, Hanau, Germany) was used to place the initial thin palatal shelf of translucent ‘enamel’ composite.
Matrix technique
Figure 7 illustrates the use of a posterior sectional matrix (Garrison, Spring Lake, MI), which was used to create the proximal wall of the restoration. The matrix was inserted interproximally and secured with a thin wedge, with care not to damage the interdental papilla which could encourage haemorrhage. The proximal wall was restored with an enamel shade to create a ‘restorative container’ that will house the dentine and enamel in layered increments of varying hue, chroma and value, based on the pre-operative shade prescription.1,12
Figure 7. The use of a posterior sectional matrix (Garrison, Spring Lake, MI) used to create the proximal wall of the restoration.
Figure 8 illustrates the completed proximal walls. Calipers were then used to ensure that the widths of the central incisors conformed to the planned shape. If the proportions had been incorrect they would have been adjusted at this stage.
Figure 8. The completed proximal walls and calipers used to ensure that the widths of the central incisors conformed to the planned shape.
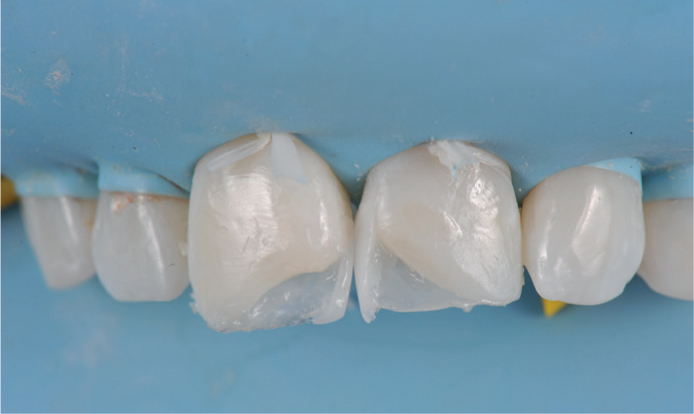
Dentine layer
The next stage involved stratification of dentine into the planned lobar structure, determined by the pre-operative assessment. Intensive colour features were then applied over the dentine layer using tinted flowable composite (Figure 9). In this case subtle applications of high chroma amber and white were introduced, with care not to make these additions too obvious and different from the adjacent teeth.
Figure 9. Intensive colour features applied over the dentine layer using tinted flowable composite.
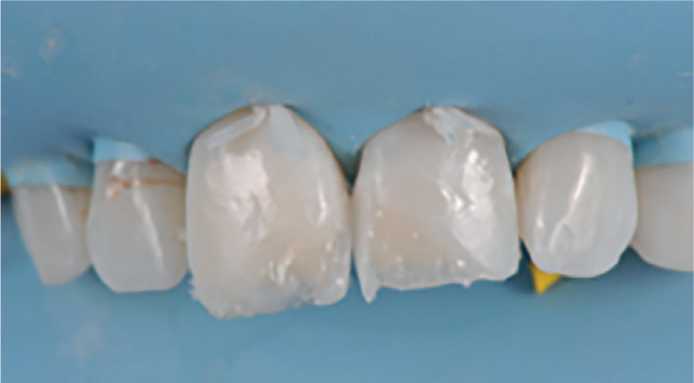
Labial enamel layer
The predetermined enamel shade was then applied over the labial surface of both central incisors. The bulk of material was applied in one increment to avoid the inclusion of voids that may be only visible during finishing procedures. Figure 10 illustrates adaptation of material to the desired position and the ambient light stable material extended the working time. Before the final light cure, the enamel layer was studied from all angles.
Figure 10. The adaptation of material to the desired position and the ambient light stable material extended the working time.
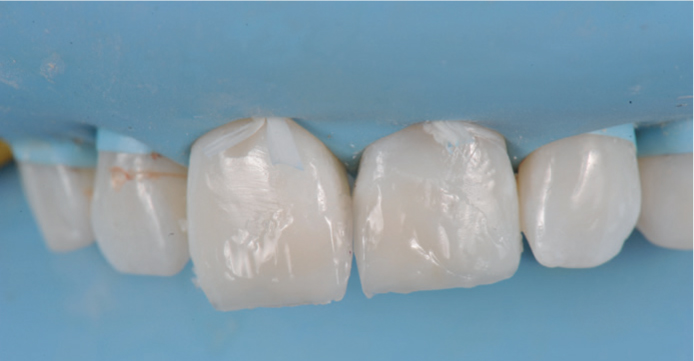
Shaping and finishing
By this stage of the procedure, the natural enamel adjacent to the restoration had reached maximum dehydration and the value (brightness) had occurred. Although contrast with the restorative material helped shaping and finishing, the patient was warned to expect a slight colour mismatch for up to 48 hours until complete rehydration had occurred. As the final enamel layer had been applied in a controlled manner, only minimal finishing was required and consisted of shaping the primary, secondary and tertiary surface texture features. The primary anatomical form should be almost complete and require minimal adjustment.
Figure 11 demonstrates the stages in which shaping and finishing were carried out with a range of finishing discs using the following sequence:
Transition lines were marked with a soft lead pencil to outline the central reflective face of the incisors (Figure 11a);
Gross finishing was carried out using a coarse disc at low revolutions to smooth the labial surface gently (Figure 11b);
Transition lines were blended with the adjacent enamel;
Line angles were rounded leaving the mesial angles more acute than the distal;
A medium finishing disc (Cosmedent Inc, Chicago USA) was used to ensure that line angles are were not over-reduced (Figure 11c);
Fine discs were then employed to smooth the restoration and begin to create surface lustre (Figure 11d);
Care was taken when shaping incisal embrasures not to allow the finishing discs to bind as this may damage restorations.
Figure 11.
(a–d) The stages in which shaping and finishing were carried out with a range of finishing discs.
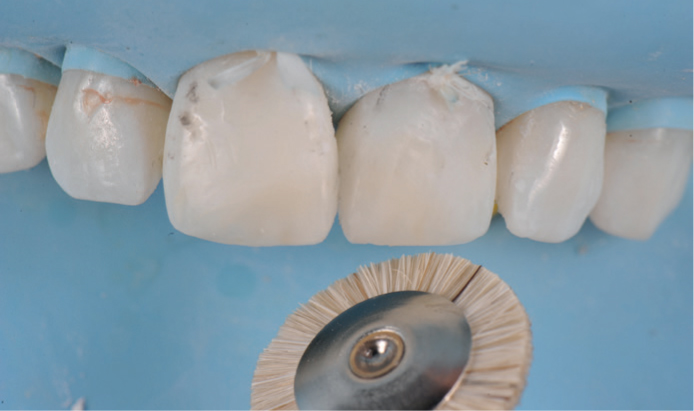
Polishing
Polishing protocols vary according to the clinician's preference and the composite material being used. Figure 12 demonstrates a goat's hair wheel (Gruppo Micerium, Italy) which was used at 4–5000 revolutions per minute and with moderate intermittent pressure. The restorations were polished to a high gloss to blend with the adjacent enamel.
Figure 12. A goat's hair wheel (Gruppo Micerium, Italy) which was used at 4–5000 revolutions per minute and with moderate intermittent pressure.
Aesthetic and functional assessment
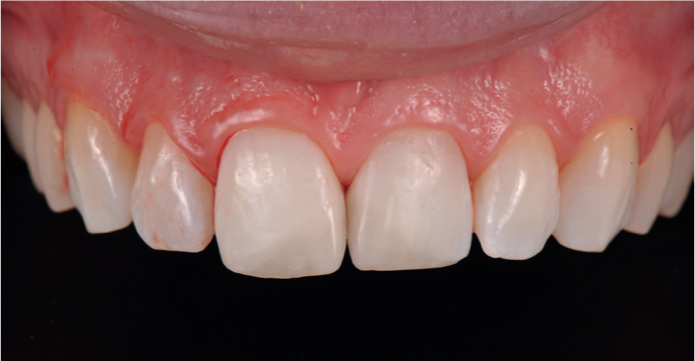
Following removal of the rubber dam, the restorations were assessed to ensure that they conformed to the pre-existing anterior occlusal guidance. A photograph was taken (Figure 13) at this stage to help plan any minor corrections that would be carried out at the review appointment (10–14 days later). Figure 13 also illustrates the level of dehydration of the residual enamel. It is important to warn patients of this at the outset.
Figure 13. A photograph was taken at this stage to help plan any minor corrections that would be carried out at the review appointment (10–14 days later). This figure also illustrates the level of dehydration of the residual enamel.
Review
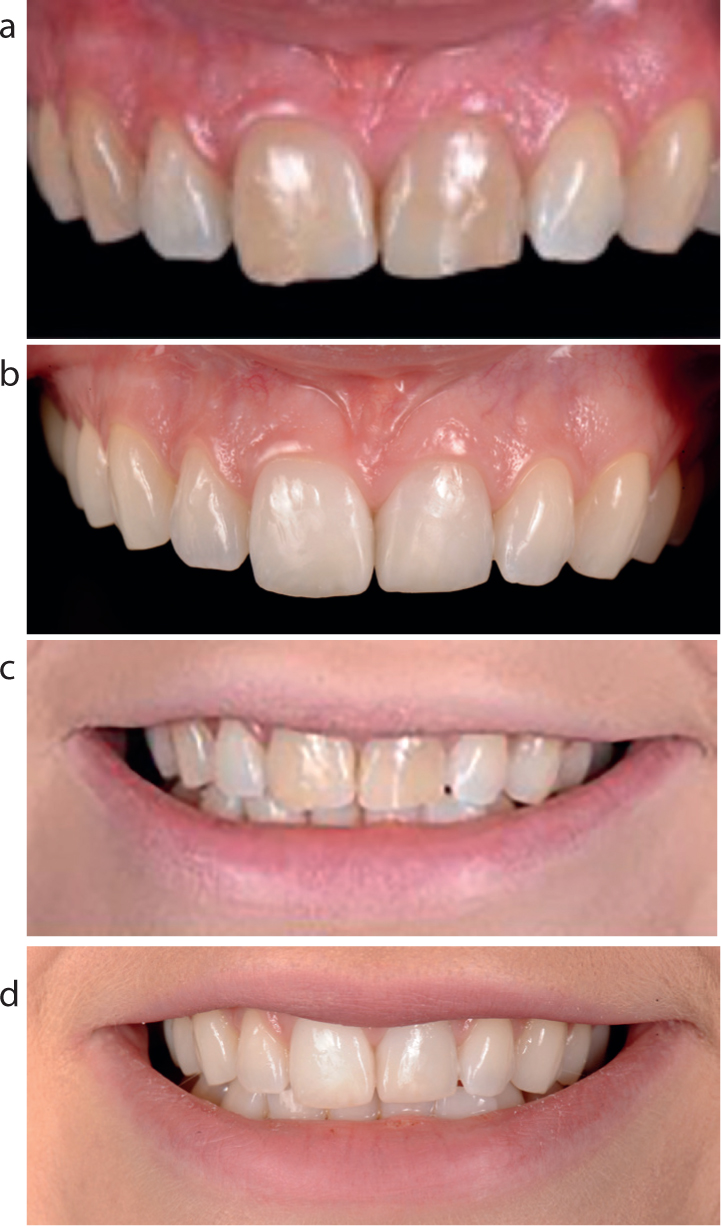
A review appointment is important in cosmetic cases to ensure that the patient is pleased with the outcome and to allow the opportunity for any functional and aesthetic corrections. Post-operative photographs are an important clinical record and may be superimposed with pre-operative images for patient education purposes and for portfolio creation with the patient's written consent. Figure 14 demonstrates a pleasing aesthetic outcome for patient and operator.
Figure 14. Pre-(a, c) and post-(b, d) operative views.
Summary
The clinical stages described in this case report demonstrate how the use of polychromatic layering techniques (along with tooth whitening) can be a predictable, aesthetic, minimally invasive alternative to traditional, more destructive, indirect techniques. Each stage should be optimized with regard to material and equipment selection and to clinical protocols. The use of clinical photography at all stages of the procedure provides a valuable treatment record and allows clinicians to reflect on outcomes and refine artistic clinical skills to a high level. Studying clinical photographs of successful cases is also rewarding for patients and clinicians alike.