Chiche GJ, Pinault A.London: Quintessence Publishing Co Ltd; 1994
Gonçalves LC, Gomes VL, De Lima Lucas B, Monteiro SB. Correlation between the individual and the combined width of the six maxillary anterior teeth. J Esthet Restor Dent. 2009; 21:182-191
de Castro MV, Santos NC, Ricardo LH. Assessment of the “golden proportion” in agreeable smiles. Quintessence Int. 2006; 37:597-604
Chiche GJ, Aoshima H.London: Quintessence Publishing Co Ltd; 2004
Naini FB, Gill DS. Facial aesthetics: 1. Concepts and canons. Dent Update. 2008; 35:102-107
Batwa W, Grewal B, Gill D. Smile analysis: what to measure. Dent Update. 2014; 41:483-489
Mehta SB, Banerji S, Aulakh R. Patient assessment: preparing for a predictable aesthetic outcome. Dent Update. 2015; 42:78-86
Terry DA, Geller W, Tric O, Anderson MJ, Tourville M, Kobashigawa A. Anatomical form defines color: function, form, and aesthetics. Pract Proced Aesthet Dent. 2002; 14:59-67
Fahl N A polychromatic composite layering approach for solving a complex Class IV/direct veneer – diastema combination: Part I. Pract Proced Aesthet Dent. 2006; 18:641-645
Devoto W, Pansecchi D. Composite restorations in the anterior region: clinical and aesthetic performances. Pract Proced Aesthet Dent. 2007; 19:465-467
Dietschi D. Optimizing smile composition and esthetics with resin composites and other conservative esthetic procedures. Eur J Esthet Dent. 2008; 3:14-29
Hugo B. Esthetics with Resin Composite.London: Quintessence Publishing Co Ltd; 2009
Vanini L. Conservative composite restorations that mimic nature. A step–by-step anatomical stratification technique. J Cosmet Dent. 2010; 26:80-98
Ward DH. Proportional Smile design: using the recurring esthetic dental proportion to correlate the widths and lengths of the maxillary anterior teeth with the size of the face. Dent Clin North Am. 2015; 59:623-638
Understanding the anatomy of anterior and posterior teeth is important as the main aims of restorative dentistry are to restore the form, function and often the aesthetics of damaged teeth. The appearance of individual anterior teeth is complex and variable. The three most important aesthetic determinants are widely considered to be tooth shape, surface texture and colour, which are further complicated by soft tissue and dento-facial factors. Learning how these interlinked anatomical features affect the aesthetic appearance of anterior teeth is difficult and presents challenges to teachers. Also, tooth anatomy teaching and clinical training in restorative dentistry may be separated by months or even years, making it difficult for students to apply previously learned anatomical principles to aesthetic restorative procedures. This is the second of two papers describing a series of step-by-step tooth drawing exercises which aim to simplify the teaching and learning of tooth anatomy.
CPD/Clinical Relevance: Detailed understanding of tooth anatomy will help clinicians accurately and predictably plan the restoration of anterior teeth.
Article
Restoration of form and function may be considered to be the main aims of restorative dentistry. When anterior teeth are involved there is an important aesthetic component and aesthetic dentistry is a rapidly growing subject area. In this regard, there is a wide range of peer and non-peer reviewed literature on dental aesthetics dating back to the late 1960s.1
During preclinical training, the amount of time and resources given to teaching the anatomical and aesthetic properties of anterior teeth (and the related subject of smile design) varies between dental schools and different countries.
If the well-established principles of occlusion and aesthetics are not mastered during undergraduate training there is a risk that students may graduate with limited skill in:
The accurate shaping of direct restorations using tooth-coloured materials;
The design and prescription of fixed and removable prosthodontic restorations so that they integrate functionally and aesthetically with the residual dentition;
Understanding of the ‘ideal’ relationships in the aesthetic zone to inform orthodontic, aesthetic restorative and cosmetic procedures.
The self-directed anterior tooth drawing exercises are comparable to the posterior versions.2 While they are generally less time-consuming, they also include two freehand drawing exercises, enabling artistically talented students to demonstrate their skills.
Prior to starting the drawing exercises, students have their own maxillary anterior teeth photographed and then complete four drawings in the order listed below:
Systematic drawing exercises that demonstrate the labial outline forms of the maxillary incisor and canine teeth;
Exercise one is repeated and supplemented with basic surface texture features;
Freehand drawing of student's own maxillary anterior teeth (using a photograph);
Freehand drawing of student's own mandibular anterior teeth (from mirror view or photograph).
The maxillary anterior tooth drawings are completed on a blank template by using online step-by-step instructions. The mandibular anterior tooth drawings are performed freehand without any instructions.
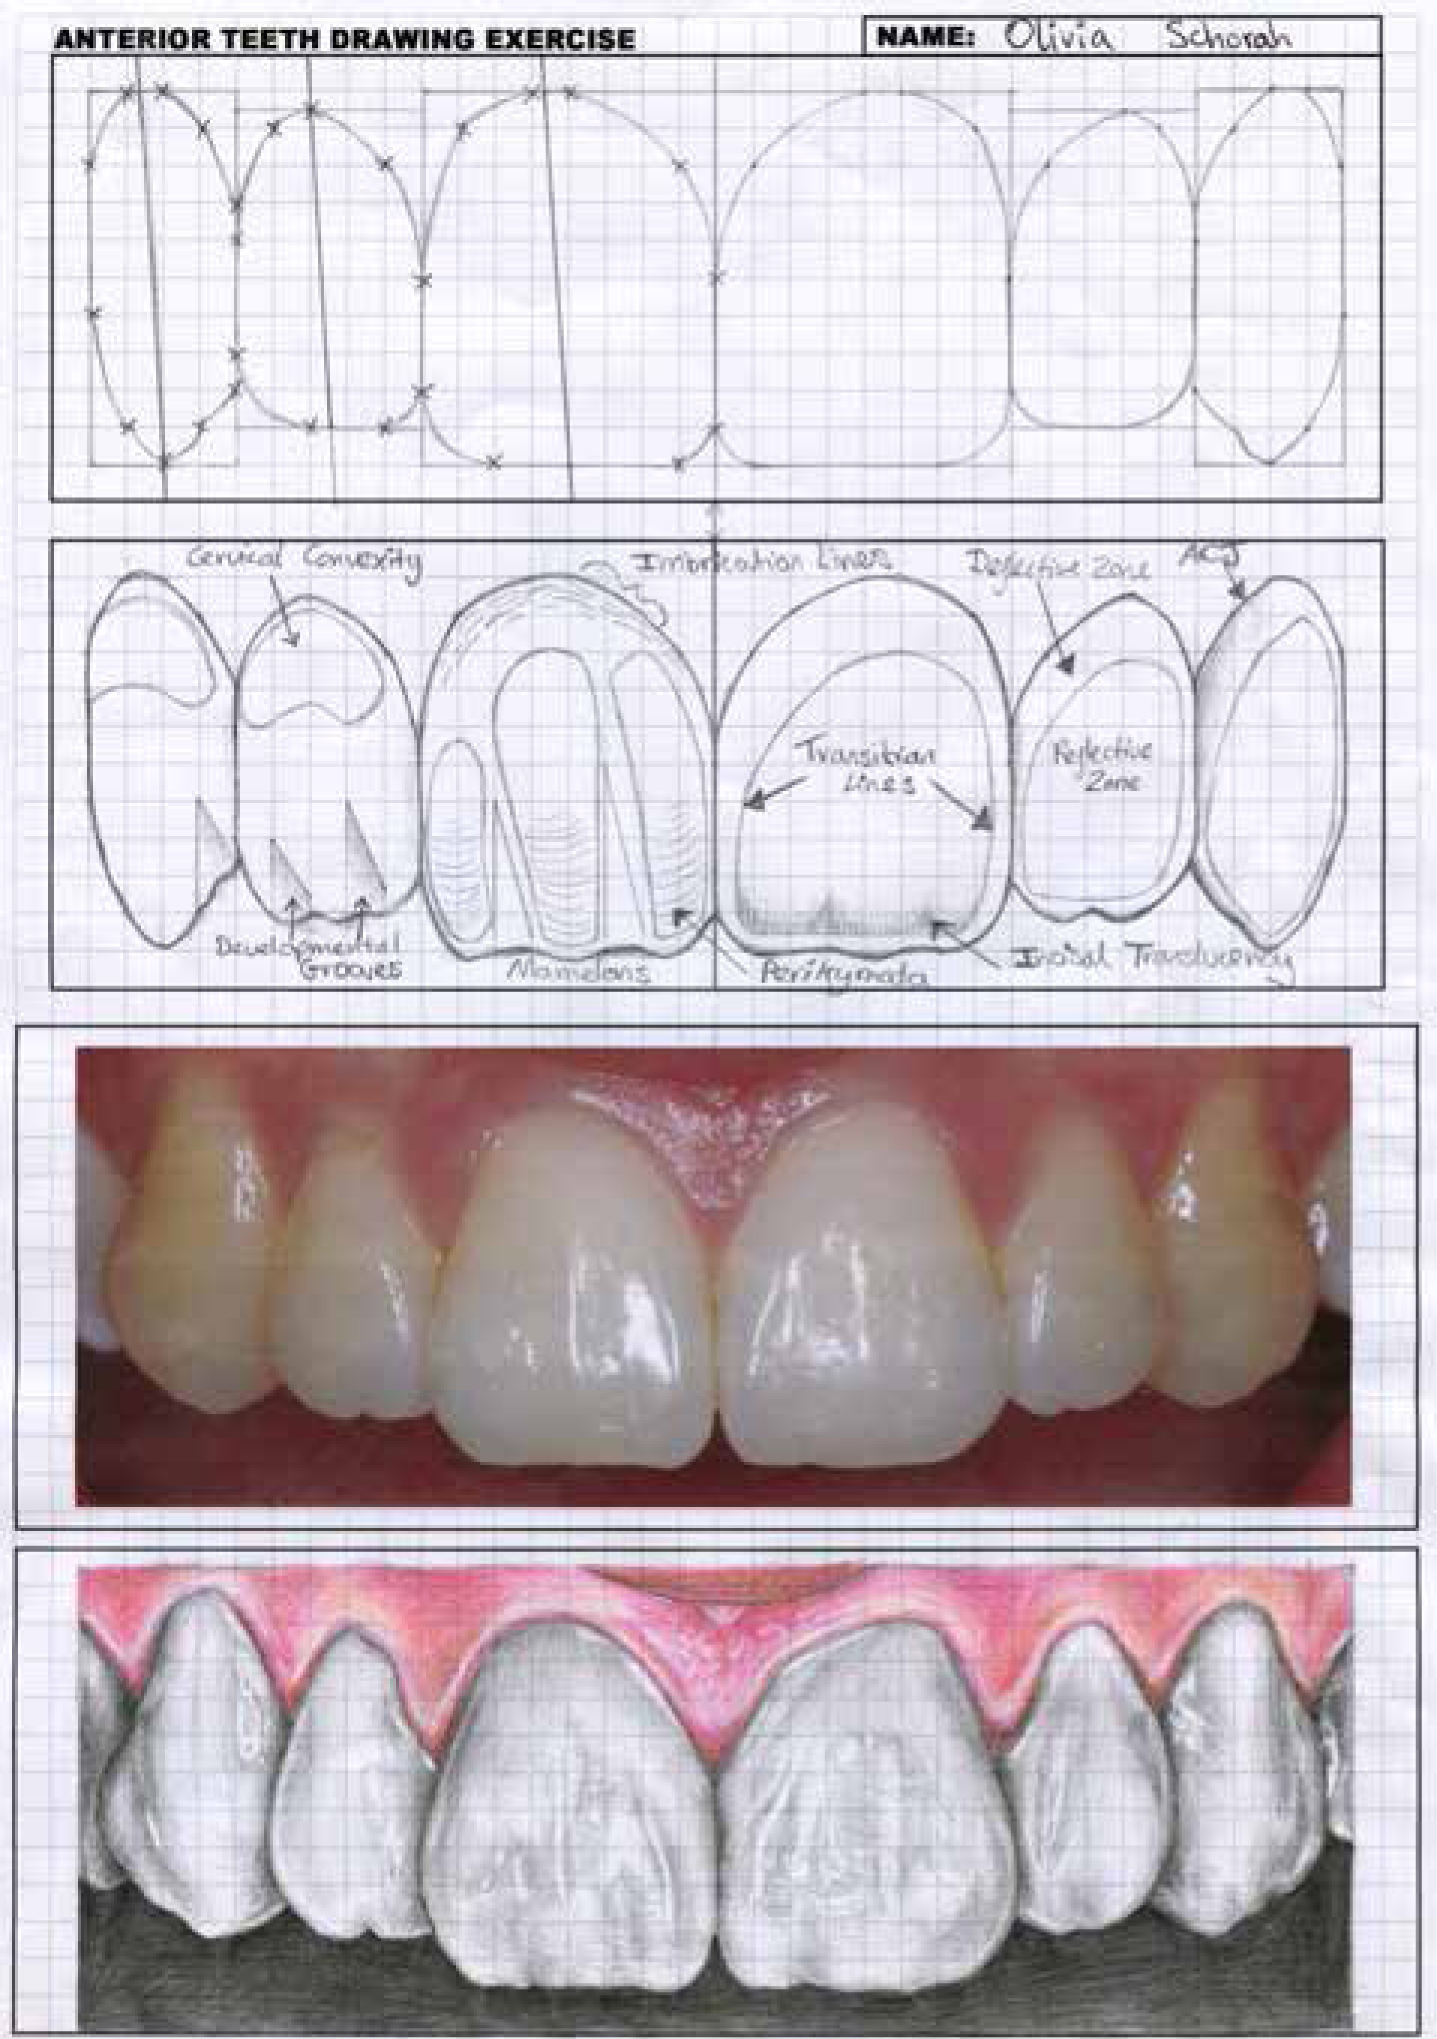
Along with the posterior tooth exercises, the completed anterior tooth drawings (Figures 1 and 2) are submitted as an original, hard copy portfolio for formative assessment and feedback.
Figure 1. Exemplary maxillary anterior tooth drawing exercise completed by a second year undergraduate student.Figure 2. Exemplary mandibular anterior tooth drawing exercise completed by a second year undergraduate student.
Anterior tooth drawing exercise design
The appearance of anterior teeth is determined primarily by the optical properties of tooth shape, surface texture and colour.3 When restoring anterior teeth there is general agreement in the literature that the most important of these three interlinked properties is tooth shape followed by surface texture. Slight errors in colour-matching may be undetectable, but errors in tooth shape are often obvious and may result in an immediate aesthetic failure of the procedure in patient terms.3
Accordingly, the main focus of the anterior tooth drawing exercises is to teach tooth shape, then basic surface texture features are incorporated. As the nature of the pencil drawing does not enable the study of tooth colour, this teaching is delivered via other methods. The learning outcomes are designed so that, by the end of the anterior tooth drawing exercises, students should be able to:
Demonstrate knowledge of the common labial outline forms of the maxillary and mandibular anterior teeth;
Understand the proportions of individual anterior teeth and their relationships with each other;
Recognize surface texture features that affect the optical properties of teeth;
Appreciate that natural dentitions very rarely conform to the idealized, stylized interpretations often cited in the literature;
Apply anatomical knowledge to inform the restorative management of anterior teeth.
In common with the posterior tooth drawing exercises, design of the anterior version was developed by combining average measurements from multiple sources including:
Anatomical study guides for dental students and technicians;4,5,6,7,8,9,10,11,12,13,14
References related to the principles of aesthetic dentistry;15,16,17,18,19,20,21,22
Practical guides for the restoration of anterior teeth using direct composite;3,23,24,25,26,27,28,29
Plastic teeth designed for simulation training eg Kavo (Biberach, Germany), Frasaco (Tettnang, Germany) Nissin (Kyoto, Japan);
Extracted natural incisors and canines;
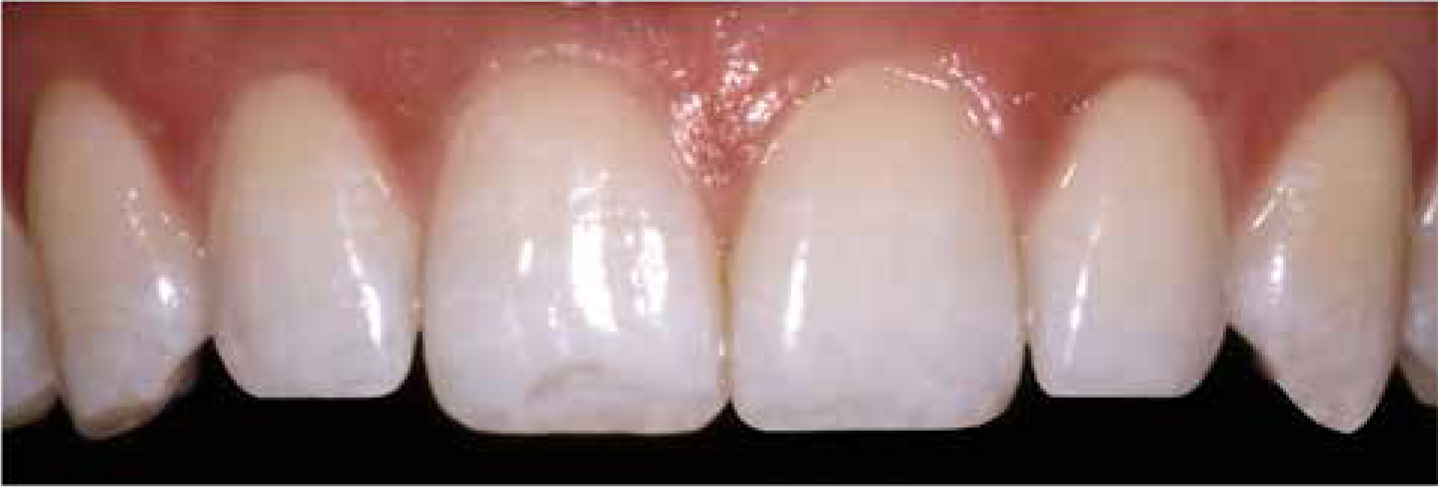
Direct observation and clinical photographs of anterior teeth (Figure 3).
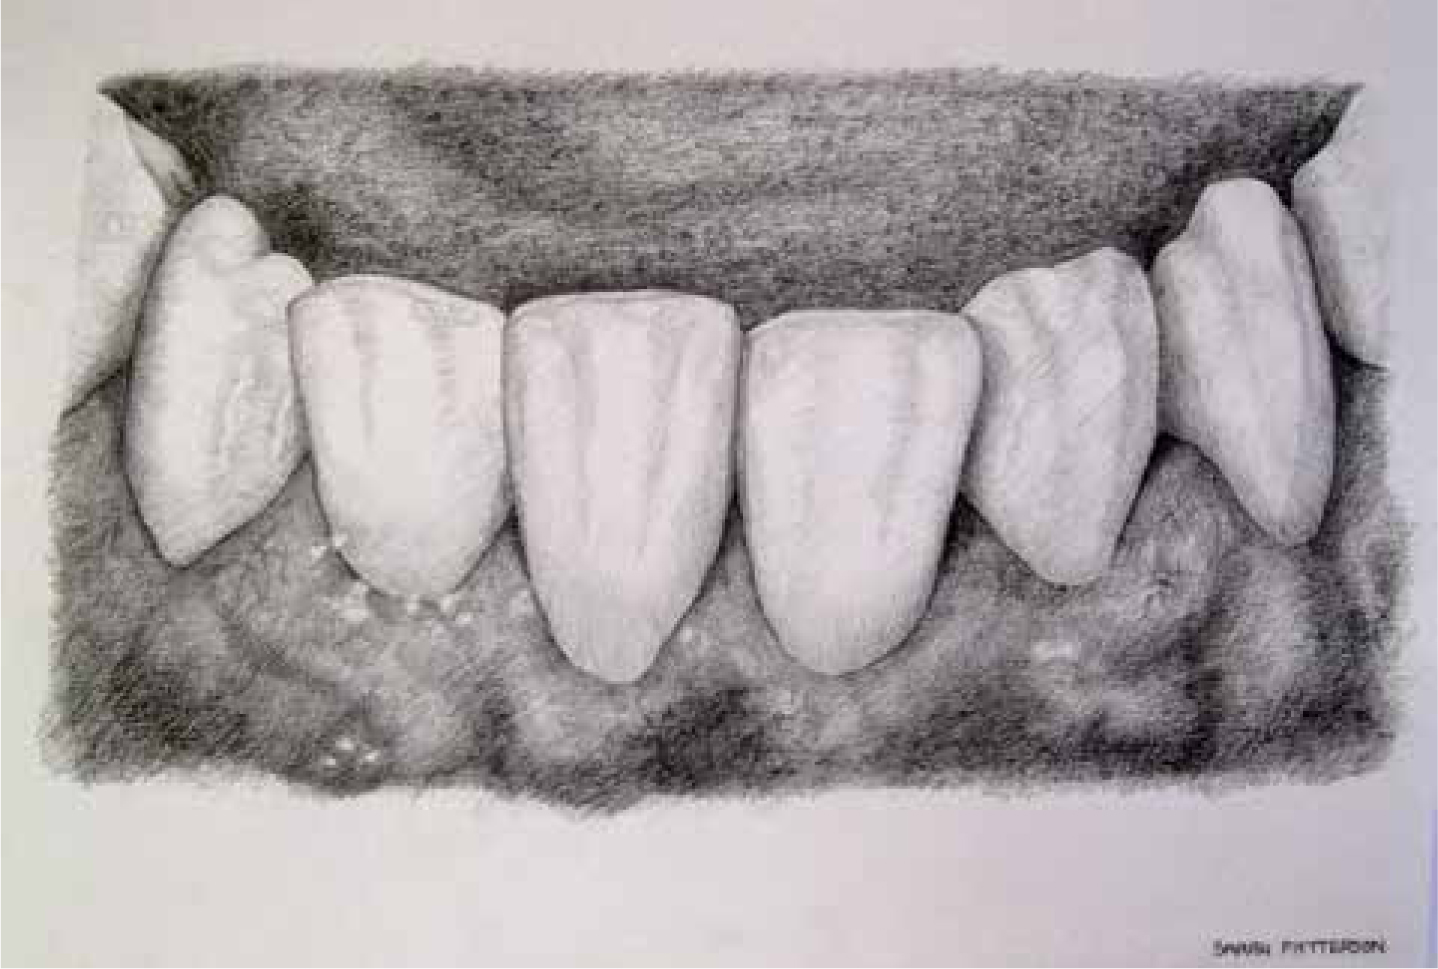
Figure 3. Clinical photograph of maxillary anterior teeth. Slightly digitally manipulated to demonstrate ‘idealized’ anatomical size, shapes and relationships.
The anterior tooth drawing exercises were designed according to the following principles:
The exercises may be carried out using relatively simple, inexpensive and easily available materials;
The exercises are carried out independently following online step-by-step guidelines;
The drawing exercises are of the permanent dentition and focus on the aesthetically obvious labial surfaces;
2D drawings were chosen rather than more complex 3D projections;
Pencil drawing is recommended to allow corrections;
Teeth are drawn oversized but to scale (5.0 mm2 graph paper representing 1.0 mm2 clinically);
To enable size, shape and relationship comparison teeth are drawn together in boxes based on published proportions;10
While the exercises use graph paper, making them suitable for both artists and non-artists, freehand drawings are also included to enable the identification of artistically talent students;
Students draw their own teeth to allow anatomical comparison with averaged, stylized interpretations. Stock photographs are made available for students undergoing orthodontic procedures or not wishing to have their teeth photographed.
The following step-by-step tooth drawing exercises may be used to learn or revise the common features making up the basic labial anatomy of maxillary and mandibular incisor and canine teeth. The guidelines that follow conform to widely-accepted anatomical principles and nomenclature.4,5,6,7,8,9,10,11,12,13,14,15,16,17,18,19,20,21,22
Step-by-step anterior tooth drawing exercise
Step 1: Maxillary anterior tooth proportions and relationships
At the top of a (portrait-orientated) piece of 5 mm2 A4 graph paper the maxillary central incisor midline is drawn vertically 12 squares in length.
Adjacent to the midline, draw six boxes that will enclose the incisor and canine drawings using the width and length proportions provided in Table 1. These measurements are based on published averages, rounded to the nearest 0.5 mm for expediency.
Teeth (Maxillary right and left)
Height (squares)
Width (squares)
Central incisors
10
8
Lateral incisors
8.5
5
Canines
10
4
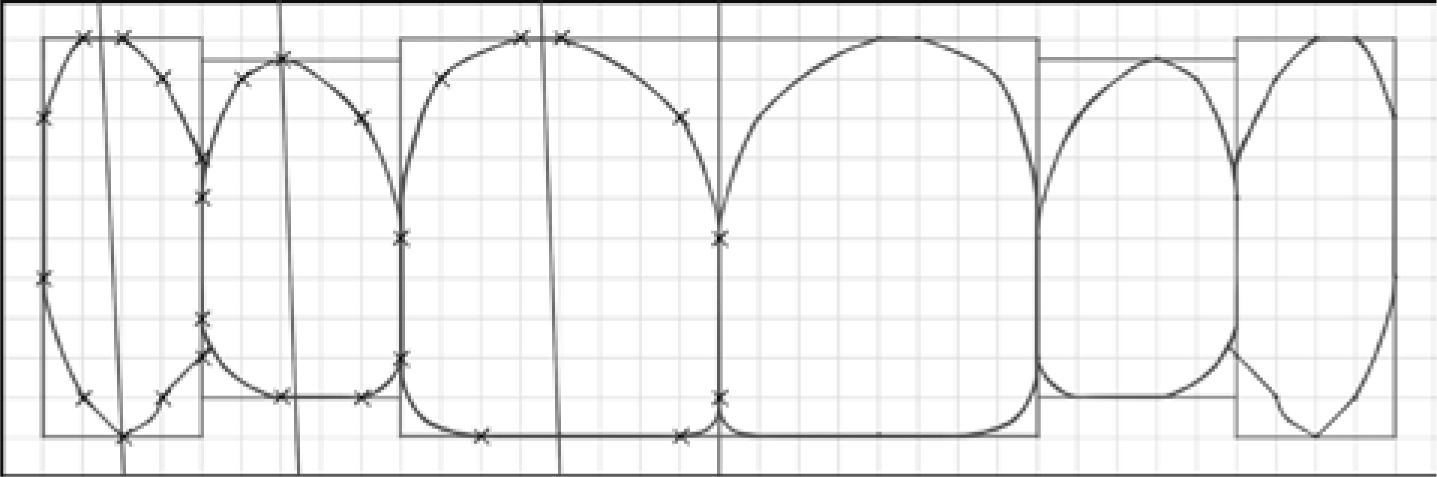
Figure 4 shows the completed boxes and the following guidelines provide explanations for the chosen dimensions and for the idealized interdental relationships.
Figure 4. Maxillary anterior tooth midline and six symmetrical adjacent boxes outlining average width and length proportions and demonstrating idealized interdental relationships.
Length guidelines
The average length of unworn central incisors ranges from approximately 10.0 to 11.0 mm;
The incisal edges of central and lateral incisors should ideally be flat and parallel to the patient's interpupillary line;
The incisal edges of lateral incisors are generally shorter (range 0.5–1.0 mm) than those of the central incisors and the canine tips;
The gingival zeniths (the highest visible points on the gingival margins) of lateral incisors are on average 0.5–1.0 mm incisal to that of central incisors and canines;
Maxillary canines have very similar crown lengths to central incisors, with an approximate +/- 0.5 mm range of natural variation;
The gingival zenith positions of maxillary central incisors and canines are ideally at a similar level.
Width guidelines
The maxillary central incisors are the largest and most aesthetically important anterior teeth;
Maximum widths of maxillary central incisors should ideally be 75–80% of their maximum lengths. (Therefore 10 x 8 boxes are selected for this exercise.)
Ideally the widths of maxillary anterior teeth should decrease moving distally. The specific ratios listed in Table 2 are proposed as guidelines.
Approximate lateral incisor widths are, on average, 2–3 mm less or 2/3 of the width of central incisors (8.5 x 5 boxes are selected for this exercise);
Although canines are approximately 1.0–1.5 mm narrower than central incisors, only the mesial half of the tooth is usually displayed when viewed from the anterior aspect (10 x 4 boxes are selected for this exercise).
*NB: Although widely recommended in the published literature it has been demonstrated that the majority of maxillary anterior tooth width ratios do not correspond with the golden proportion ratio.
Step 2: Outline form
Following completion of the boundary boxes, the next stage is to draw the labial outline forms of the six maxillary anterior teeth using the intersection points illustrated in Figure 5.
Figure 5. Outline forms of maxillary anterior teeth when viewed from the labial aspect.
The specific points may then be joined together with straight and curved lines to create a close approximation of the labial outlines of the maxillary incisors and canines. The guidelines that follow provide an overview of the aesthetic principles governing the shapes chosen for the drawing exercises.
Outline form guidelines
The central incisors should dominate the patient's smile and be symmetrical with each other, as small amounts of asymmetry are obvious, even to lay observers;16
For convenience, the right and left lateral incisors and canines are also drawn symmetrically (however, it has been reported that the majority of patient's lateral incisors are asymmetrical);16
The majority of distal incisal line angles of the central and lateral incisors are more rounded than their mesial counterparts. (Therefore they are drawn as 1 x 1 and 2 x 2 curves, respectively);
Ideally, the incisal embrasures (spaces between incisal angles) should increase in depth, moving distally from the midline;
The long axes of all the maxillary anterior teeth should ideally have a slight mesio-angular orientation (therefore the gingival zenith positions of anterior teeth are marked slightly distally to the incisal midlines and canine tips);
Clinically, the gingival zenith positions of lateral incisors are often closer to their tooth midline compared to central incisors;
The interdental connectors (the areas where teeth appear to touch) are longer than the actual contact points and the connector positions have been found to move cervically, progressing distally from the midline;
Joining the intersections marked on the graph paper completes the labial outline forms of the maxillary incisor teeth and ‘joining the dots’ also develops the planar surface of the canine teeth and stylized interpretations of canine tip forms.
Step 3: Surface texture
Following tooth shape, surface texture is considered to be the next most important determinant of the optical properties of anterior teeth.3 Surface texture anatomy is infinitely variable between individual teeth and between patients. This is diminished with age as teeth undergo non-carious tooth tissue loss (NCTTL) from attrition, erosion and abrasion.
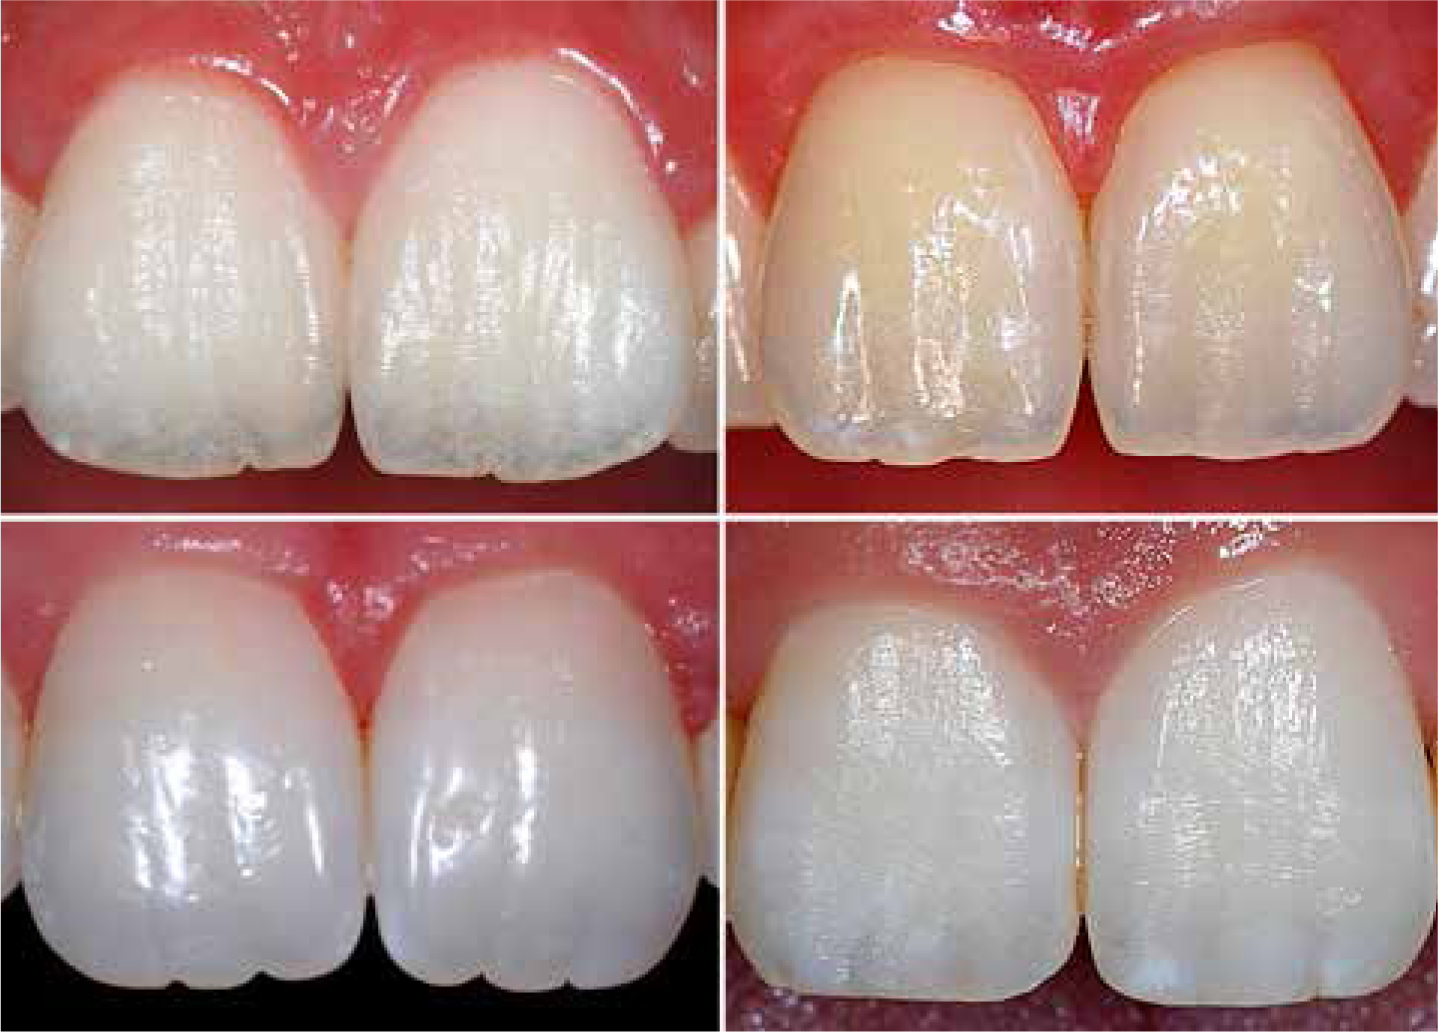
In young patients, unworn labial surface texture is often highly reflective, resulting in an attractive bright appearance (Figure 6).
Figure 6. Light reflection from labial surface texture features on maxillary central incisors
Surface texture anatomy may be arbitrarily divided into the primary, secondary and tertiary features listed in Table 3.
Primary Surface Texture
Secondary Surface Texture (Macro-texture)
Tertiary Surface Texture (Micro-texture)
Reflective zone
Developmental lobes
Micro-grooves
Deflective zone
Developmental grooves
Perikymata
Transition lines
Cervical bulge
Imbrication lines
Mamelons
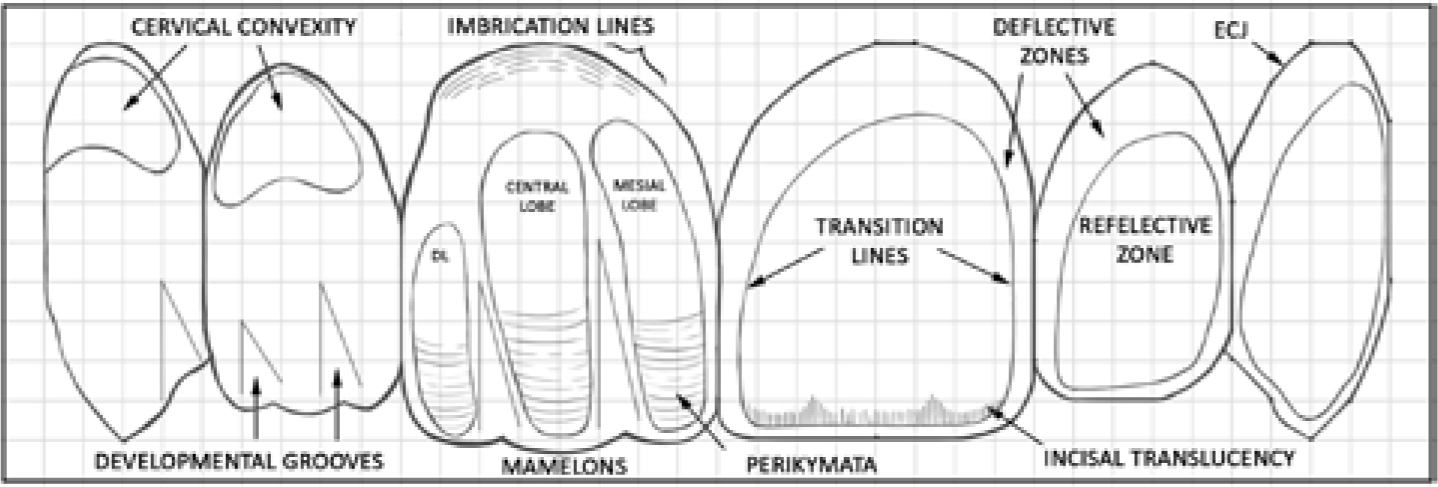
The first part of the surface texture exercise requires students to repeat steps one and two. Repetition reinforces the tooth shape learning outcomes and provides a framework for the drawing of the basic surface texture features, which are described below and illustrated in Figure 7.
Figure 7. Annotated drawing demonstrating common surface texture features of maxillary anterior teeth.
Primary surface texture
When incident light strikes the labial surface of the anterior teeth most of it is reflected back towards the observer. This reflective area, which has various names (reflective zone/face; apparent face; silhouette form), is bordered by curved surfaces which deflect light giving a darker outline (deflective zone).
The junctions of the reflective and deflective zones are often referred to as transition lines. Transition lines are key features in restorative dentistry as their accurate positioning strongly affects the aesthetic integration of direct and indirect restorations.3
Secondary surface texture
This is referred to as macro-texture and includes the following anatomical features.
Developmental lobes
There are usually three developmental lobes on the labial surface of maxillary anterior teeth;
On maxillary central incisors the mesial developmental lobe is usually the longest and most prominent and may exhibit a twisted morphology. The lobe runs from the incisal edge to the middle third of the tooth before blending into the cervical bulge;
The central developmental lobes are usually the widest and extend to form the majority of the gingival bulge. They are usually less prominent than the mesial lobe and may be flat or slightly concave (although occasionally they are more pronounced);
The distal developmental lobe is often quite prominent but is shorter than the mesial lobe. It may be rounded or separated from the cervical bulge by a slight depression.
Developmental grooves
As demonstrated in Figure 7, the developmental grooves are V-shaped depressions of variable length that are aligned with the long axes of the maxillary anterior teeth;
Developmental grooves divide the developmental lobes longitudinally and may also be present on the labial surfaces of canine teeth;
On central incisors, the mesial developmental groove is usually the longest and extends into the middle third of the tooth. The distal groove is usually shorter extending just to the middle third;
On lateral incisors, the mesial developmental grooves usually resemble those on the central incisors, but the distal groove is often diminished;
On maxillary canines, the mesial developmental groove is usually confined to the incisal third, whereas the distal groove is often longer.
Cervical bulge
The cervical bulge may also be referred to as the cervical/gingival convexity or the emergence profile;
The cervical bulge is formed from the convergence of the developmental lobes in the gingival third of the labial surface.
Mamelons
Mamelons are small, rounded protuberances on the edges of central and lateral incisor teeth;
While mamelons are often present on the tips of newly erupted incisors, they are relatively quickly worn away by mastication.
Tertiary surface texture
This is referred to as micro-texture and includes:
Accessory ridges/grooves which are smaller than the main developmental lobe/grooves;
Perikymata which are very small, horizontal surface striations caused by the formation of enamel prisms;
Imbrication lines which are subtle, broken, crescent-shaped ridges on the cervical bulge, running parallel to the amelo-cemental junction (ACJ). They are usually less apparent on lateral incisors.
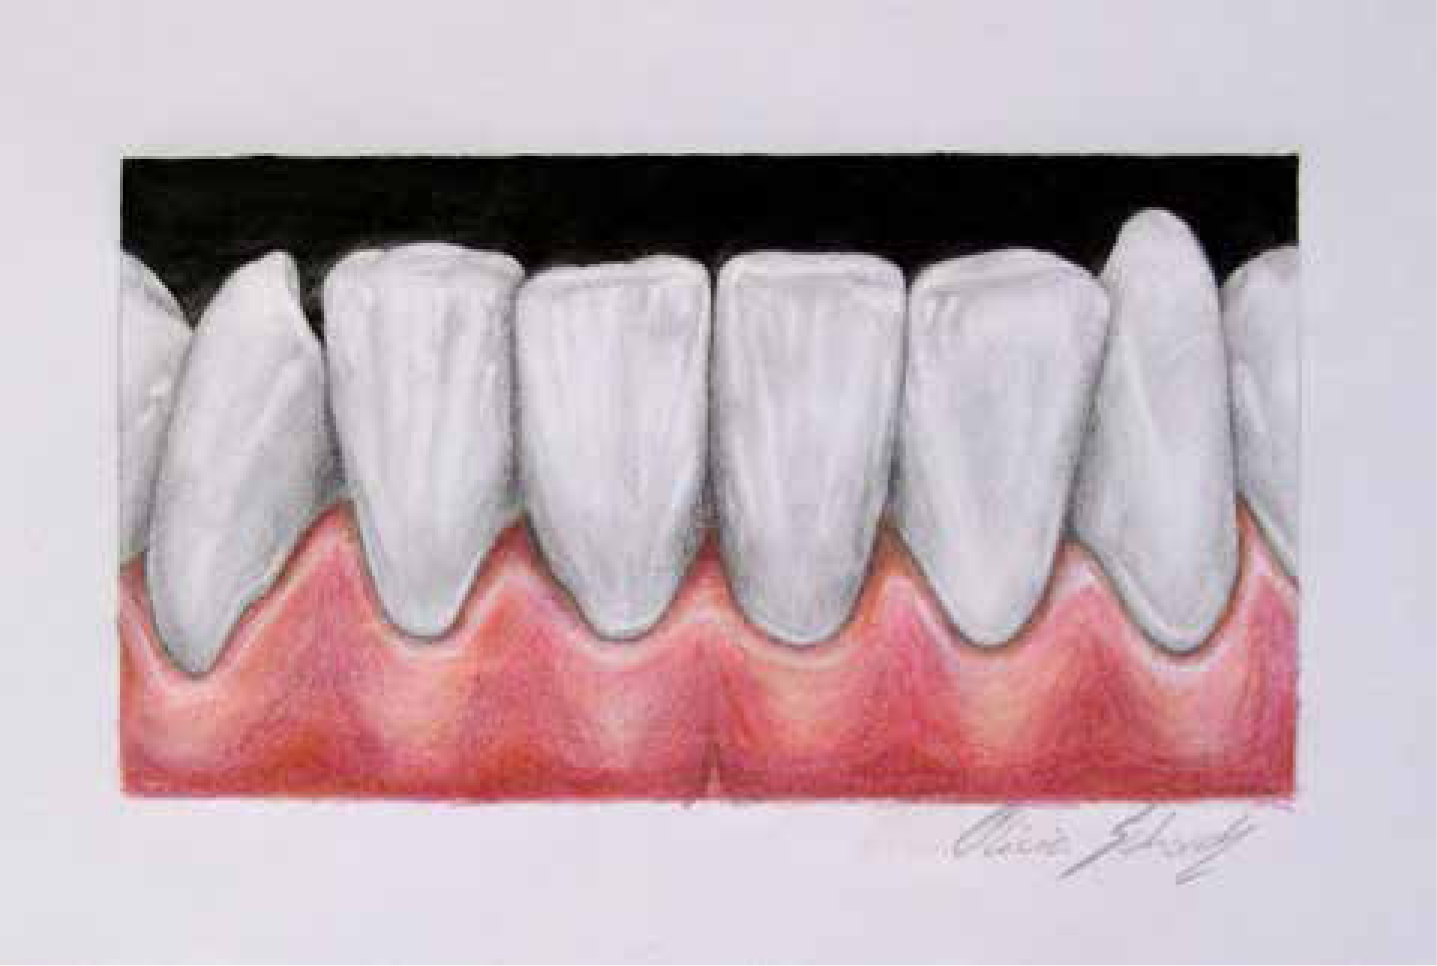
Step 4: Anatomical comparison exercise
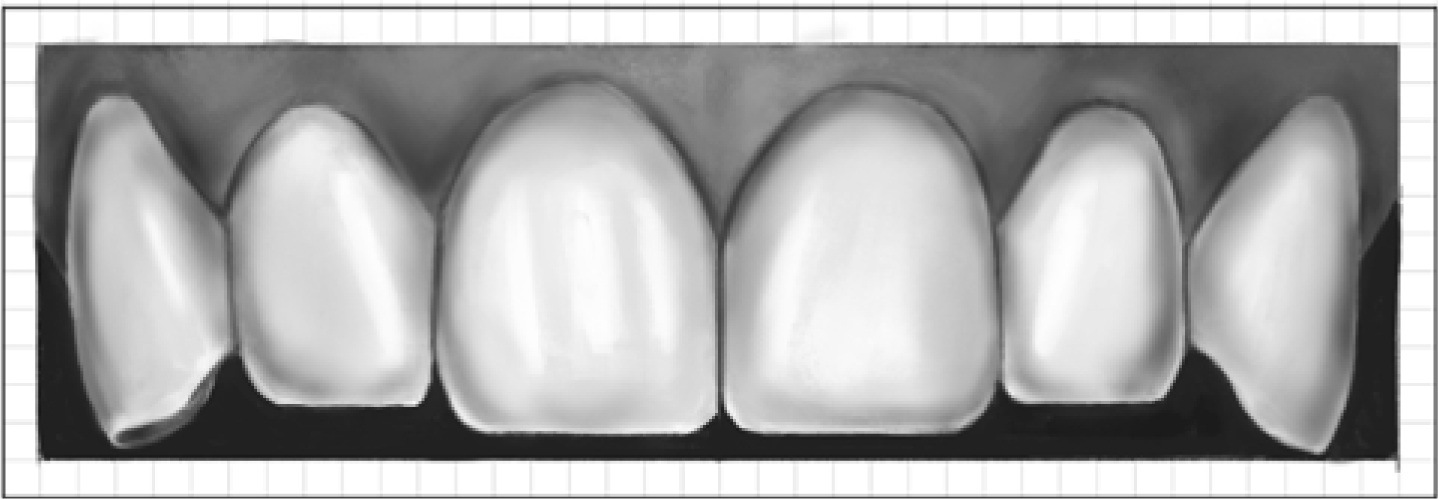
The third maxillary anterior tooth drawing exercise requires students to use a high resolution, close-up photograph to guide a freehand drawing of their own teeth. A stylized digital example is provided to enable comparison (Figure 8).
Figure 8. Idealized digital rendering of the maxillary anterior teeth shown in Figure 3.
Step 5: Drawing mandibular anterior teeth
The final drawing exercise requires students to draw their own mandibular incisors and canines. The teeth are drawn freehand, without following specific guidelines, using photographs or mirror views. Students are encouraged to compare the anatomy of their own mandibular anterior teeth to the following aesthetic guidelines:10
The lengths of mandibular incisors are usually similar;
Mandibular central incisors are usually symmetrical;
Mandibular lateral incisors are usually wider than their central incisor counterparts (the opposite relationship to maxillary incisors);
The average maximum widths of mandibular central and lateral incisors are reported to be 5.0 mm and 5.5 mm, respectively;
Mandibular incisal widths may be used restoratively to plan prospective maxillary incisor widths using the following equation: width of upper central incisor = width of lower central incisor + ½ width of lower lateral incisor.
Following the freehand drawing, students should be able to demonstrate understanding of the following:
That there is considerable variation between natural teeth;
That virtually no human teeth conform to the ‘idealized’ guidelines widely reported in the literature;
That the drawing exercises may be used to guide the restorative management of anterior teeth;
This final exercise also aims to afford artistically talented students the opportunity to demonstrate their skills (Figure 9).
Figure 9. Exemplary freehand pencil drawing of mandibular anterior teeth completed by a second year undergraduate student.
Summary
The tooth drawing exercises described in this paper and the previous one aim to overcome some of the challenges in teaching and learning tooth anatomy, and aim to guide the accurate, predictable, enjoyable restoration of patients with damaged anterior and posterior teeth.