Iqbal MK, Kohli MR, Kim JS. A retrospective clinical study of incidence of root canal instrument separation in an endodontics graduate program: a PennEndo database study. J Endod. 2006; 32:1048-1052
Hülsmann M, Schinkel I. Influence of several factors on the success or failure of removal of fractured instruments from the root canal. Endod Dent Traumatol. 1999; 15:252-258
Spili P, Parashos P, Messer HH. The impact of instrument fracture on outcome of endodontic treatment. J Endod. 2005; 31:845-850
Wu J, Lei G, Yan M, Yu Y, YU J, Zhang G. Instrument separation analysis of multi-used ProTaper Universal rotary system during root canal therapy. J Endod. 2011; 37:758-763
Ramirez-Solomon M, Soler-Bientz R, de la Garza-Gonzalez R, Palacios-Garza CM. Incidence of Light Speed separation and the potential for bypassing. J Endod. 1997; 23:586-587
Parashos P, Gordon I, Messer HH. Factors influencing defects of rotary nickel-titanium endodontic instruments after clinical use. J Endod. 2004; 30:722-725
Daugherty DW, Gound TG, Comer TL. Comparison of fracture rate, deformation rate, and efficiency between rotary endodontic instruments driven at 150 rpm and 350 rpm. J Endod. 2001; 27:93-95
Bryant ST, Thompson SA, al-Omari MA, Dummer PM. Shaping ability of ProFile rotary nickel-titanium instruments with ISO sized tips in simulated root canals: part 1. Int Endod J. 1998; 31:275-281
Kosti E, Zinelis S, Lambrianidis T, Margelos J. A comparative study of crack development in stainless-steel hedstrom files used with step-back or crown-down techniques. J Endod. 2004; 30:38-41
Gambarini G. Rational for the use of low-torque endodontic motors in root canal instrumentation. Endod Dent Traumal. 2000; 16:95-100
Alapati SB, Brantley WA, Svec TA, Powers JM, Nusstein JM, Daehn GS. SEM observations of nickel-titanium rotary endodontic instruments that fractured during clinical use. J Endod. 2005; 31:40-43
Patino PV, Biedma BM, Liebana CR, Cantatore G, Bahillo JG. The influence of a manual glide path on the separation rate of NiTi rotary instruments. J Endod. 2005; 31:114-116
Ankrum MT, Hartwell GR, Truitt JE. K3 Endo, ProTaper, and ProFile systems: breakage and distortion in severely curved roots of molars. J Endod. 2004; 30:234-237
Suter B, Lussi A, Sequeira P. Probability of removing fractured instruments from root canals. Int Endod J. 2005; 38:112-123
Madarati AA, Watts DC, Qualtrough AJ. Opinions and attitudes of endodontists and general dental practitioners in the UK towards the intracanal fracture of endodontic instruments: part 1. Int Endod J. 2008; 41:693-701
Sjogren U, Hagglund B, Sundqvist G, Wing K. Factors affecting the long term results of endodontic treatment. J Endod. 1990; 16:498-504
Sigueira JF. Aetiology of root canal treatment failure: why well-treated teeth can fail. Int Endod J. 2001; 34:1-10
Machtou P, Reit C. Non-surgical retreatment, 1st edn. In: Bergenholtz G, Hørsted-Bindslev P, Reit C Oxford: Blackwell Munksgaard Ltd; 2003
Rocke H, Guldener PHA. Obstruktion des Wurzelkanals, 3rd edn. In: Guldener PHA, Langeland K Stuttgart: Thieme; 1993
McGuigan MB, Louca C, Duncan HF. Clinical decision-making after endodontic instrument fracture. Br Dent J. 2013; 214:395-400
Okiji T. Modified usage of the Masserann kit for removing intracanal broken instruments. J Endod. 2003; 29:466-467
Mandel E, Adib-Yazdi M, Benhamou L-M, Lachkar T, Mesgouez C, Sobel M. Rotary NiTi profile systems for preparing curved canals in resin blocks: influence of operator on instrument breakage. Int Endod J. 1999; 32:436-443
Hülsmann M. Methods for removing metal obstructions from the root canal. Endod Dent Traumatol. 1993; 9:223-237
Alomairy KH. Evaluating two techniques on removal of fractured rotary nickel-titanium endodontic instruments from root canals: an in vitro study. J Endod. 2009; 35:559-562
Hülsmann M. The removal of silver cones and fractured instruments using the Canal-Finder-system. J Endod. 1990; 16:596-600
Shen Y, Peng P, Cheung GS. Factors associated with the removal of fractured NiTi instruments from root canal systems. Oral Surg Oral Med Oral Pathol Oral Radiol Endod. 2004; 98:605-610
Cujé J, Bargholz C, Hülsmann M. The outcome of retained instrument removal in a specialist practice. Int Endod J. 2010; 43:545-554
Nagai O, Tani N, Kayaba Y, Kodama S, Osada T. Ultrasonic removal of broken instruments in root canals. Int Endod J. 1986; 19:298-304
Rhodes JS, Pitt Ford TR, Lynch PJ, Liepins PJ, Curtis RV. Micro-computed tomography: a new tool for experimental endodontology. Int Endod J. 1999; 32:165-170
Madarati AA, Watts DC, Qualtrough AJ. Factors contributing to the separation of endodontic files. Br Dent J. 2008; 204:241-245
Terauchi Y, O'Leary L, Kikuchi I, Asanaqi M, Yoshioka T, Kobayashi C, Suda H. Evaluation of the effciency of a new file removal system in comparison with two conventional systems. J Endod. 2007; 33:585-587
Ward JR, Parashos P, Messer HH. Evaluation of an ultrasonic technique to remove fractured rotary nickel-titanium endodontic instruments from root canals: an experimental study. J Endod. 2003; 29:756-763
Gencoglu N, Helvacioglu D. Comparison of the different techniques to remove fractured endodontic instruments from root canal systems. Eur J Dent. 2009; 3:90-95
Souter NJ, Messer HH. Complications associated with fractured file removal using an ultrasonic technique. J Endod. 2005; 31:450-452
Ward JR, Parashos P, Messer HH. Evaluation of an ultrasonic technique to remove fractured rotary nickel-titanium instruments from root canals: clinical cases. J Endod. 2003; 29:764-767
Gary SP, Cheung GSP. Instrument fracture: mechanisms, removal of fragments, and clinical outcomes. Endod Topics. 2009; 16:1-26
Terauchi Y, O'Leary L, Suda H. Removal of separated files from root canals with a new file removal system: case reports. J Endod. 2006; 32:789-797
Berutti E, Fedon G. Thickness of cementum/dentin in mesial roots of mandibular first molars. J Endod. 1992; 18:545-548
Janik JM. Access cavity preparation. Dent Clin North Am. 1984; 28:809-818
Yared GM, Kulkarni GK. Failure of ProFile Ni-Ti instruments used by an inexperienced operator under access limitations. Int Endod J. 2002; 35:536-541
Feldman G, Solomon C, Notaro P, Moskowitz E. Retrieving broken endodontic instruments. J Am Dent Assoc. 1974; 88:588-591
Pai ARV, Kamath MP, Basnet P. Retrieval of a separated file using Masserann technique: a case report. Kathmandu Univ Med J. 2006; 4:238-242
Spriggs K, Gettleman B, Messer HH. Evaluation of a new method for silver point removal. J Endod. 1990; 16:335-338
Gettleman BH, Spriggs KA, ElDeeb ME, Messer HH. Removal of canal obstructions with the Endo Extractor. J Endod. 1991; 17:608-611
Martin D. Removal of fractured instrument with a new extractor: clinical cases, African edn. 2011
Roig-Greene JL. The retrieval of foreign objects from root canals: a simple aid. J Endod. 1983; 9:394-397
Eleazer PD, O'Connor RP. Innovative uses for hypodermic needles in endodontics. J Endod. 1999; 25:190-191
Johnson WB, Beatty RG. Clinical technique for the removal of root canal obstructions. J Am Dent Assoc. 1988; 117:473-476
Suter B. A new method for retrieving silver points and separated instruments from root canals. J Endod. 1998; 24:446-448
Al-Fouzan KS. Incidence of rotary ProFile instrument fracture and the potential for bypassing in vivo. Int Endod J. 2003; 36:864-867
Mize SB, Clement DJ, Pruett JP, Carnes DL Effect of sterilization on cyclic fatigue of rotary nickel–titanium endodontic instruments. J Endod. 1998; 24:843-847
D'Arcangelo C, Varvara G, De Fazio P. Broken instrument removal – two cases. J Endod. 2000; 26:368-370
Rahimi M, Parashos P. A novel technique for the removal of fractured instruments in the apical third of curved root canals. Int Endod J. 2009; 42:264-270
Parashos P, Messer HH. Questionnaire survey on the use of rotary nickel–titanium endodontic instruments by Australian dentists. Int Endod J. 2004; 37:249-259
Professor of Higher Education in Conservative Dentistry, Faculty of Dentistry and Laboratory of Biostatistics, Clinical Research and Epidemiology, Mohammed V University in Rabat
Professor of Higher Education in Conservative Dentistry, Department of Conservative Dentistry, Faculty of Dentistry, University Mohammed V Souissi Rabat, Avenue Allal El Fassi, Rue Mohammed Jazuli, Madinat Al Irfane, Rabat – Institutes, Morocco
Professor of Higher Education and Head of Service of Conservative Dentistry, Department of Conservative Dentistry, Faculty of Dentistry, University Mohammed V Souissi Rabat, Avenue Allal El Fassi, Rue Mohammed Jazuli, Madinat Al Irfane, Rabat – Institutes, Morocco
The successful removal of a separated instrument from the root canal depends on various factors. The location of the broken fragment must be determined because that is commonly the most important factor in determining successful retrieval of the fragment. A variety of different methods for removing obstructions have been described in the literature. However, guidelines for the removal of a separated instrument have not been established. This review aims to describe the methodological approaches to adopt for removing an intracanal separated instrument, depending on the clinical situation, both when the fragment extends into the pulp chamber and two-thirds of the way down the root canal.
CPD/Clinical Relevance: This paper aims to describe the methodological approaches to adopt for removing an intracanal separated instrument, depending on the clinical situation.
Article
One of the most troublesome complications in endodontic therapy is having a separated instrument (SI) within the root canal space. As techniques and instrumentation have improved over time, observations have been made about the fracture rate of various endodontic instruments in root canals.
Whereas separation rates of stainless steel (SS) instruments have been reported to range between 0.25% and 6%,1,2 the separation rate of nickel-titanium (NiTi) rotary instruments has been reported to range between 1.3% and 10.0%.1,3,4,5 Numerous factors have been associated with the fracture of NiTi rotary instruments:
It has been noted that NiTi instruments frequently fracture in narrow, curved root canals.14,15 The breakage usually occurs in the apical one-third of a curved canal.13,14 The instruments usually separate by two different mechanisms: torsional fatigue or bending fatigue.16 While SS files are typically operated manually, fracture is often a result of overuse and associated with a pre-existing distortion of the instrument.17
Even in experienced hands, instrument fracture can still occur, frustrating both practitioners and patients.18 Intracanal SI, which usually prevents access to the apex, might lead to the failure of root canal therapy and cause anxiety to patients.19,20 Therefore, the best option in the management of root canal instrument fracture is removal, facilitating effective obturation of the root canal system.21 Only after removing the SI can the root canal be negotiated, cleaned and shaped optimally. If the root canal cannot be cleaned and shaped successfully, remnants of pulp tissue and bacteria may compromise the treatment outcome.19,22 Successful removal of the fragment from the tooth also provides psychological benefits for the patient and avoids the risk of medico-legal action.23
The orthograde removal of a SI may present a significant challenge to practitioners.24 No standardized procedure for successful instrument removal has been established,25 even though a number of different removal techniques and devices have been reported.2627,28 The purpose of this article is not to provide an exhaustive list of removal techniques but rather to describe the methodological approaches to adopt for removing an intracanal SI, depending on the clinical situation.
Factors influencing the successful removal of separated instruments
The success rate for removal of a SI has been reported as varying from 53% to 95%.27,29,30,31 The wide variation in reported results can be explained by a range of factors which influence the probability of removal.32
Anatomic factors
Root anatomy, such as the diameter, length, canal curvature and thickness of the root dentine, has been reported to affect the ability to remove a SI safely.33 The influence of anatomic factors can be explained in terms of visualization and access;34 that is, the ability to see the separated segment, obtain clear access, and manipulate retrieval instruments/devices safely and effectively.
Canal curvature is one of the most important factors that influences the successful management of a SI. Some investigators reported that successful removal rates significantly decreased as the severity of curvature increased.29,30,34 These studies demonstrate that the removal of SI from curved canals poses a particular challenge for clinicians. The problem with such cases is due to the tendency for the file to lie on its side, with the coronal portion of the fragment directed against one wall of the canal because of the natural tendency of the metal to straighten out as it exits a curved canal.35
The removal of a SI is therefore more predictable in single-rooted teeth and teeth with uncomplicated root canal anatomy (eg incisors, canines, palatal roots of maxillary molars). The dimension and the internal anatomy of these roots makes fragment removal more straightforward.2,29,30 On the other hand, the poorest rates for successful removal are associated with the mesiobuccal canals of maxillary molars and mandibular molars.30 Somewhat surprisingly, some authors have reported lower success rates for maxillary and mandibular premolars due to narrow root canals and root canal irregularities.2,29 By contrast, another study reported no statistical difference in removal success rates with regard to tooth and/or root type.15
Separated instrument factors
The chance of successfully removing a SI from the root canal depends also on factors relating to the instrument itself, such as the type of instrument, the location of the fragment, and its length.
Material
SS files are considered to be easier to remove than NiTi instruments15,34,36 for the following reasons:
NiTi instruments usually fracture in short lengths, especially after torsional failure;37 the longer the fragment, the higher the success rate of retrieval since longer fragments are usually more coronally located.26
NiTi instruments tend to thread into root canal walls because of their rotary movement.37
Clinical observation has revealed that, owing to its flexibility, fragments of NiTi instruments in curved root canals tend to lie against the outer root canal wall rather than remain in the centre of the canal.32,38,39
NiTi instruments have a higher propensity to fracture later in the removal process, perhaps due to the accumulation of heat from direct ultrasonic vibration.15,32,36
Rotary or hand instruments
Hand NiTi instruments tend to be easier to remove than rotary instruments. This is because rotary instruments generally fracture into smaller lengths and further apically, at or around the curve of narrow canals. In addition, because of their rotational motion, they tend to become impacted in the canal walls, occluding the entire canal lumen. Mandel et al found that NiTi rotary instruments tend to fracture at the midpoint of curvature within simulated root canals.25
Design
The design of a SI is also important. For example, the removal of K-filesTM is easier and more successful than Hedstrom filesTM owing to Hedstrom's structural design.30 Compared with K-filesTM, Hedstrom filesTM have a greater helix angle, deeper flutes, and greater positive rake angle.40 These features, which allow Hedstrom filesTM to have greater cutting efficiency than K-filesTM, may result in deeper engagement in the root canal wall at the time when breakage occurs.41
Location
A SI located in the straight portion of the canal can usually be removed.39 When a SI lies partially around the canal curvature but the coronal aspect is still visible and accessible, then removal might be possible.38 If the entire segment of the SI is apical to the curvature, although more challenging, it can also be removed.32 Furthermore, a number of studies have concluded that attempts at removing a SI in the apical third are often unsuccessful and may lead to unwanted effects such as excessive dentine removal and weakening of the tooth, ledge formation, root perforation and apical extrusion of the fragment into the periradicular tissues.15,31,42,43
Length
Long fragments should be easier to remove than short fragments, since fragments greater than 5 mm in length are likely to engage dentine at their tips, creating space coronally to allow for the loosening of the fragment; however, this notion has not been demonstrated experimentally.29 Other studies reported either no correlation between fragment length and success of removal or did not investigate length as a variable.15,30
Other factors
Clinician's skill and available armamentarium
Both the clinician's skill and the availability of armamentarium affect the likelihood of safely removing a fractured instrument. Several authors have noted the importance of operator skill and experience on successful removal as well as the negative effect of operator fatigue.30,35,43 Removing a SI from the root canal is a demanding task, requiring not only dexterity but also suitable equipment. The need for magnification as well as good knowledge of root canal anatomy cannot be overemphasized.41 The successful removal of fractured instruments has become more predictable due to technological and methodological advances, such as the use of the dental operating microscopes, ultrasonics and microtube extraction devices.32
Patient factors
Factors relating to the patient him/herself, such as the extent of mouth opening, limitations in accessing the tooth, time constraints, anxiety level and motivation to retain teeth are important.41
Strategy for the removal of separated fragments
It is generally agreed that the location of the fragment within the root canal is the main determinant when choosing which technique and device to use.44 The approach should always include techniques and devices that offer the highest probability of successful removal while at the same time minimize both the amount of dentine sacrificed as well as procedural time (Figures 1–21).45
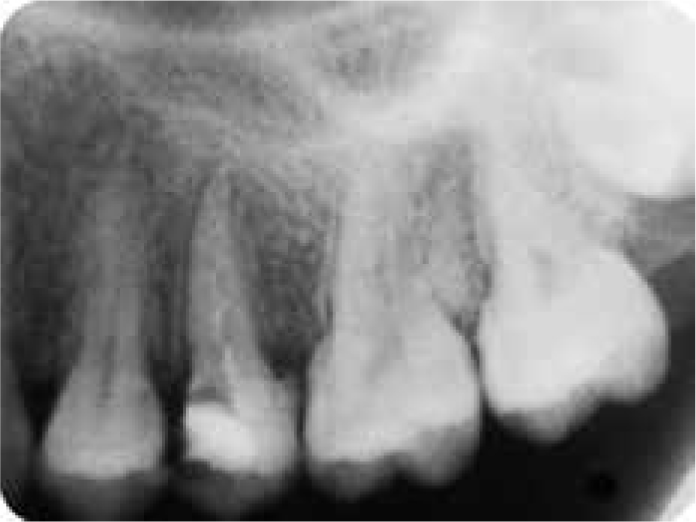
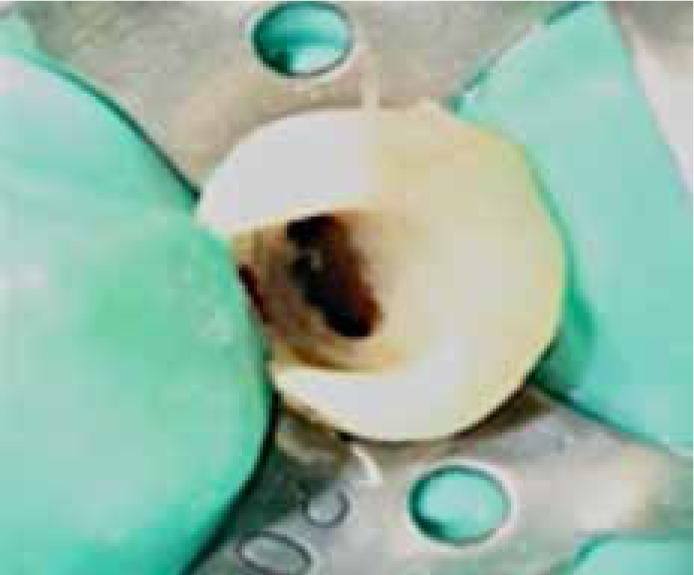
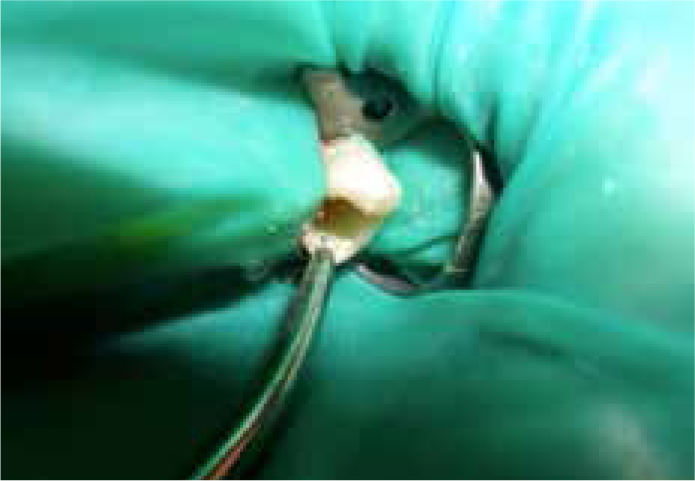
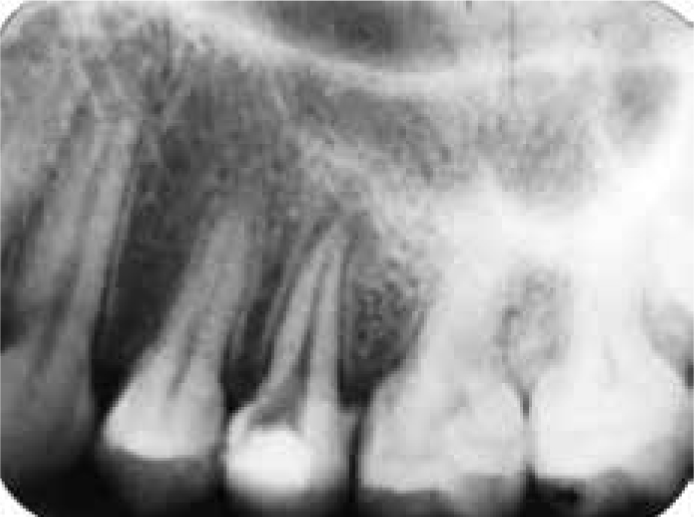
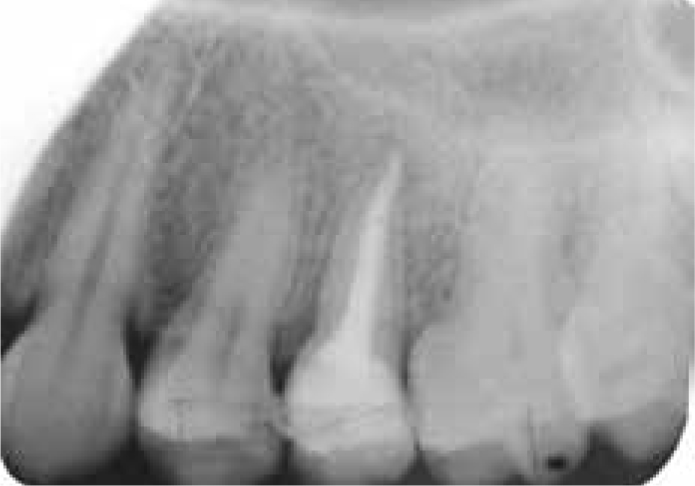
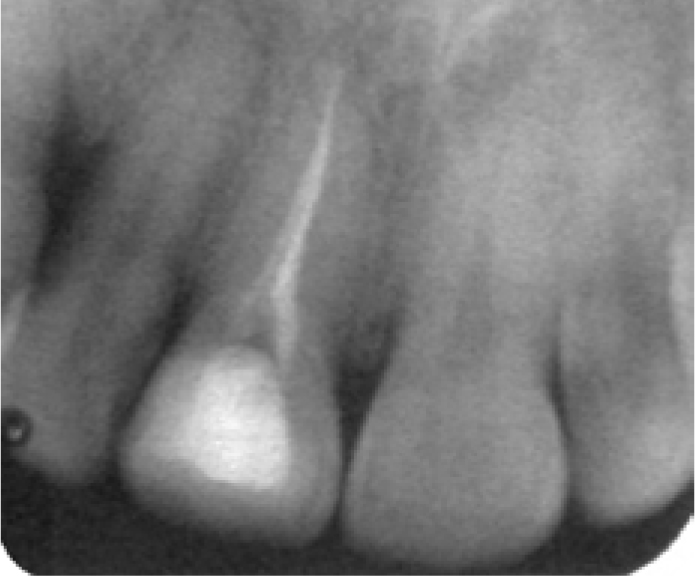
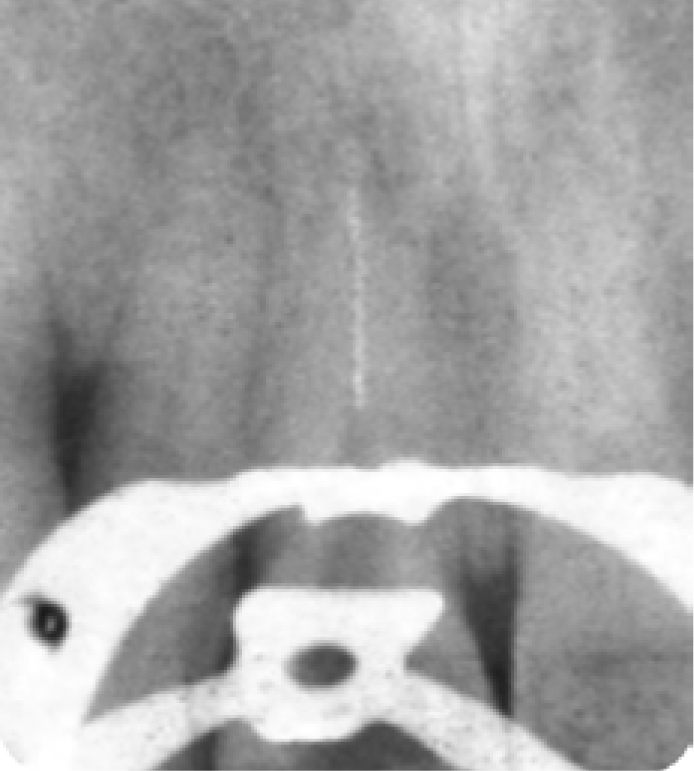
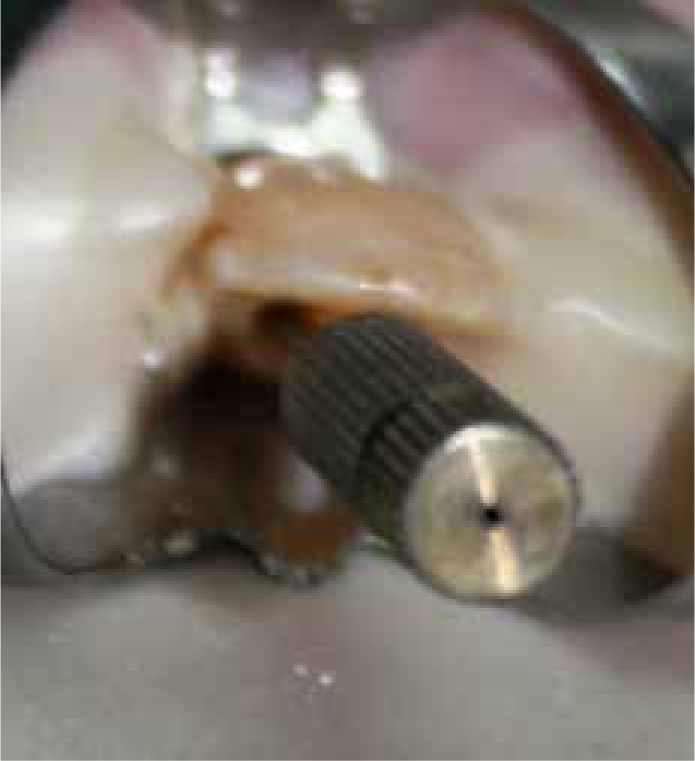
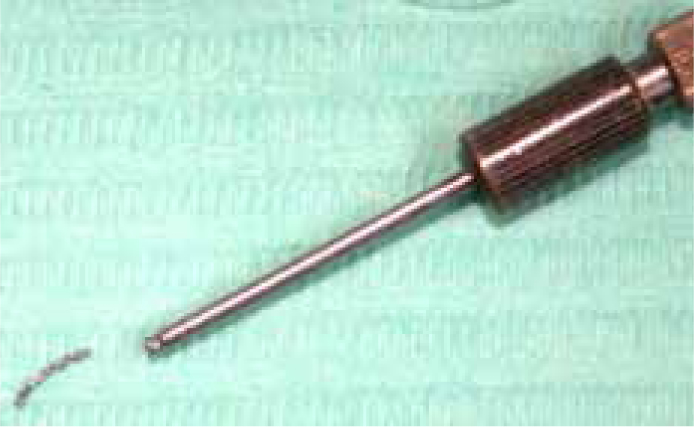
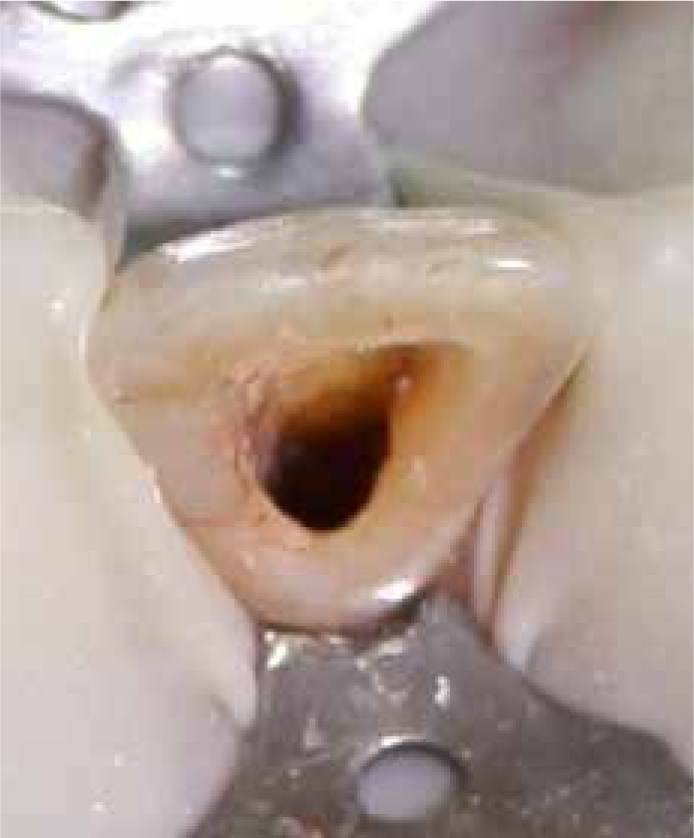
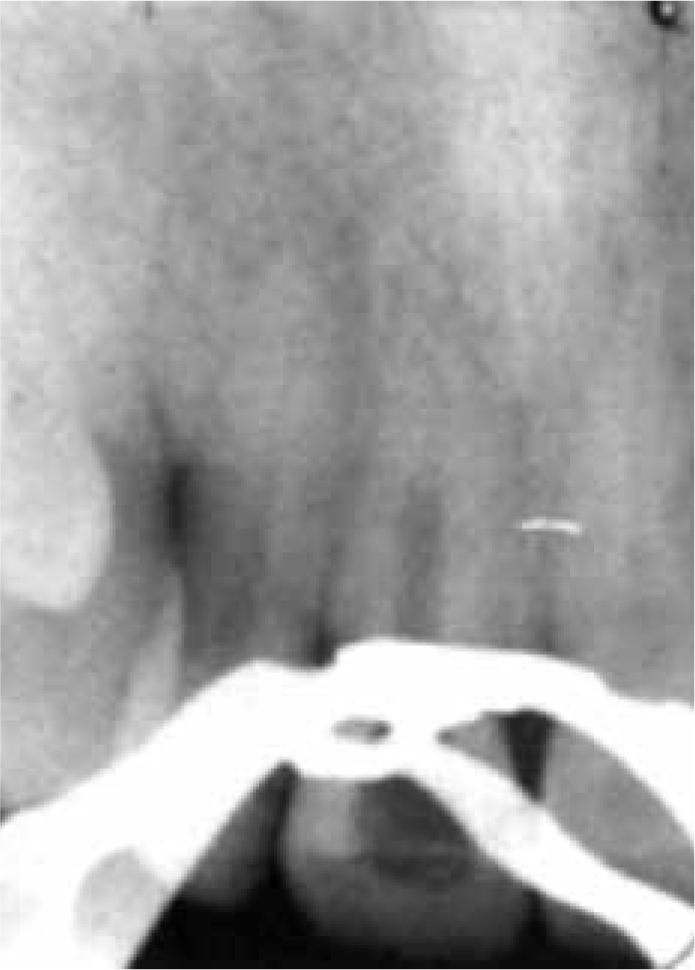
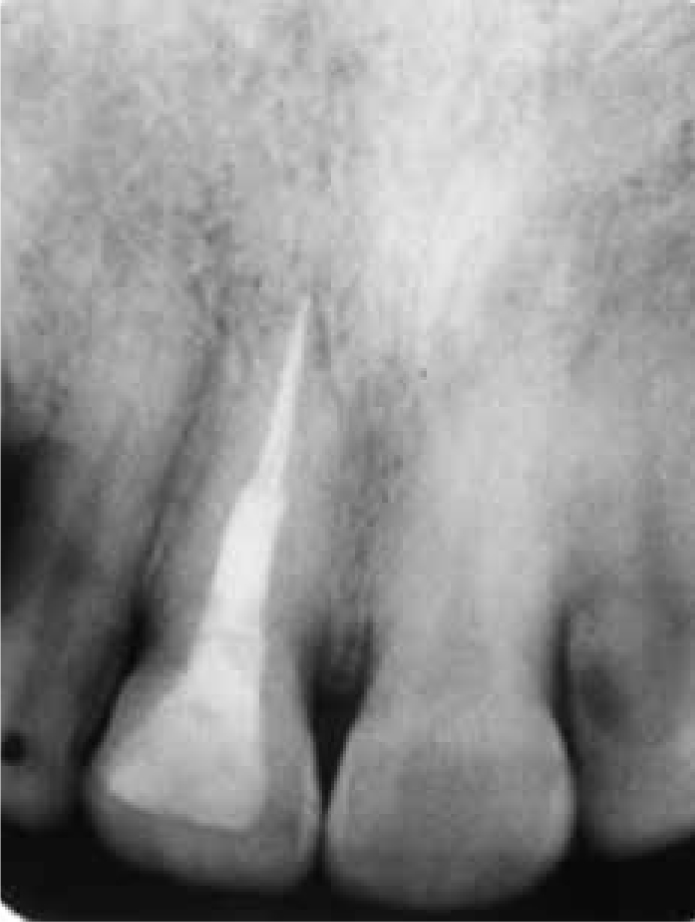
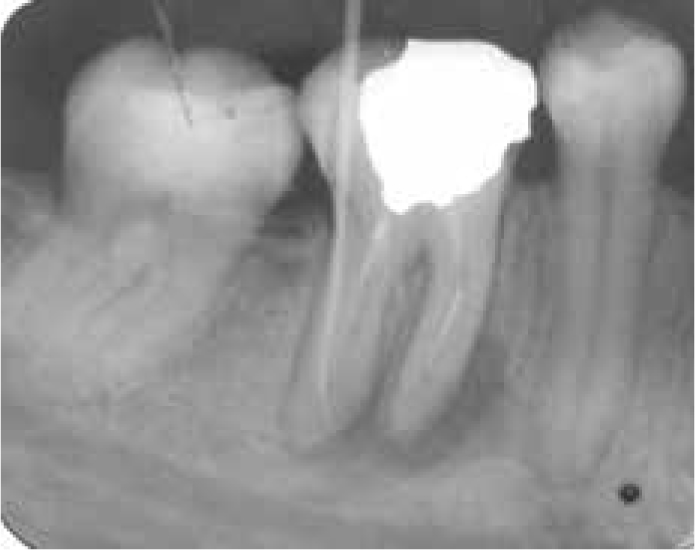
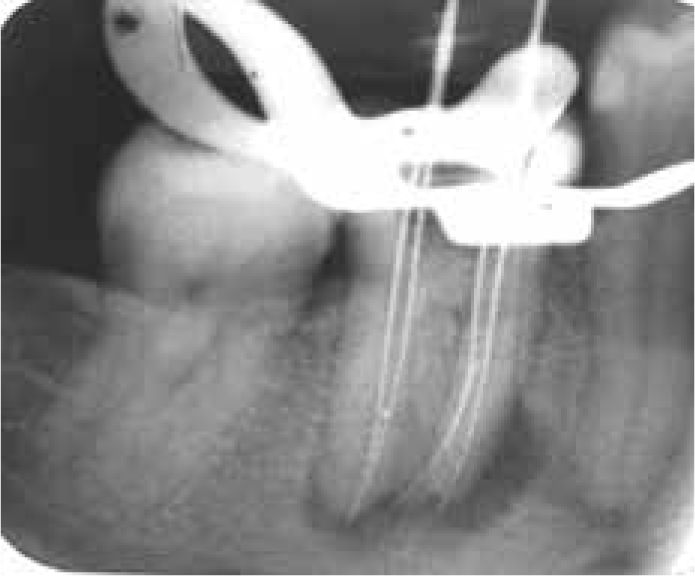
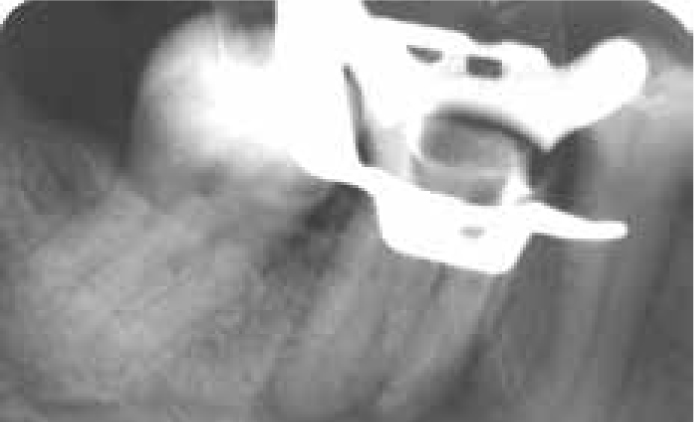
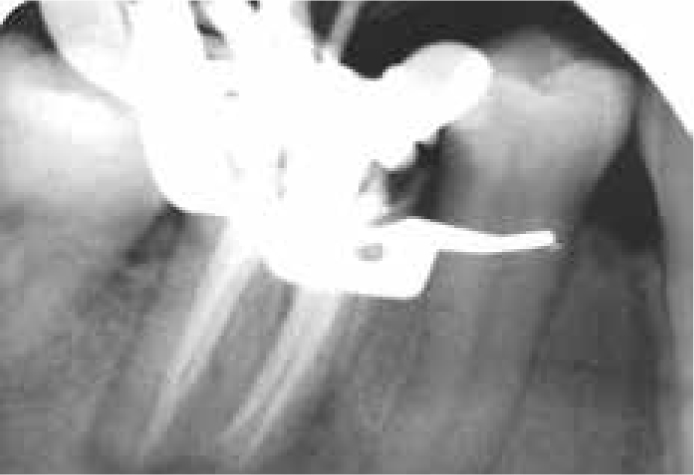
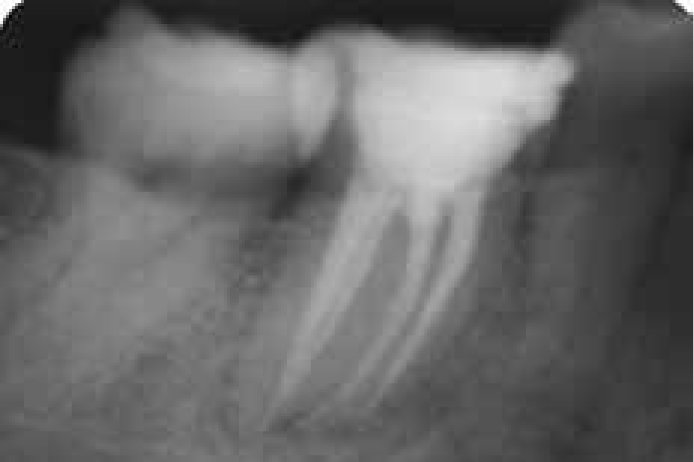
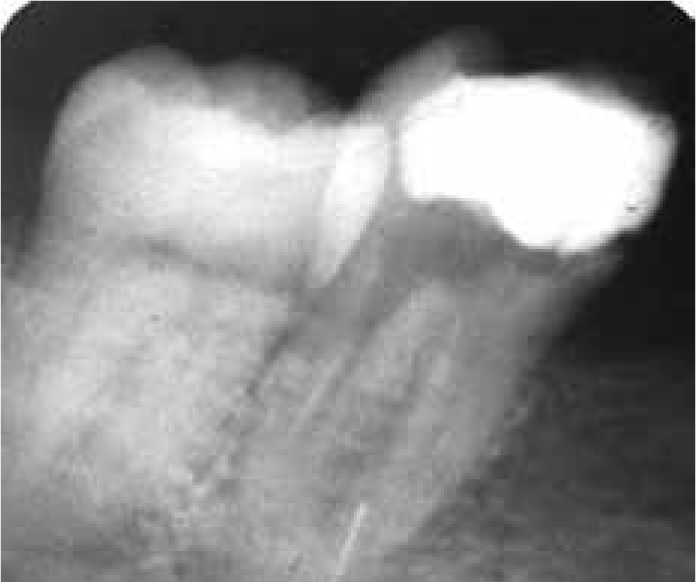
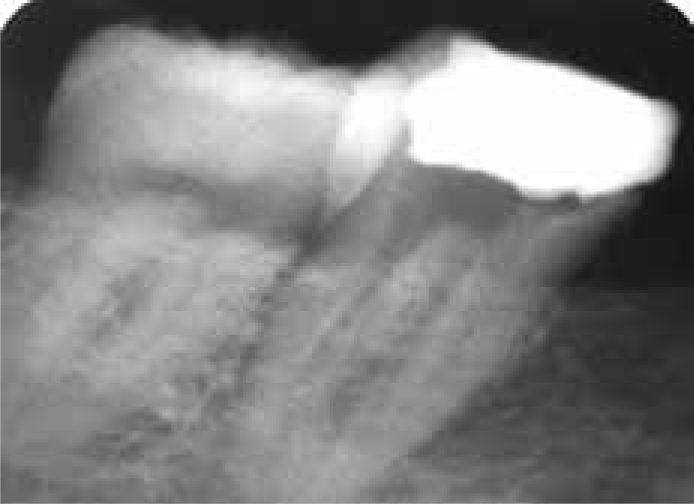
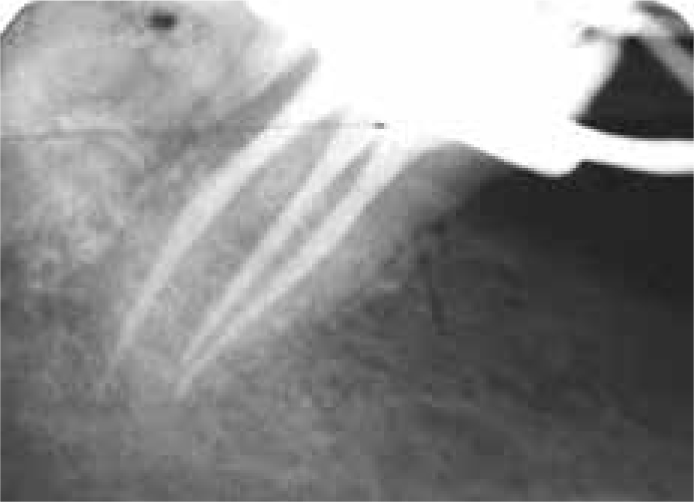
Figure 1. Case 1: Pre-operative radiograph showing a separated lentulo spiral filler extruded beyond the root foramen with a periapical lesion in maxillary left second premolar.Figure 2. Case 1: The coronal end of the fragment extends into the pulp chamber.Figure 3. Case 1: Removal of the fractured instruments using a plier.Figure 4. Case 1: Radiograph showing the completion of file removal. Removal time: 17 min.Figure 5. Case 1: Post-operative radiograph showing the obturated tooth.Figure 6. Case 2: A pre-operative film of a maxillary central incisor shows separated file after attempting endodontic retreatment by the referring dentist.Figure 7. Case 2: The old obturation material was removed but the fractured instrument was still tightly sealed into the root canal. Note the extent of the fragment from coronal third to apical third.Figure 8. Case 2: The coronal end of the fragment located in the coronal third of the root canal.Figure 9. Case 2: Gripping the fragment by Masserann Extractor with plunger sleeving, followed by a counterclockwise mode to ‘unscrew’ blocked instruments.Figure 10. Case 2: The file removed by using the Masserann extractor. Removal time: 30 min.Figure 11. Case 2: Root canal free from the fragment.Figure 12. Case 2: Radiograph showing empty root canal. Note the considerable enlargement of the root canal after removal of the instrument.Figure 13. Case 2: Final radiograph after root canal obturation using vertical condensation showing considerable enlargement of the coronal portion of the canal. Significant ledge formation is evident.Figure 14. Case 3: Pre-operative radiograph of mandibular right first molar showing a fractured instrument located in the middle third of the mesiobuccal root canal. Note the presence of periapical lesion with fistula.Figure 15. Case 3: Fragment bypassed using a small manual stainless steel K-fileFigure 16. Case 3: The instrument was removed after 36 min using an ultrasonically activated fileFigure 17. Case 3: The root canal was cleaned and filled by lateral condensation of gutta-percha.Figure 18. Case 3: A follow-up radiograph shows that healing of the periapical lesion is progressing.Figure 19. Case 4: A pre-operative radiograph of a mandibular second molar showing a fractured F1 ProTaper® rotary file located in the apical third of the mesiobuccal root canal.Figure 20. Case 4: Radiograph showing successful removal of the fractured instrument using a softened 40/0.04 taper gutta-percha, allowed into the distobuccal canal to harden for approximately 3 min. The gutta-percha point and fractured instrument were then successfully removed using careful and delicate clockwise and counterclockwise pulling action. Removal time: 43 min.Figure 21. Case 4: A post-operative film showing completed obturation of root canals after successful removal of the instrument.
Preliminaries
Close inspection of pre-operative radiographs and knowledge of root anatomy is imperative before attempting the removal procedure in any tooth in order to ascertain the relative amount of surrounding dentine and the risk of perforation. Even then, a two-dimensional view of the root may provide an inaccurate estimate of dentine thickness.46
After analysis of the radiograph, the first step is to eliminate any obstructions that prevent direct access to the SI. This is important since the main cause of instrument separation is often the presence of coronary interferences.44,47,48 The clinician must consider the anatomy of the tooth being treated. For instance, in the case of the mesial root of a mandibular molar, a root in which instrument fracture frequently occurs,29,37 there is almost always the presence of an isthmus connecting the mesiobuccal and mesiolingual canal. When attempting to locate the SI in this location, it would be easier and safer to remove dentine at the isthmus between the two mesial canals to free the fragment. Avoid targeting the furcal aspect of the root to prevent strip perforation. The same principle may be applied to the mesiobuccal root of a maxillary molar, where the presence of an MB2 (or mesiolingual) canal is quite common.44
Removing fragments which extend into the pulp chamber
If a file has fractured with the fragment extending into the pulp chamber, or in a position where there is sufficient space around it, then quite often this can be simply removed by using mini-forceps,49 such as Steiglitz forceps (Union Broach, York, PA), Peet silver point forceps (Silvermans, New York, NY), or Endo Forceps (Roydent, Johnson City, TN).
Removing separated instruments from the coronal third
When the SI is located within the root canal, it is generally impossible for the pliers to grip the instrument satisfactorily.21 Since this portion of the canal is generally wide and straight, using an extractor microtube is usually better and faster because it increases retention while gripping the embedded fragment.45 There are several microtube removal methods, both old and new, and the choice is made depending on the diameter of the canal and separated instrument.
Microtube extraction is designed to engage an intracanal SI mechanically. It generally involves positioning the end of a narrow metal tube over the exposed coronal tip of the SI, a circumferential trough around the head of the fragment having previously been created by specialized trephine drills supplied with the system [MasserannTM (Micro-Mega, Besançon, France); Endo ExtractorTM (Brassler, Savannah, GA, USA); Meitrac systems (Hager and Meisinger, Neuss, Germany); Endo RescueTM (Kome/Brasseler, Savannah, GA)] or ultrasonics [CancellierTM (SybronEndo, Orange, CA USA); iRSTM (Instrument Removal System, Dentsply Endodontics, Tulsa, OK, USA); FRSTM (File Removal System, Dentsply Tulsa Dental, Tulsa, OK, USA)]. The tube then engages the fragment mechanically (MasserannTM, IRSTM, MeitracTM, FRSTM, Endo RescueTM) or with the aid of a cyanoacrylate glue (CancellierTM, Endo ExtractorTM).21 When the clinician feels that the tightest grip has been achieved, the entire assembly is rotated in a counterclockwise direction to unscrew the fragment from the dentine and remove it.50
Ultimately, the external diameter of a device dictates how deep it can be safely introduced into a canal, while the internal diameter is selected to be slightly larger than the diameter of the fragment (Table 1).
Extractor System
Reference
Sizes
Inside Diameters of Tubes (mm)
Outside Diameters of Tubes (mm)
Means of Troughing
Mechanism of Fastening
Success Rates
Endo-Extractor System (Roydent)
Gettleman et al, 19912
3 extractors: RedYellowWhite
Red: 0.80Yellow: 0.50White: 0.30
1.5 mm on all
Trephine drill outside diameter 1.6 mm
Applying a cyanoacrylate glue
No studies
The Meitrac Endo Safety System (Hager and Meisinger GmbH, Neuss, Germany)
If the operator does not have access to microtube extraction, other techniques may be considered. A wire loop can be formed by passing the two free ends of a 0.14-mm wire through a 25-gauge injection needle from the open end until they slide out of the hub end. By using a small mosquito hemostat, the wire loop can be tightened around the upper free part of the fragment, and then the whole assembly can be extracted from the root canal. The loop can be either small and circular or long and elliptical in shape, according to canal size and the location of the fragment.26,54
Another technique is the use of a hypodermic needle to trephine around the coronal aspect of the fragment manually.55 The beveled tip of a hypodermic needle can be shortened to cut a groove around the coronal part of the fragment by rotating the needle under light apical pressure. The needle size should allow its lumen to encase the coronal tip of the fragment entirely, which guides the needle tip while cutting so as to remove the minimum amount of dentine.55 To remove the fragment, a cyanoacrylate glue or strong dental cement (eg polycarboxylate) can be inserted into the hypodermic needle and, when set, the complex (needle-adhesive-fragment) can be pulled out delicately in a clockwise or counterclockwise rotational movement. Roughening the smooth lumen by creating small burs can enhance the bond.56 For cases in which glue cannot be used, a Hedstrom file can be pushed in a clockwise turning motion through the needle to wedge the upper part of the fragment against the needle's inner wall.57 When the fragment and the Hedstrom file are interlocked, both can then be gently pulled out of the root canal.41
If the SI is a barbed broach and is not tightly wedged in the root canal, the easiest and fastest technique is to use another small barbed broach with a small piece of cotton twisted around it, which can then be inserted inside the root canal to engage the fragment; then the whole assembly is withdrawn.49
Removing separated instruments from the middle third
When the fragment is located deep in the middle third, the sequence of steps for instrument removal is as follows.
After creating straight-line access to all canals, radicular access to the obstruction is prepared. If radicular access is limited, NiTi rotary or hand files are used to create sufficient space to introduce Gates Glidden drills into the canal orifice safely. The drills are then used in a brush-like manner to create additional space and allow maximum visibility of the obstruction.43
Going in the first time, bypassing may be carried out using stainless-steel hand K-filesTM. The majority of root canal lumens are elliptical in cross-section, which facilitates the bypassing of a SI with a hand K-fileTM; especially when it is lodged in the middle or coronal third.29,58,59 Bypassing attempts should be made with a small hand K-fileTM on the buccal and/or lingual aspect with frequent radiographs to follow the progress of instrumentation and prevent perforations.
Once bypassed, the fragment may be dislodged using an endosonic file. Before activating the file, it is generally recommended that a cotton plug be placed in other canal orifices to prevent the removed segment from lodging in another canal. A K-fileTM is mounted on an ultrasonic handpiece, which is then inserted into the root canal between the fragment and the root canal wall in order to penetrate alongside the broken fragment. The file can then be ultrasonically energized. It is necessary for the K-filesTM mounted on the ultrasonic handpiece to be thinner than the last hand K-filesTM used. The ultrasonic K-fileTM is gently pushed up and down 1 or 2 mm between the fragment and the root canal wall. The broken instrument is usually loosened from the root canal wall because of the ultrasonic vibrations of the energized file. The SI can then be washed out with the irrigant. This method allows for the conservation of the remaining dentine wall of the root canals and can also save time.60
If the attempt to bypass the broken file with K-filesTM fails, the second option is to create a circumferential ‘staging platform’ around the coronal end of the SI. Select an ultrasonic tip that can access the depth of the obstruction and allow contact alongside the fragment. The ultrasonic tip is activated at the lowest possible power setting and used dry. This allows the clinician constant microscopic vision of the energized tip and the SI. An unobstructed view is also essential to maximize success, since ultrasonic tips are most effective when used alongside the SI. Without the microscope, it is easy to come into contact with the top of the SI and push it further into the canal. Careful washing and drying of the operating field is also essential to maintain visibility at all times to prevent procedural accidents.43 For this, a dental assistant uses a triplex syringe to direct a continuous stream of air to blow away dentinal dust, allowing an uninterrupted view of the procedure. The selected ultrasonic tip is then used in a counterclockwise direction around the obstruction, removing dentine and lightly trephining in order to expose the coronal portion. Once the coronal portion of the obstruction is exposed, gently wedge the energized tip between the obstruction and the canal wall while using a sodium hypochlorite irrigating solution in the canal, which will often cause the SI to be freed and removed.
When ultrasonic vibration is ineffective, the next attempt can be to remove the SI with a tube-extractor that has been selected based on the diameters of the canal and SI (Table 2). The periphery of the fragment is exposed and gripped with the tube-extractor. However, if the fragment is tightly wedged into the dentine and efforts to loosen it with manual pressure are unsuccessful, the ultrasonic tip can be applied directly against the exposed end of the fragment and activated under the microscope. The alternate application of the ultrasonic vibration and counterclockwise rotation with the extractor allows the SI to be removed.
Position of SI
Strategy
Pulp chamber
Mini-forceps
Coronal 1/3
First option: extractor microtubeSecond option: ‘wire loop’ or ‘hypodermic needle’
Middle 1/3
First option: bypassing followed by ultrasonic vibrations with ultrasonic K-fileSecond option: ‘staging platform’ followed by ultrasonic vibration with ultrasonic tipThird option: tube-extractorIf unable to display with magnification: ‘Braiding of Endodontic Files’
Apical 1/3
Bypassing followed by ‘softened gutta-percha point’‘Braiding of Endodontic Files’
If visualization is not possible with magnification and/or after attempting to establish straight-line access to the SI, the procedure described above is not recommended because of the risk of perforation and extensive canal damage. This is also the case if the clinician does not have ultrasonics.35 In these cases, the remaining option is ‘braiding’ with Hedstrom filesTM. The first Hedstrom fileTM is gently screwed into the canal alongside the SI, and two further Hedstrom filesTM are introduced to wind around one another, all of which are then withdrawn together. The largest possible size of files should be used with caution because of the possibility of separation of the braided files.61
Removing separated instruments from the apical third
In general, removing SI from the apical third is unsuccessful and may lead to undesired effects.15,31,38,42,43 This is due to the fact that the use of fine ultrasonically-activated instruments is not always possible in more apically located root canal sections because of limited space and visibility.24 Any approach to removing SI in the apical third should always prioritize safety. Therefore, the safest technique is to use a ‘softened gutta-percha point’ as described by Rahimi and Parashos.61 The technique begins with the use of SS Hedstrom filesTM 8, 10 and 15, which can reveal if the instrument could be partially bypassed and whether it is loose within the root canal. Following this, the apical 2–3 mm of a size 40, 0.04 taper gutta-percha point is dipped in chloroform for approximately 30 seconds. The softened gutta-percha is then inserted into the distobuccal canal and allowed to harden for approximately 3 minutes. The gutta-percha point and SI are then successfully removed using careful and delicate clockwise and counterclockwise pulling action.61
‘Braiding of Endodontic Files’ can be used when the fragment is positioned deeply in the canal and not visible and the clinician is relying on tactile sense, or the fragment is loose but cannot be retrieved by using other means.15,29
The ‘Braiding of Endodontic Files’ can also be used when the fragment is not visible because it is positioned deep in the canal, leaving the clinician to rely on touch. This technique can also be used if the fragment is loose but cannot be retrieved by other means.15,29
Removing separated instruments from curved canals
Since curved canals often curve in more than one plane, a significant amount of dentine has to be sacrificed in order to establish straight-line access to the SI, especially in the apical one third of the canal.35 These situations present a particular dilemma for the clinician since no device or instrument removal technique has been described that can result in the successful and conservative removal of SI in the hard-to-reach areas of the canal system.61
The softened gutta-percha removal technique may be tried in this situation since this conservative technique does not require direct vision or straight-line access.5 If this attempt is unsuccessful, it is recommended to leave the fragment in situ, when appropriate, as this is a less destructive option, conserving tooth substance, time and money.23
Conclusion
Although integration of modern techniques into endodontic practice has improved the clinician's ability to remove SI, removal may not always be possible or even desirable. Furthermore, removal of a SI is not without considerable risk, particularly in the apical regions of the root canal. Therefore, when an instrument fractures in the root canal, the clinician must carefully evaluate the options of attempting to remove the instrument, attempting to bypass the instrument, or preparing and filling to the SI.43 The chances of successful removal must be weighed against potential complications.62 When conservative management of a separated instrument fails and clinical and/or radiographic follow-up indicates the presence of disease, surgical intervention may be warranted if the tooth is to be retained.57