Rada RE. Mechanical stabilization in mandibular anterior segment. Quintessence Int. 1999; 30:243-248
Bernal G, Carvajal JC, Muñoz-Viveros CA. Clinical management of mobile teeth. Contemp Dent Pract. 2002; 4:10-22
Sewón LA, Ampula L, Vallit PK. Rehabilitation of a periodontal patient with rapidly progressing marginal alveolar bone loss 1 year follow up. J Clin Periodontol. 2000; 27:615-619
Tarnow DP, Fletcher P. Splinting of periodontally involved teeth: indications and contraindications. NY State Dent J. 1986; 52:24-27
Mosedale RF. Current indications and methods of periodontal splinting. Dent Update. 2007; 34:168-180
Pollack RP. Non-crown and bridge stabilization of severely mobile, periodontally involved teeth. A 25-year perspective. Dent Clin North Am. 1999; 43:77-103
Ozcan M. Inlay-retained FRC restorations on abutments with existing restorations: 6 years results. J Dent Res. 2010; 89:(Spec Iss A)
Mannocci F, Machmouridou E, Watson TF, Sauro S, Sherriff M, Pilecki P, Pitt Ford TR. Microtensile bond strength of resin-post interfaces created with interpenetrating polymer network posts or cross-linked posts. Med Oral Patol Oral Cir Bucal. 2008; 13:E745-752
Vallittu PK, Sevelius C. Resin-bonded, glass fiber-reinforced composite fixed partial dentures: a clinical study. J Prosthet Dent. 2000; 84:413-418
Ozcan M, Kumbuloglu O, User A. Fracture strength of fiber-reinforced surface-retained anterior cantilever restorations. Int J Prosthodont. 2008; 21:228-232
Strassler HE, Brown C. Periodontal splinting with a high-modulus polyethylene ribbon. Compend (Chairside). 2001; 22:610-620
Sewon LA, Ampula L, Vallittu PK. Rehabilitation of a periodontal patient with rapidly progressing marginal alveolar bone loss: 1 year follow-up. J Clin Periodontol. 2000; 27:615-619
Tooth mobility is commonly seen in general dental practice, usually resulting from chronic periodontitis. A fibre-reinforced composite splint may be used to treat mobile teeth successfully. This article will concentrate on the precise steps on how to place such a periodontal splint. Minimally invasive options should always be considered. In long-term maintenance of periodontally involved teeth where the active disease is under control, the periodontal splint can be very helpful as part of a comprehensive periodontal treatment plan.
CPD/Clinical Relevance: A fibre-reinforced composite periodontal splint may improve the masticatory ability and consequently the patient's quality of life.
Article
Periodontal splinting can simply be described as the joining of mobile periodontal involved teeth to one another in order to stabilize the affected teeth. In that regard, mechanical stabilization techniques can provide increased comfort and improve function, especially for geriatric dental patients.1 The ultimate aim of splinting mobile teeth is to restore function and comfort and by so doing promote tooth retention and maintenance of periodontal health.2 In contemporary clinical practice, preservation of mobile teeth is increasingly required, as the older population is averse to losing their teeth for several reasons, including psychological concerns.1 In the past, these mobile teeth were commonly extracted and replaced with a fixed or removable prosthesis. In cases with severe destruction of the periodontium, fixed prostheses, complete or partial dentures and implant-supported prostheses may not be the optimal treatment options. In cases with severe periodontitis, the long-term results cannot be guaranteed and an affordable technique like splinting might provide a suitable and cost-effective solution.3 This article will focus on the technique of placing a direct fibre-reinforced composite splint.
Indications and contra-indications of the periodontal splint4
Indications
Where the patient is experiencing pain and discomfort during mastication;
Where extractions should be avoided due to relevant medical history;
Where multiple mobile teeth, as a result of gradual loss of alveolar bone, will benefit from stabilization;
Where long-term prognosis of advanced periodontally involved teeth cannot be guaranteed;
Where there is already advanced alveolar bone loss and implant placement will be complicated or impossible;
To stop over-eruption or migration of mobile teeth;
To avoid the unintentional loss of a very mobile tooth;
Prior to periodontal treatment, where debridement can cause an unplanned extraction of extremely mobile teeth;
The temporary periodontal splint is used to stabilize mobile teeth during and after periodontal treatment. The temporary splint will assist the healing process after the active periodontal treatment. In such cases, these splints may be removed after successful periodontal treatment;
The periodontal splint is also useful to replace a single missing tooth or to secure a natural tooth pontic directly after an extraction.5
Contra-indications
Where splinting will make oral hygiene procedures significantly more difficult, splinting is not indicated;
Where splinting will adversely interfere with the patient's occlusal guidance;
Where the oral hygiene is not acceptable and not improving after appropriate instruction;
There is little evidence that splinting of periodontally involved teeth would improve the prognosis of periodontal disease.1
To summarize these indications and contra-indications it is worth referring back to two articles5, 6 by key opinion leaders in splinting:
Roger F Mosedale: ‘Used correctly, periodontal splinting can greatly improve the comfort, prognosis and outcome for a patient with serious periodontal disease. But used incorrectly, splinting can cause further deterioration in periodontal health’.⁵
Ralph P Pollack: ‘After analysing forces and stresses on the periodontium for more than 30 years, that stabilization of severely mobile teeth can retain teeth, if in health, almost indefinitely.6
Types of splints
Light-cured composite without reinforcement. The success of this stabilization technique has its limitations due to the current properties of composites, and repairs are often necessary.
Orthodontic stainless steel wire bonded to the affected teeth with composite. The principal problem with these splints may be that the resin can break away from the metal because of a lack of chemical integration between the metal and the composite.
Composite reinforced with braided wires or a metal wire mesh. With this method a groove or channel is prepared in the clinical crowns of the teeth to be splinted. The wire or mesh is then bonded into the channel with flowable composite and covered with composite.1
Indirect cast metal splints. They were often used when a missing tooth had to be replaced using the same concept as a conventional Maryland resin-bonded bridge. The main disadvantage of this type of splint was the frequency of bonding failure. This technique was also expensive and time-consuming due to impression-taking and the fact that the services of the dental technician was required.
Fibre-reinforced composite materials. The fibre-reinforced composite periodontal splint has been reported as the optimal method for direct periodontal splinting.
Many different manufacturers' products are available, examples being; Fiberkor (Jeneric/Pentron), Vectris (Ivoclar), EG Fibres (Kuraray/Japan) and everStick® (GC Corporation Tokyo Japan). The everStick® range of fibres has proved to be popular in the UK as their use is backed up by more than 300 scientific papers with many years of clinical follow-up data.7 The everStick® products have the interpenetrating polymer network (IPN), which provides excellent properties for bonding with composite materials, adhesives and resin cements.8 The fibre bundles consist of silanated glass fibres impregnated with a PMMA (polymethylmethacrylate) polymer and Bis GMA matrix.9,10,11 Each fibre bundle is also surrounded by a PMMA outer layer. Otherwise, the components of the fibre-reinforced composite are the same as that of a composite. In essence, it is only the shape and the size of the glass-filling particles that differs. In fibre-reinforced composites the filling particles are unidirectional glass strains instead of small glass particles. These glass strains provide exceptional strength to the fibre bundle and there is an intimate bond between the fibre bundles and the composite restorative material, which results in a reliable strong periodontal splint, capable of handling the masticatory forces. The impregnated fibre glass reinforcement materials, like the everStick® products, are popular⁵ due to the ease of use and minimally invasive nature of these products.
Advantages of the fibre-reinforced composite splint
Can be placed precisely without blocking the interdental triangular areas which should be kept clear for oral hygiene purposes;
Minimal interference to the occlusion (especially in the mandibular anterior segment on the lingual aspects of the teeth);
Minimally invasive technique as there is no need for intra-coronal preparation when a surface retainer fibre splint is placed;
The end result is aesthetic as the fibre bundle is tooth-coloured and, in most cases, is placed on the lingual surfaces of the teeth involved;
The procedure is relatively simple − see the step-by-step procedures in this article;
The treatment is cost-effective;
Repairable if necessary;
Less chance of catastrophic failure.
Step-by-step instructions
Pre-operative assessment and important aspects to remember when placing the fibre splint
The mandibular anterior segment from canine to canine will be used as an example for the splinting procedure, as this is the area in the mouth most frequently treated with a periodontal splint.12 In this case, the everStick®PERIO fibre bundle (GC Corporation, Tokyo, Japan) was used as the reinforcement for the periodontal splint:
Before undergoing the clinical procedure, it is important to train one's dental nurse on a model and show the dental nurse where and how to cure the fibres correctly;
A curing light with a narrow tip is easier for precise tacking of the fibre;
In cases where there is insufficient occlusal clearance (eg a complete Class 1 occlusion) an intra-coronal splint rather than a surface-retained splint should be considered on the palatal aspect of the upper anterior teeth. A labial splint on the upper anterior teeth is another option that can be considered. In some cases, with ‘a problematic close bite’, two small sectional splints on the labial surfaces from the upper laterals to canines, together with the palatal splint from canine to canine, is an excellent addition for strength. The two additional labial fibres will counteract the heavy occlusal forces present on these canines;
EverStick®PERIO fibres should be positioned close to the incisal edge in order to minimize the forces to which the splint will be subjected. The splint should also not interfere with the occlusal contacts, eg on the palatal surface of the upper anterior teeth. Assess the occlusion after completion of the splint, if any premature contacts are detected with articulation paper, these should be equilibrated;
The splint is normally placed in two stages − first, etching and application of bonding agent, followed by flowable composite on the labial inter-proximal areas, and then the second stage with etching and application of bonding agent, followed by placing the fibre bundle on the lingual side;
Make sure all fibres are covered with a thin layer of composite.
Tooth preparation
EverStick®PERIO fibres can be used in surface-retained and intra-coronal splints on the lingual/palatal, labial and occlusal surfaces of the teeth. The steps for the intra-coronal splint are the same as for the surface-retained splint except for the preparation of a groove, mesial to distal, in the teeth to be splinted.
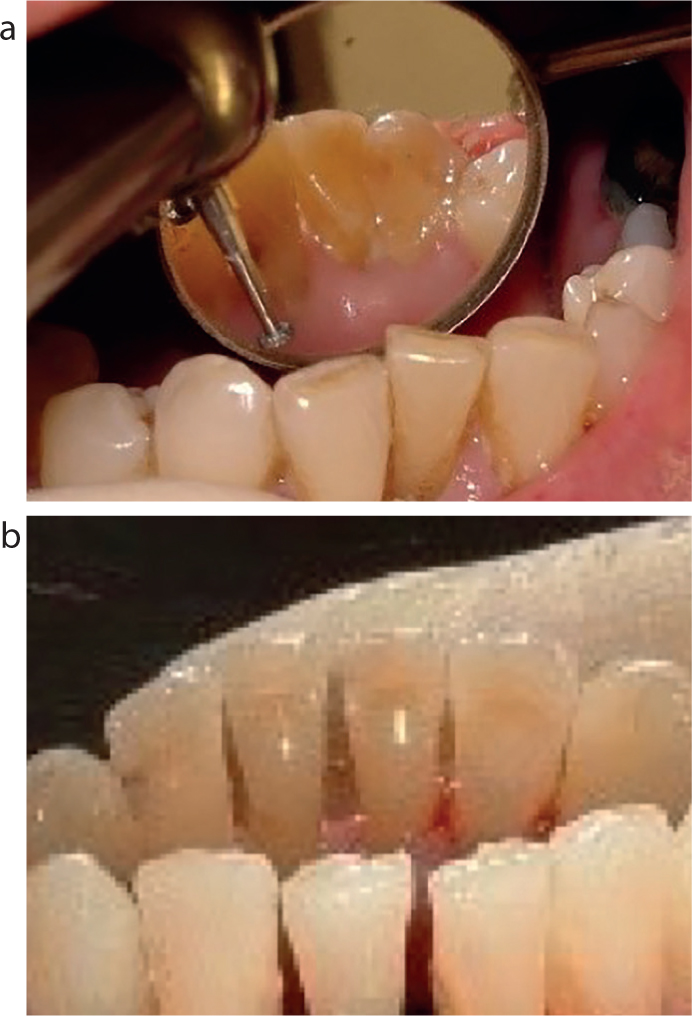
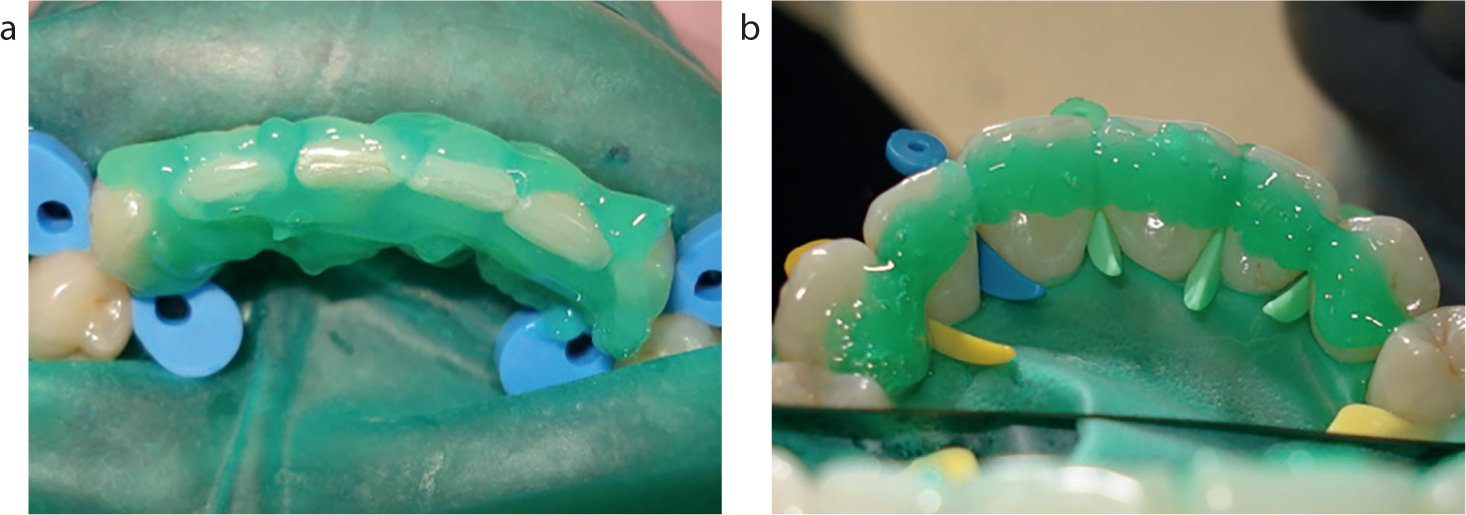
The groove is normally prepared on the lingual side of the mandibular anterior teeth. The groove should be shallow and should not extend through the enamel of the teeth − this will ensure the best bonding result. Most cases can be performed without local anesthetic with a round diamond bur about a 1 mm in diameter in the air-rotor handpiece (Figure 1).
Figure 1.
(a, b) Groove prepared with a round diamond bur about a 1 mm in diameter in an air-rotor handpiece.
The fibre bundle should be in close contact with the surfaces of the teeth. To enhance the bonding strength, all tooth surfaces should be thoroughly cleaned with a paste of pumice and water. Make sure that all calculus is removed from the teeth. The best bonding results will be obtained if the enamel surfaces are slightly roughened with a fine diamond bur and/or particle air abrasion (Figure 2).
Figure 2. The enamel surfaces are slightly roughened with a fine diamond bur and/or particle air abrasion for the best bonding results.
The labial side is also prepared where the mobile teeth will be stabilized with flowable composite (Figure 2). The preparation of the teeth to be bonded is a very important aspect of the splinting.
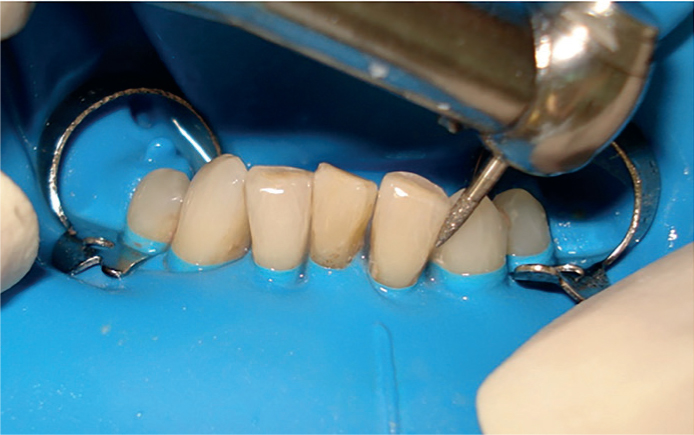
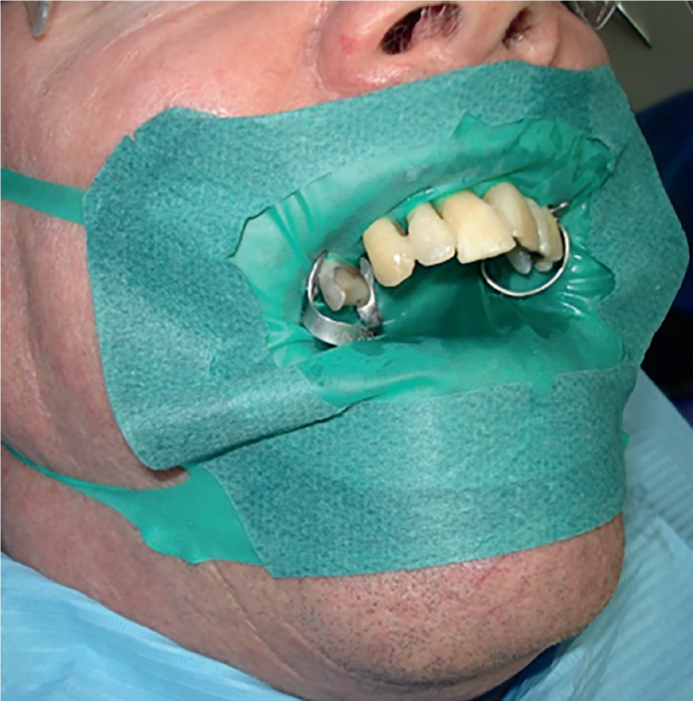
Isolation
Rubber dam isolation is the optimal method of moisture control when splinting (especially the lower anterior splint). It will simplify the procedure for both the clinician and the patient. Never attempt to place a lower periodontal splint without rubber dam isolation. The DryDam® (Directa Dental Group, Sweden) is suitable for the procedure as no rubber dam frame is involved (Figure 3).
Figure 3. Isolation with rubber dam isolation is the optimal method of moisture control when splinting.
Material selection
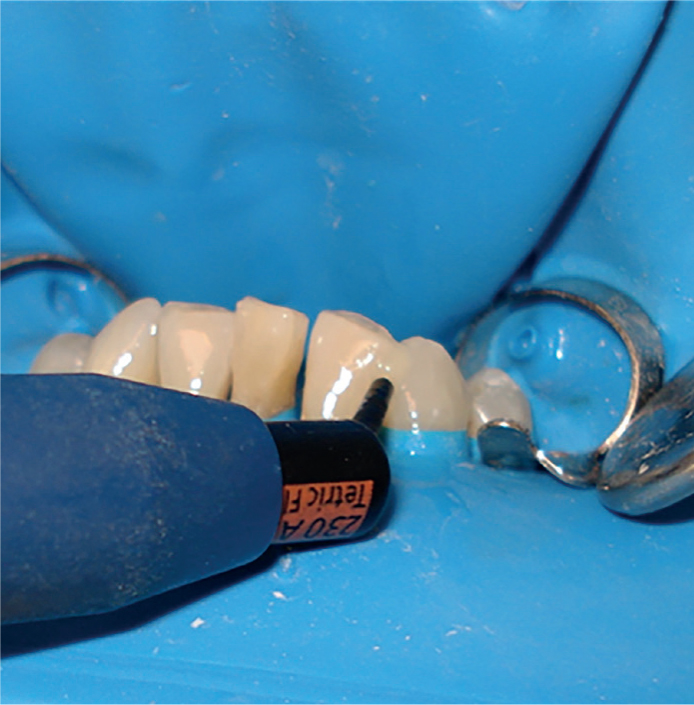
The EverStick®PERIO (GC) is a popular fibre for splinting mobile teeth. The fibre is bonded to the teeth using a flowable light cure composite (eg G-aenial™ Universal Flo A3, GC Corporation, Tokyo, Japan). After placement, the fibres are covered with a layer of composite (eg G-aenial™ anterior A3, GC Corporation, Tokyo, Japan).
Handling the fibres
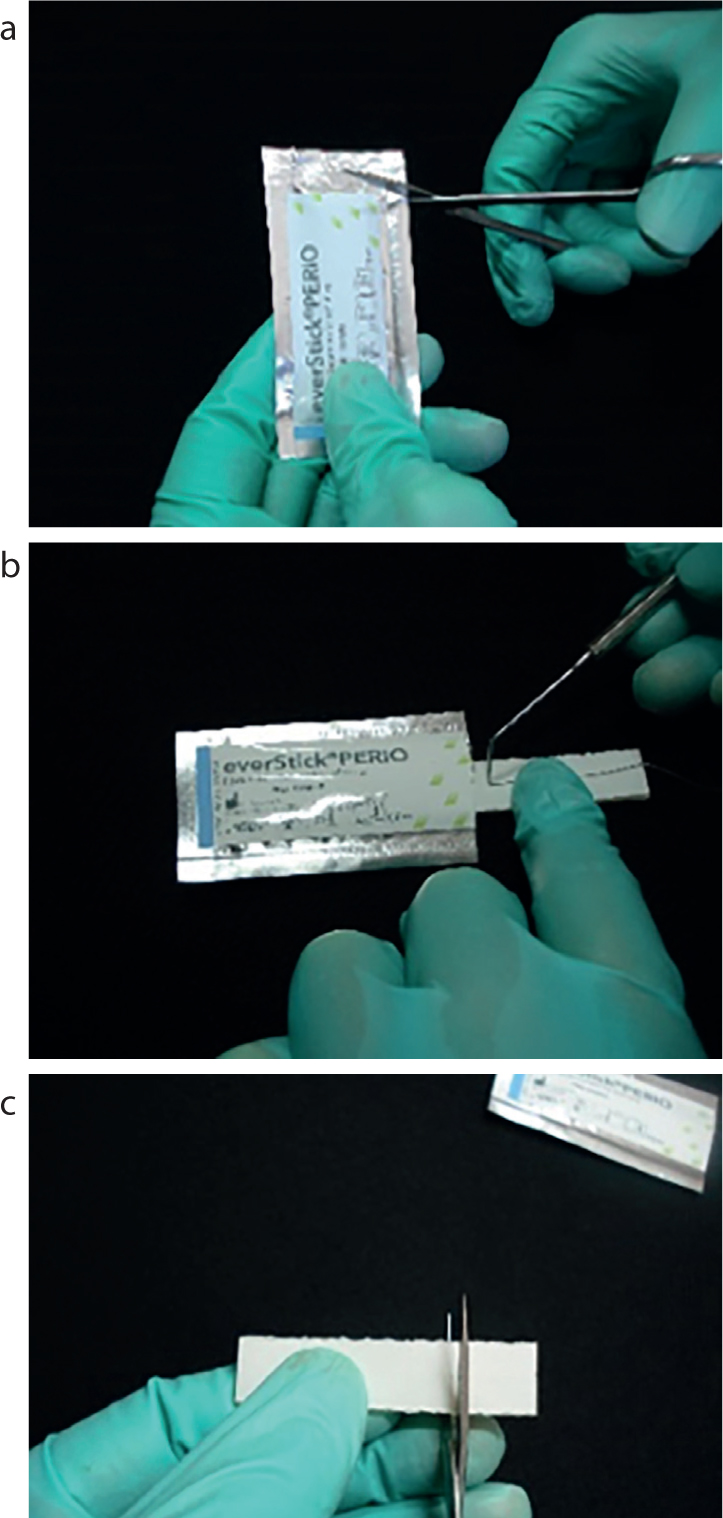
Measure the length of fibre required for the periodontal splint by using a piece of ligature wire or dental floss. The ligature wire can be pushed into the inter-proximal areas in order to give a more accurate measurement. This is done intra-orally and, in most cases, will be from canine to canine. Always measure the fibre to be slightly longer (about 2 mm) than necessary as some of the length will be taken up by pushing the fibres in between the teeth. Open the foil package with a pair of scissors (Figure 4a). Pull out the fibres, bedded in a silicone package, using tweezers and mark the desired length of fibre (Figure 4b). Cut the fibre together with the silicone package using scissors (Figure 4c). Cover the cut piece of fibre to protect it from light; to prevent premature curing of the fibres. Replace the remaining fibres and carefully seal the foil envelope by using the sticker provided for this purpose. Store the remaining fibres in a refrigerator (at a temperature of 2–8° C, 35–46 °F)
Figure 4.
(a) Opening the foil package with a pair of scissors. (b) Fibres removed using tweezers and the desired length of fibre marked. (c) Scissors used to cut the fibre together with the silicone package.
Adhesion
Etch all surfaces and inter-proximal spaces thoroughly with 37% phosphoric acid, following manufacturer's instructions. A wide area should be etched (Figure 5) to ensure maximum bonding area. It is recommended that the enamel should be etched for 20 seconds to obtain a properly etched surface. The surfaces should be well rinsed and air-dried after etching.
Figure 5.
(a, b) Etch a wide area to ensure maximum bonding.
Stabilizing the mobile teeth on the labial side
The mobile teeth should be stabilized on the labial side with flowable composite. The composite should be bonded after etching and bonding, as this will contribute to the strength of the fibre splint. The labial composite should be finished to establish an aesthetically pleasing end result (but should not be removed completely) (Figure 6).
Figure 6. The labial composite should be finished to establish an aesthetically pleasing end result.
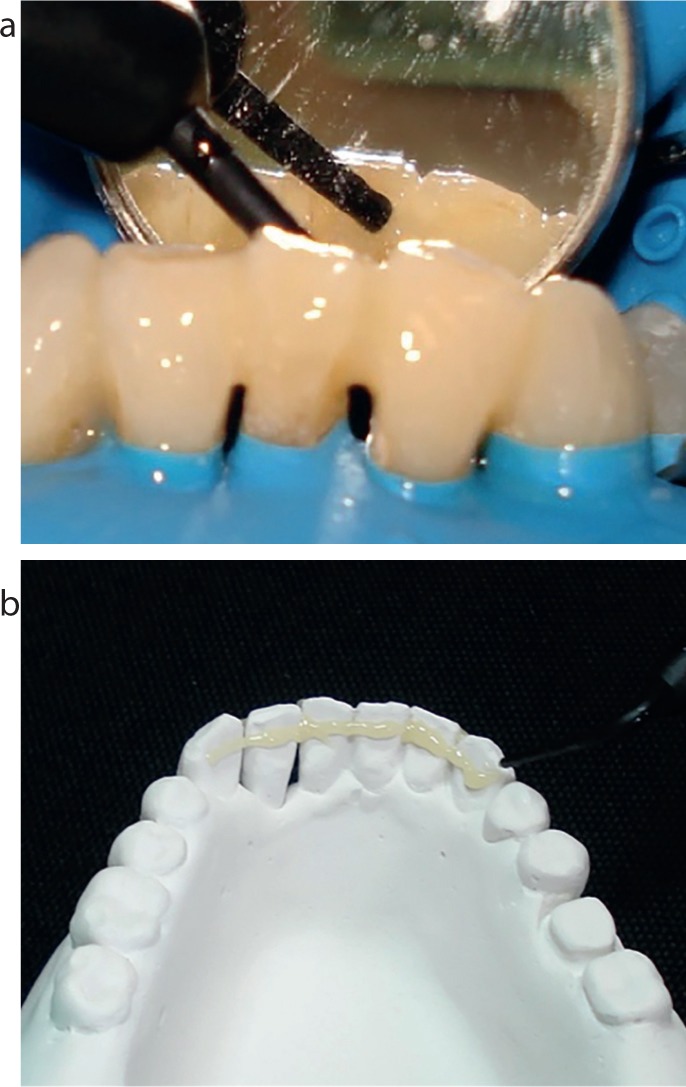
Apply flowable composite (luting cement for the fibre bundle)
The flowable composite should act as a luting cement for the fibre bundle. Apply a thin layer of flowable composite (Figure 7a) on the lingual surfaces of the teeth as well as over the inter-proximal spaces − a continuous layer of flowable composite, as seen on the model (Figure 7b). Ensure that no composite is allowed to go into the gingival embrasure areas. Do not cure the composite at this stage.
Figure 7.
(a, b) Apply a continuous thin layer of flowable composite on the lingual surfaces of the teeth as well as over the inter-proximal spaces.
Light curing
Remove the fibre from the silicone packaging. Place the fibre bundle into the uncured flowable composite and manipulate the fibre bundle into the correct position.
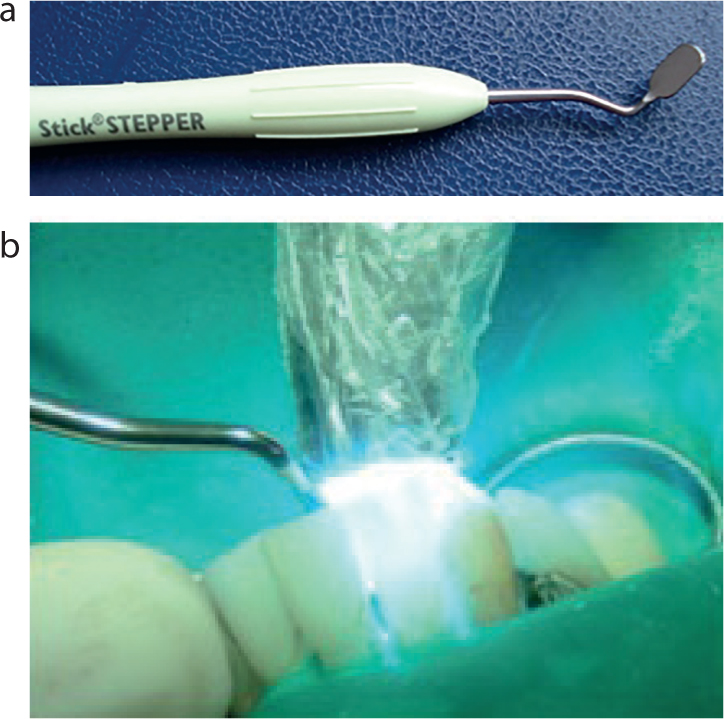
The fibre is now ‘spot cured’ or ‘tacked’ into position. The overhead dental light should be moved away from the oral cavity as the light could polymerize the fibre bundle and flowable composite prematurely before the fibre is tacked into the correct position on the teeth. The Stepper instrument (GC Corporation, Tokyo, Japan) (Figure 8a) is used to tack the fibre into position and to ensure close contact of the fibre to the teeth and inter-proximal areas. It is important that the chairside assistant should position the tip of the curing light close to the fibre and the wide blade of the Stepper instrument (Figure 8b). This will ensure that the wide blade (Figure 8a) will prevent the white light from curing the rest of the fibre. Each tooth should be spot cured or tacked individually for five seconds, five seconds being long enough to cure the fibre in position. To start the ‘tacking process’, place the fibre bundle inter-proximally between the first and second tooth with the Stepper instrument. The fibre could be held down in position onto the first tooth with a hands instrument or thumb nail. The chairside assistant should polymerize the fibre on the left-hand side of the Stepper instrument, for five seconds (Figure 8b). Move the Stepper instrument to the next interproximal area (between the second and third tooth) and repeat this process until the whole splint is cured into position. Once the first tooth is completed, the rest of the procedure is relatively easy. If any voids are detected, fill them with flowable composite. Properly cure the fibre now for 20 seconds per tooth.
Figure 8.
(a) The Stepper instrument is used to tack the fibre into position and to ensure close contact of the fibre to the teeth and inter-proximal areas. (b) It is important that the chairside assistant positions the tip of the curing light close to the fibre and the wide blade of the Stepper instrument.
Composite veneer placement
Hybrid or flowable composite is now used to cover all the fibre material. The uncured composite can now be carefully sculptured and smoothed around the teeth. Conventional composite paste is better for this purpose than the flowable composite. A probe is used to smooth the composite inter-proximally. The composite brush wetted with Composite Primer (GC) will enable the clinician to obtain a smooth surface which will need very little polishing after final curing. The composite is then completely cured.
Finishing and polishing
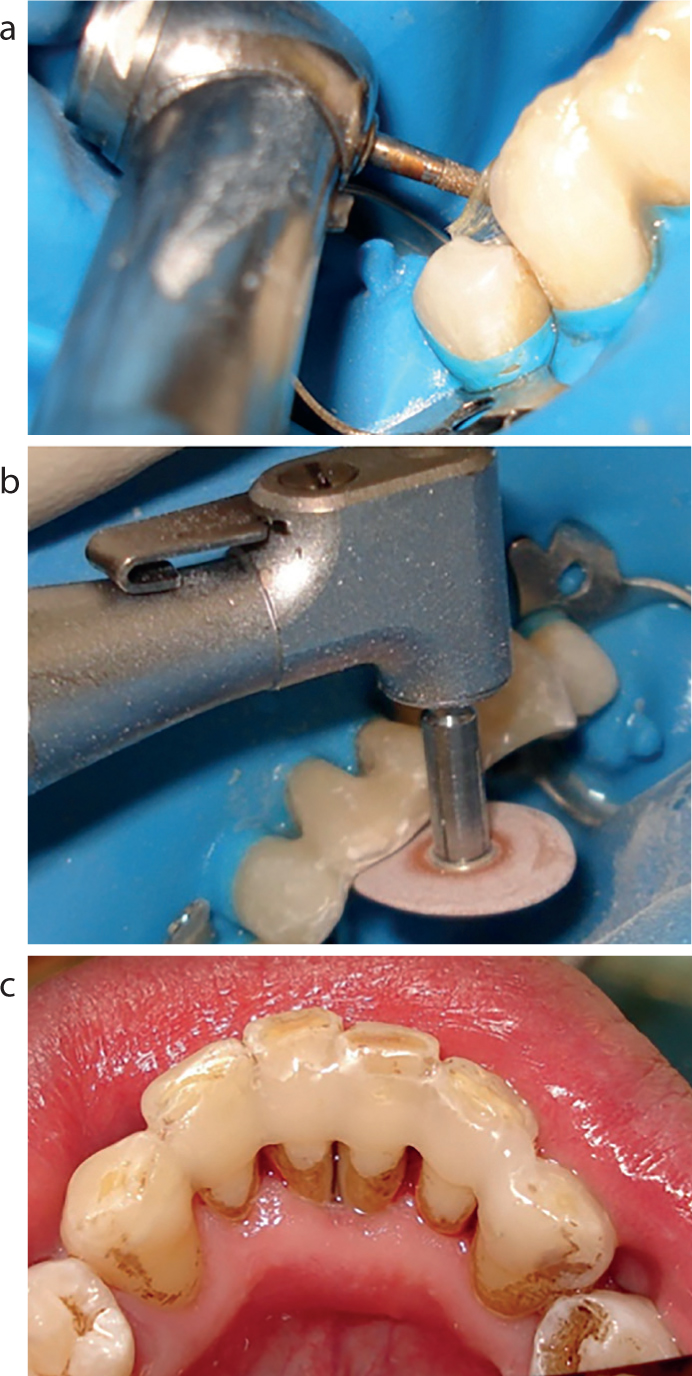
The cured splint is then finished and polished. If the fibre is slightly long it can be cut using a diamond bur in the high-speed handpiece (Figure 9a). The exposed fibres must then be covered with a small increment of flowable composite.
Figure 9.
(a) If the fibre is slightly long it can be cut using a diamond bur in the high-speed handpiece. (b) The splint can then be contoured and polished with a series of finishing and polishing burs, discs, strips and pastes. (c) A well-polished fibre-reinforced composite splint will prevent accumulation of plaque.
The splint can then be contoured and polished with a series of finishing and polishing burs, discs, strips and pastes (Figure 9b). A well-polished, fibre-reinforced composite splint will prevent accumulation of plaque and the patient will get used to the newly placed splint much more easily (Figure 9c). Proper polishing will also improve the longevity and assist with the maintenance of the splint.
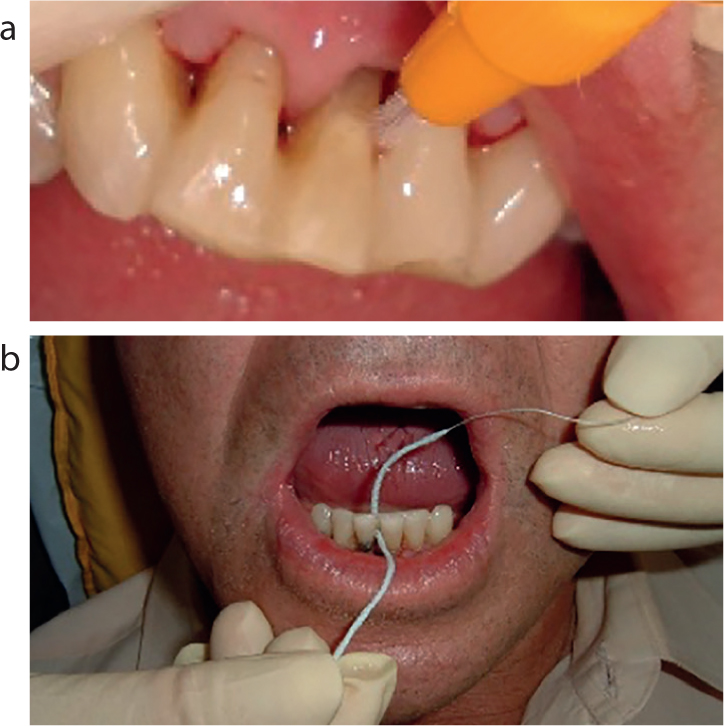
Maintenance
After placing the FRC splint a demonstration of how to carry out interdental cleaning should be given to the patient. The patient should be made aware of the fact that the teeth are joined together and both interdental brushes and Super Floss (Oral B) should be explained and demonstrated (Figure 10).
Figure 10.
(a, b) Both interdental brushes and Super Floss (Oral B) should be explained and demonstrated to the patient.
Conclusion
Splinting of seemingly ‘hopeless’ periodontally involved teeth can be a useful aid as part of the comprehensive periodontal treatment plan. The technique is not complicated and inexpensive and can improve the quality of life of the patient with advanced periodontal disease.13