Mackenzie L, Banerjee A. Minimally invasive direct restorations: a practical guide. Br Dent J. 2017; 223:163-171
Minimata Convention on Mercury. 2013.
van Dijken JW, Hörstedt P. Effect of the use of rubber dam versus cotton rolls on marginal adaptation of composite resin fillings to acid-etched enamel. Acta Odontol Scand. 1987; 45:303-308
Mackenzie L, Shortall AC, Burke FJT. Direct posterior composites: a practical guide. Dent Update. 2009; 36:71-80
van de Sande FH, Rodolpho PA, Basso GR, Patias R 18-year survival of posterior composite resin restorations with and without glass ionomer cement as base. Dent Mater. 2015; 31:669-675
Bohaty BS, Ye Q, Misra A, Sene F, Spencer P. Posterior composite restoration update: focus on factors influencing form and function. Clin Cosmet Investig Dent. 2013; 5:33-42
Gilmour AS, Latif M, Addy LD, Lynch CD. Placement of posterior composite restorations in United Kingdom dental practices: techniques, problems, and attitudes. Int Dent J. 2009; 59:148-154
Wilson NH, Lynch CD. The teaching of posterior resin composites: planning for the future based on 25 years of research. J Dent. 2014; 42:503-516
Mackenzie L, Banerjee A. The minimally invasive management of early occlusal caries: a practical guide. Prim Dent J. 2014; 3:34-41
Laegreid T, Gjerdet NR, Johansson A, Johansson AK. Clinical decision making on extensive molar restorations. Oper Dent. 2014; 39:231-240
Opdam N, Skupien JA, Kreulen CM, Roeters J, Loomans B, Huysmans MD. Case report: a predictable technique to establish occlusal contact in extensive direct composite resin restorations: the DSO-technique. Oper Dent. 2016; 41:(S7)96-108
Blum IR, Younis N, Wilson NH. Use of lining materials under posterior resin composite restorations in the UK. J Dent. 2017; 57:66-72
Burke FJT. From extension for prevention to prevention of extension: (minimal intervention dentistry). Dent Update. 2003; 30:492-502
Ferracane JL. Resin composite – state of the art. Dent Mater. 2011; 27:29-38
Green D, Mackenzie L, Banerjee A. Minimally invasive long-term management of direct restorations: the ‘5 Rs’. Dent Update. 2015; 42:413-426
Banerjee1 A. Minimal intervention dentistry: part 7. Minimally invasive operative caries management: rationale and techniques. Br Dent J. 2013; 214:107-111
de la Peña VA, García RP, García RP. Sectional matrix: step-by-step directions for their clinical use. Br Dent J. 2016; 220:11-14
Ericson D. The concept of minimally invasive dentistry. Dent Update. 2007; 34:9-18
Kidd EA. How ‘clean’ must a cavity be before restoration?. Caries Res. 2004; 38:305-313
Bonsor S. Contemporary strategies and materials to protect the dental pulp. Dent Update. 2017; 44:731-741
Costa T, Rezende M, Sakamoto A, Bittencourt B Influence of adhesive type and placement technique on postoperative sensitivity in posterior composite restorations. Oper Dent. 2017; 42:143-154
Sauro S, Pashley DH. Strategies to stabilise dentine-bonded interfaces through remineralising operative approaches – state-of-the-art. Int J Adhes Adhes. 2016; 69:39-57
Burke FJT, Lawson A, Green DJB, Mackenzie L. What's new in dentine bonding?: universal adhesives. Dent Update. 2017; 44:328-340
Tjäderhane L. Dentin bonding: can we make it last?. Oper Dent. 2015; 40:4-18
Overton JD, Sullivan DJ. Early failure of Class II resin composite versus Class II amalgam restorations placed by dental students. J Dent Educ. 2012; 76:338-340
Sarrett DC. Clinical challenges and the relevance of materials testing for posterior composite restorations. Dent Mater. 2005; 21:9-20
Jung JH, Park SH. Comparison of polymerization shrinkage, physical properties, and marginal adaptation of flowable and restorative bulk fill resin-based composites. Oper Dent. 2017; 42:375-386
Chesterman J, Jowett A, Gallacher A, Nixon P. Bulk-fill resin-based composite restorative materials: a review. Br Dent J. 222:337-344
Shortall AC, Price RB, MacKenzie L, Burke FJT. Guidelines for the selection, use, and maintenance of LED light-curing units – Part II. Br Dent J. 2016; 221:551-554
Mackenzie L. Tooth anatomy: a practical guide Part 1: drawing posterior teeth. Dent Update. 2017; 44:697-712
Featherstone JD, Doméjean S. Minimal intervention dentistry: part 1. From ‘compulsive’ restorative dentistry to rational therapeutic strategies. Br Dent J. 2012; 213:441-445
Sharif MO, Caleugh M, Merry A, Tickle M, Dunne SM, Brunton P Replacement versus repair of defective restorations in adults: resin composite. Cochrane Database Syst Rev. 2010; (2)
The restoration of damaged posterior teeth using direct composite materials is an integral component of contemporary dental practice. Resin-based materials are now routinely used to solve a wide range of restorative problems from the minimally invasive management of early carious lesions to the total restoration of severely worn dentitions.
As there is a wide variation in the teaching and practice of posterior composite techniques worldwide, this paper aims to provide an evidence-based update designed to help clinical teams equip practices with suitable materials and equipment and optimize all clinical stages of posterior composite procedures.
CPD/Clinical Relevance: Knowledge, understanding and advanced practical skill in posterior composite restorations is an essential requirement for contemporary clinical dentistry.
Article
Although amalgam has served dentistry well for over 150 years, its use is declining due to patient and professional demand for tooth-coloured alternatives, which are generally less sacrificial of tooth tissue,1 and as a result of an international environmental treaty aimed at phasing down the use of mercury-containing products.2
The use of resin composites for the restoration of posterior teeth has been an accepted technique since the 1970s.3 It is now a routine procedure in dentistry,4,5 with 100s of millions of posterior composite restorations being performed annually.6
Over the last ten years, encouraging long-term outcomes have resulted in a significant improvement in the reputation of posterior composites7 and, when appropriately carried out, they may be considered to be the optimal method of restoring posterior teeth.8
Resin composite has been demonstrated to be successful in a wide range of clinical applications, from minimally invasive preventive resin restorations (PRRs)9 to the restoration of complex multi-surface cavities,10 and even for the total rehabilitation of severely worn dentitions.11
In the UK and worldwide, dental schools are increasingly recommending composite resin as the material of choice for the restoration of posterior teeth8,12 and experienced clinicians now routinely use it in place of outmoded, destructive indirect techniques.8,12
Despite clear evidence of their significant advantages (listed below), the consensus of the indications for posterior composites is still divided. Disparity and confusion persist regarding case selection and the appropriate materials, equipment and clinical techniques.7,8
Advantages of posterior composites
Promotion of minimally invasive (MI) cavity design;1
Suitable for a wide variety of clinical applications;5
Adhesive techniques may increase the fracture resistance of the tooth/restorative complex;13
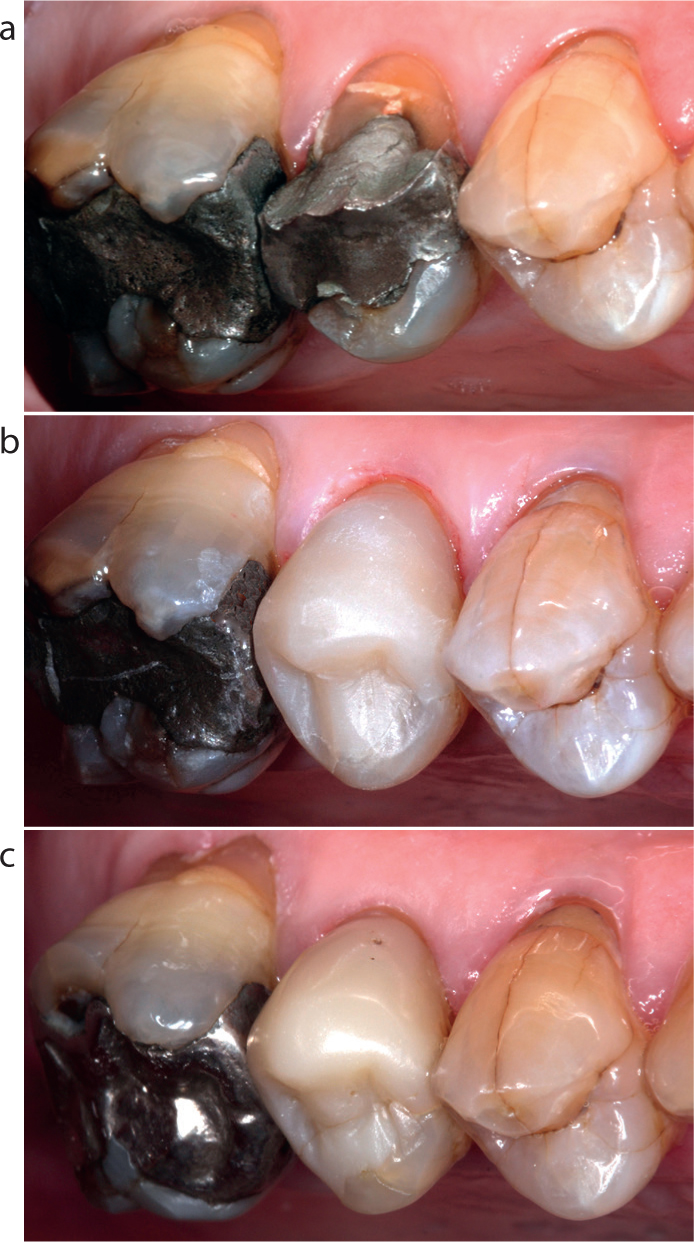
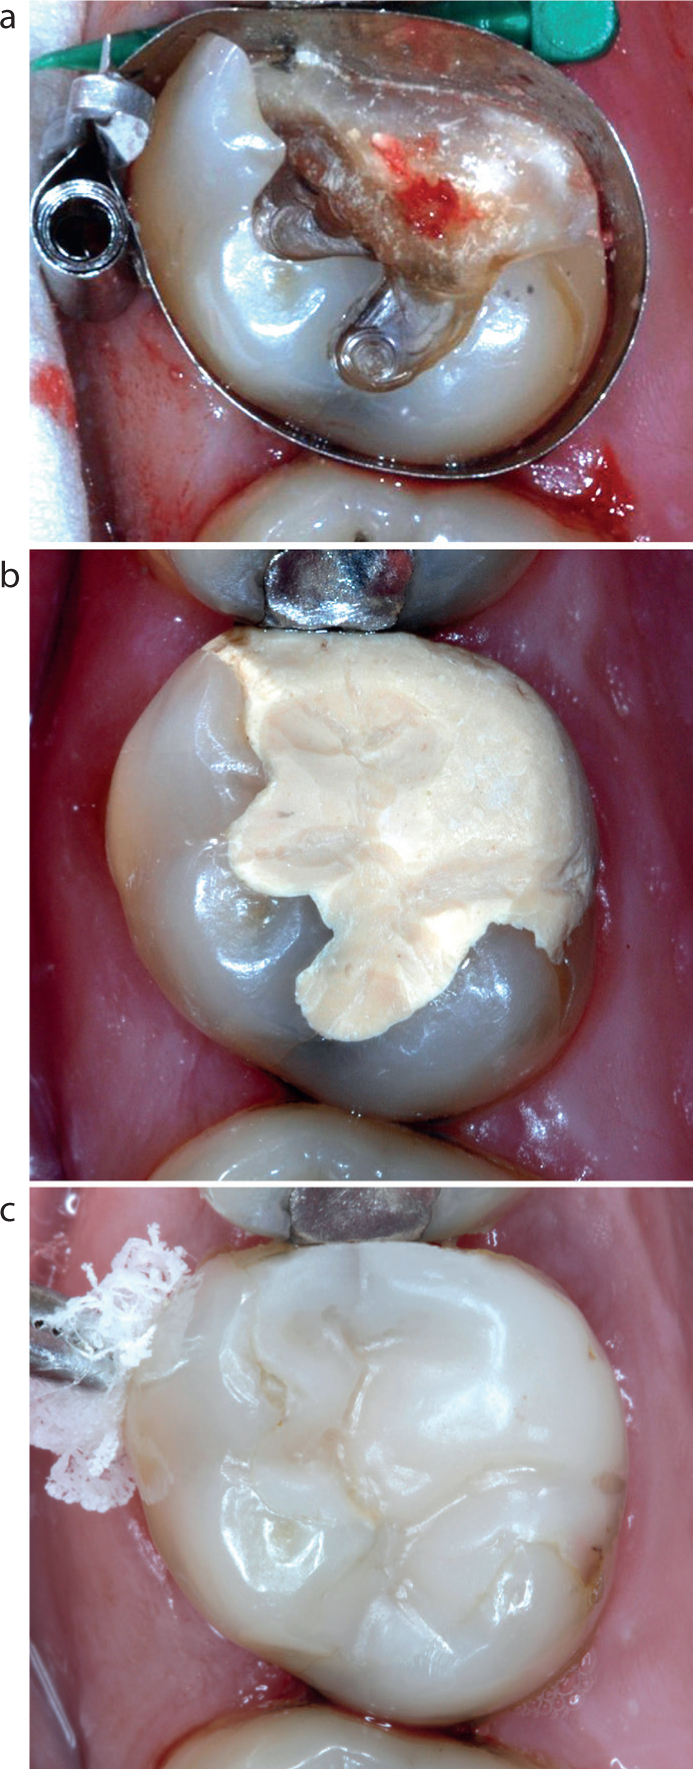
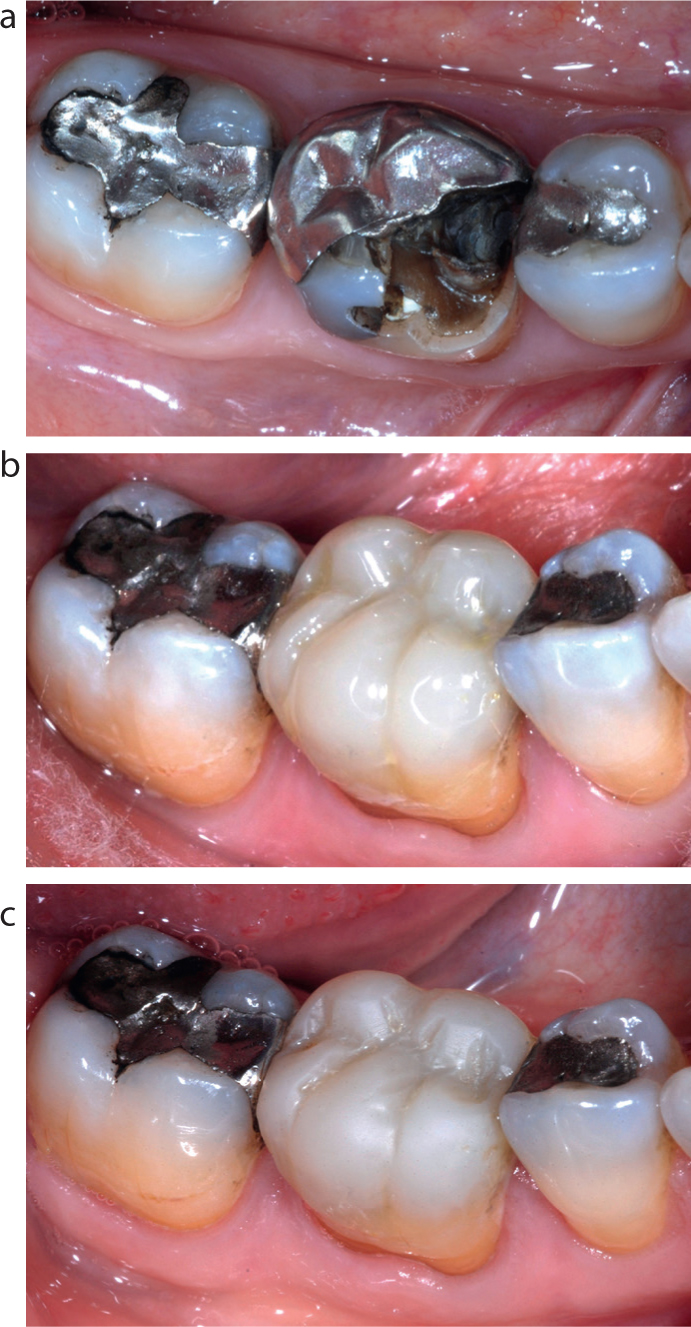
Efficacy for the conservative restoration of aesthetically important teeth (Figure 1);
Satisfies increasing demand for aesthetic restorations;6
Useful for the immediate treatment of fractured teeth;
Resin composite may be easily adapted to all cavity forms;
Sealed restorations promote pulp cell survival and repair and reduce the risk of bacterial microleakage;1
Obviates the need for more destructive indirect restorative techniques;
Clear evidence of comparable longevity to amalgam restorations;7,12
Protection of residual tooth tissue, due to comparable strength (tensile, flexural) to amalgam and feldpathic porcelain restorations;14
Improvements in adhesives and the mechanical, physical and handling properties of composite materials has reduced technique sensitivity;
Better teaching has improved clinical performance;6
Undermined enamel left following cavity preparation can be retained as it will be supported by the underlying bonded material;
When failure occurs, restorations often remain amenable to minimally invasive renovation, repair or replacement;
May be combined with fibre-reinforced composite materials as a framework for bridges and splints;
Leaves future restorative options open.
Figure 1. MODB direct composite restoration: (a) pre-op; (b) immediate- and (c) eight-year post-op.
Disadvantages and contra-indications
While advances in resin composite materials and adhesive technologies have reduced or eliminated most of their historical problems, posterior composites remain technique sensitive, particularly with regard to cavity design, management of operatively exposed dentine, moisture control, contact point formation, adhesive protocols, material/adhesive selection and placement technique,7,8 where failure to manage polymerization shrinkage stress increases the risk of post-operative sensitivity, hard tissue flexure/fracture and microleakage.5
As posterior composites require specialized skills and are demanding in terms of clinical time,4 this paper aims to provide an update of the latest evidence-based protocols that will enable the optimization of every clinical stage of posterior composite restorations.
Case selection
Minimally invasive direct restorative techniques focus on biologically respectful interventions designed to address aetiological factors, maximize preservation of natural tooth tissues and promote smaller restorations of increased longevity that are easy to maintain, renovate and repair and leave future restorative options open, when necessary.1
While more than 50% of all dental procedures involve the replacement of failed existing restorations,15 primary interventions are only indicated where carious lesions have advanced to obvious cavitation and where remineralization techniques have reached their limit. The general aims of restorative dentistry are to:
Replace significant loss of dental tissue;
Eliminate plaque retention and stagnation;
Restore physiological masticatory function;
Minimize the risk of future disease;
Restore aesthetics where appropriate.
As previously described, there are very few contra-indications for the use of posterior composites, but patients must be made aware that:
Meticulous moisture control will be required throughout adhesive procedures and may involve rubber dam isolation;
Appropriate surgery time will be required, which may be greater than that for an amalgam restoration;
Post-operative complications may be likely if restorations are not adequately adapted and polymerized or if there is incomplete control of the problems associated with polymerization shrinkage stress;
Composite should be avoided in rare cases of hypersensitivity to resin-based materials and/or adhesives.
Regardless of material, the clinical survival of dental restorations is often poor15 and becomes significantly worse as they increase in size and complexity.6
Pre-operative assessment
Pre-operative assessment should include a detailed risk analysis because, in poorly motivated, high-risk patients, adhesive restorations show reduced long-term survival.1
Periodontal and pulp status should be assessed using appropriate investigations including radiographs, where justified.16
Prior to isolation, intercuspal and excursive occlusal contacts should be assessed. Preparation outlines should be designed to avoid heavy loading on restorative margins. Photography of pre-operative articulating paper marks provides a useful reference to help reduce finishing time and enables the accurate reproduction of the occlusal scheme.
Opposing and adjacent teeth should be examined and, if their position or contour is likely to compromise successful restoration, they should be adjusted appropriately.
The shade should be recorded before isolation, as teeth rapidly dehydrate and lighten in colour.4 A proprietary shade guide may be used, or a test sample of composite may be applied to the tooth and light cured (as there may be a shade shift on polymerization). Shape is a more important functional and aesthetic consideration than shade and a slight shade mis-match assists finishing and will reduce the risk of cavity enlargement during restoration removal.
Isolation
Good moisture control is critical to the success of all adhesive procedures. While rubber dam is widely accepted as the optimal method of isolation,3 it is rarely or never used by the majority of practitioners, who cite poor experience, time and financial constraints, inadequate training and limited benefit as barriers to its routine use.7
It has been demonstrated that good results may be achieved with cotton wool rolls and aspiration.7 This technique also allows immediate occlusal adjustments.1
To improve skills with rubber dam, repetitious practice is recommended, beginning with simple, single hole isolation for Class I cavities. Isolation of Class II cavities requires a minimum of three dam holes and the rubber dam clamp should be placed on a tooth distal to the one being restored.
In deep Class II cavities, it may be necessary to cut the dam interproximally to prevent it impinging on the cervical margin of boxes and hindering matrix placement.17
Cavity preparation
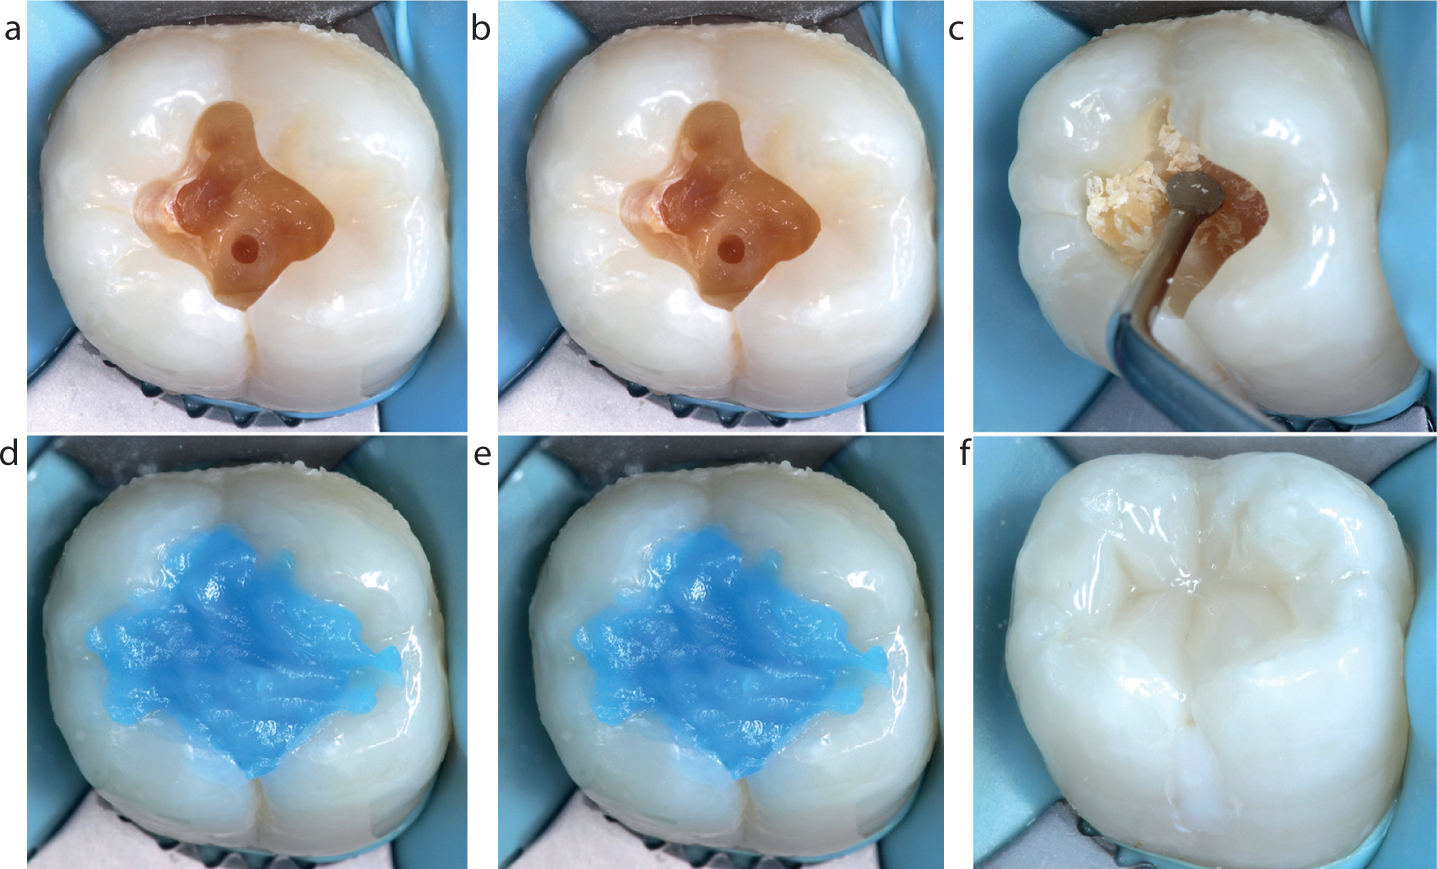
As small restorations last longer than large ones it is important to maximize the amount of residual tooth structure.18 The rationale behind minimally invasive cavity preparation may be summarized as follows,1,19 and is illustrated (along with the restoration) in Figure 2.
Access to caries is limited to that which enables visualization and excavation of soft, irreversibly demineralized dentine;
Existing restorations should be carefully removed to minimize cavity enlargement;
Fragile enamel prisms should be removed as they may fracture under compressive/shear occlusal loads and from tensile polymerization shrinkage forces. Fine composite finishing burs may be used for this purpose;
Soft, irreversibly demineralized, carious dentine should be carefully excavated using appropriate instruments;
The excavation endpoint is determined by lesion texture (not colour) and is ceased immediately when leathery/firm affected dentine is reached;
To reduce the risk of pulpal exposure, acid-damaged affected dentine should be retained. Its collagen has the potential to repair and also exhibits adequate adhesive bonding potential;
Every effort should be made to preserve sound marginal enamel to optimize bonding, as dentine-bonded interfaces have been shown to degrade with time;
No extension into sound fissures is indicated;
Bevels are not recommended on occlusal surfaces, as thin restorative margins are liable to fracture;
The use of magnification (+/- light) facilitates minimally invasive preparation and caries excavation;
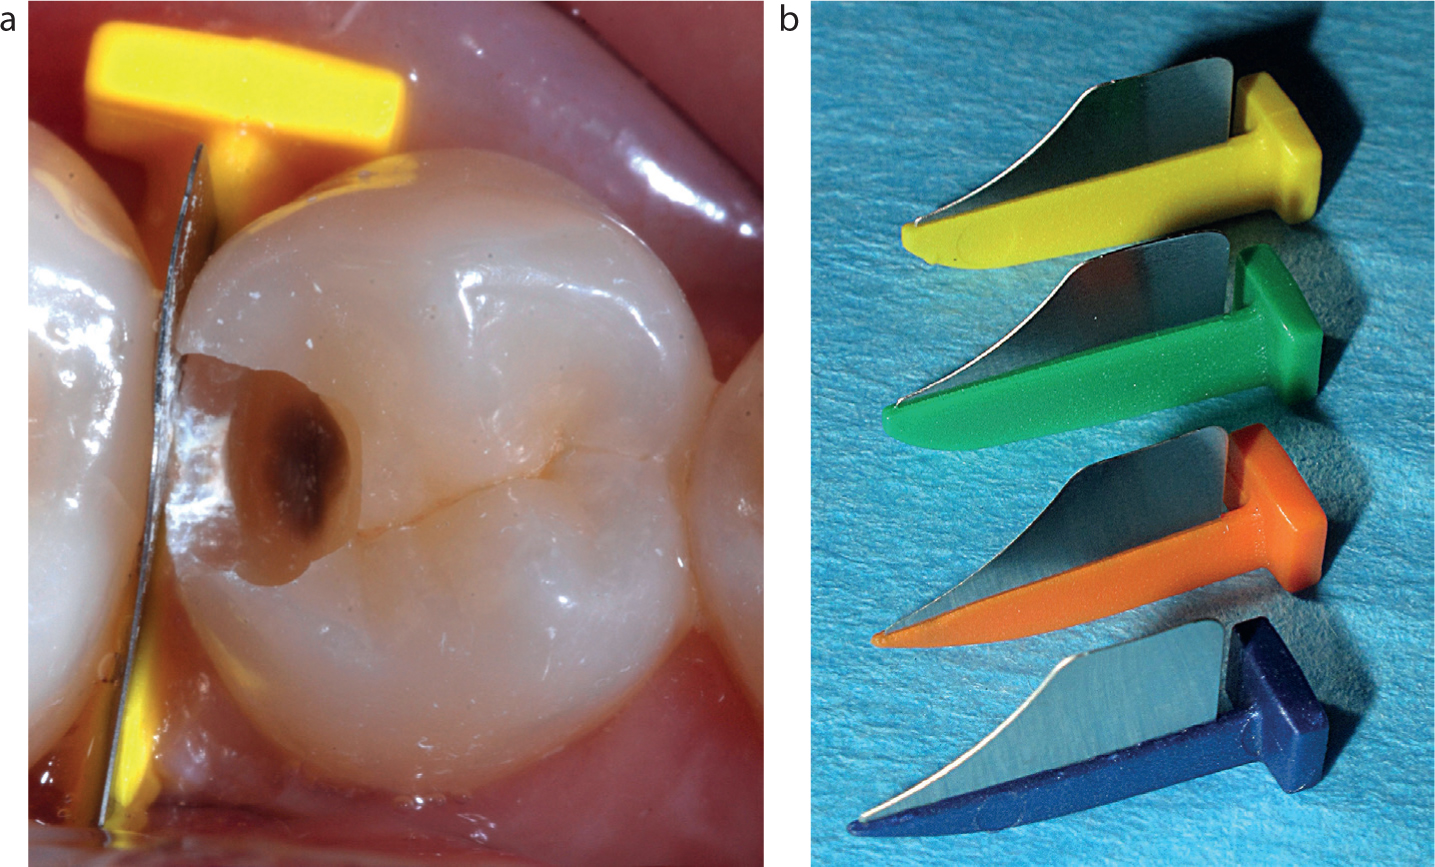
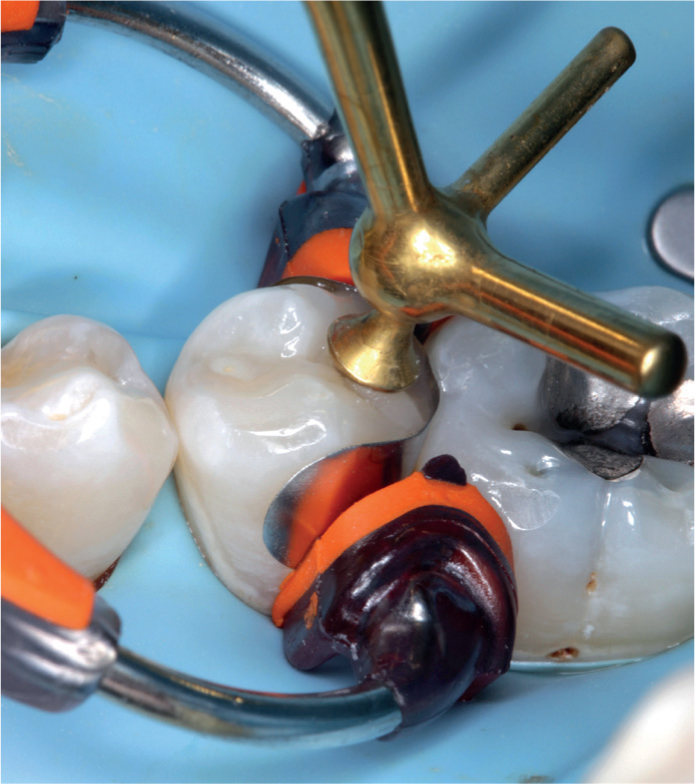
Care must be taken to avoid iatrogenic damage to adjacent teeth (ideally by the use of protective wedges, Figure 3), which should be inspected for early cavitated lesions and restored conservatively while there is direct access;
Marginal ridges should be preserved, where possible, as their loss results in a significant decrease in fracture resistance;
Undercuts resulting from minimally invasive cavity preparation provide retention and resistance form and will reduce stress on the adhesive bond during loading;
Rounded internal line angles aid adaptation of composite and reduce stress concentration;
Particle air abrasion prior to etching has been demonstrated to enhance bond strengths;13
Metal dentine pins are completely contra-indicated with all resin composite restorations.
Figure 2.
(a–d) Minimally invasive cavity preparation and (e, f) direct composite restoration of an occlusal carious lesion.Figure 3.
(a, b) Protective wedges (FenderWedges™ Directa, Upplands Väsby, Sweden).
Linings?
The management of operatively exposed dentine, particularly in deep cavities, remains a confusing subject and this is not helped by variation in teaching.7,8
In contemporary adhesive restorative dentistry, there is no clinical indication to place a ‘protective’ lining under resin composite materials.1,12 Modern bonding agents satisfy the ideal properties of a lining material by sealing the dentine tubules opened by cavity preparation, preventing microleakage and therefore pulpal inflammation.20
Although linings remain popular with practitioners concerned about post-operative sensitivity,7 they are unnecessary as resin composites are insulators rather than conductors of heat. In addition, the avoidance of a separate layer of lining material increases the available surface area for bonding and stimulates the repair of affected dentine.8
While immediate, transient, post-operative sensitivity may be expected as a result of trauma to the dentine-pulp complex and the polymerization of overlying composite material,21 20% of dentists still frequently report problems with posterior composites, the most common of which is post-operative sensitivity.7,12
Deep cavities have an increased density and diameter of open dentine tubules, resulting in an increase in intrinsic moisture and in the risk of microbial ingress which may lead to pulpal inflammation. When the estimated residual dentine thickness is less than 0.5 mm, a biocompatible material may be used as an indirect pulp cap.
Indirect pulp capping
Resin-modified glass ionomers (RMGI) eg Vitrebond™ (3M, St Paul, MI, USA) may be considered to be the material of choice for indirect pulp capping as they have the following advantages:
Creation of a durable, self-adhesive chemical bond to dentine;20
Has remineralizing properties and increases resistance to demineralization;23
Thermal expansion properties are similar to dentine;23
Light curing of the resin component allows immediate stabilization;
Reduces the risk of pulpal exposure and promotes pulpal healing;16
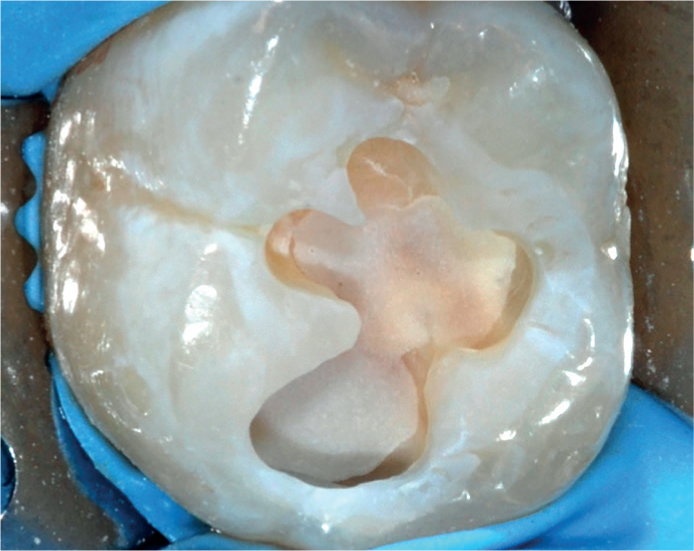
Reduces the risk of complications resulting from errors with etching, washing and drying of dentine (Figure 4).
Figure 4. RMGI lining reduces the risk of dentine desiccation during cavity drying.
Intermediate RMGI layers, if used, should be kept to minimal thickness as they have inferior mechanical properties and will fatigue over time.5 The outline form of the restoration should be entirely in composite as open sandwich techniques are no longer recommended.5
Direct pulp capping
While the routine use of calcium hydroxide lining materials is no longer relevant in restorative dentistry, they may still be used as a direct pulp cap over obvious pulpal exposures.8 Only small, localized amounts of material are required and, once set, they should be covered with a layer of RMGI to protect from subsequent etching.
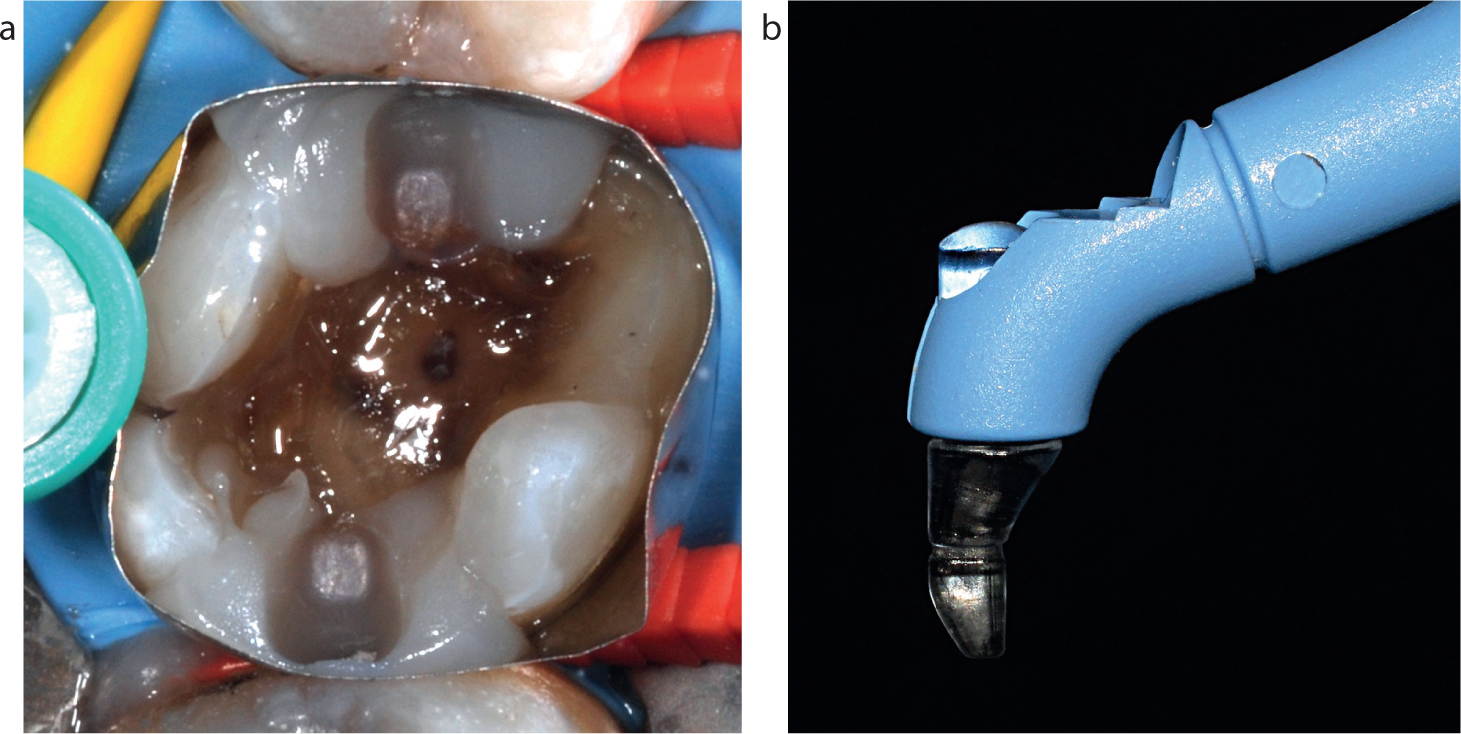
Therapeutic tricalcium silicate materials are also now available for direct pulp capping, eg Biodentine™ (Septodont, France). These extremely biocompatible materials have antimicrobial properties and induce pulpal cell proliferation/repair at a faster rate than calcium hydroxide20 (Figure 5).
Figure 5.
(a) Pulpal exposure. (b) Tricalcium silicate (Biodentine™) direct pulp cap. (c) Overlying direct composite restoration/tooth continues to respond positively to thermal pulp testing at five years post-operatively.
Adhesion
Successful bonding is a fundamental requirement for long-lasting posterior composites. Modern bonding systems create a predictable union between resin composites and residual tooth tissue,12 and reduce the need for more destructive traditional cavity preparations.1
As it is such a critical stage and dentists still commonly report problems with post-operative sensitivity, premature reduction/loss of bond strength and marginal degradation, the following detailed guide to adhesion is designed to help clinicians optimize bonding procedures.
Function of adhesives
Enamel bonding is predictable and successful when etched with phosphoric acid and the immediate bonding of most contemporary adhesive systems is excellent.23
Dentine is a much more challenging substrate for bonding as it is less mineralized than enamel and is intrinsically moist. Deeper cavity surfaces have greater permeability and exhibit higher levels of moisture. The volume of water within the demineralized dentine is difficult to control and excess water contributes to incomplete infiltration of resin into the demineralized collagen matrix.23
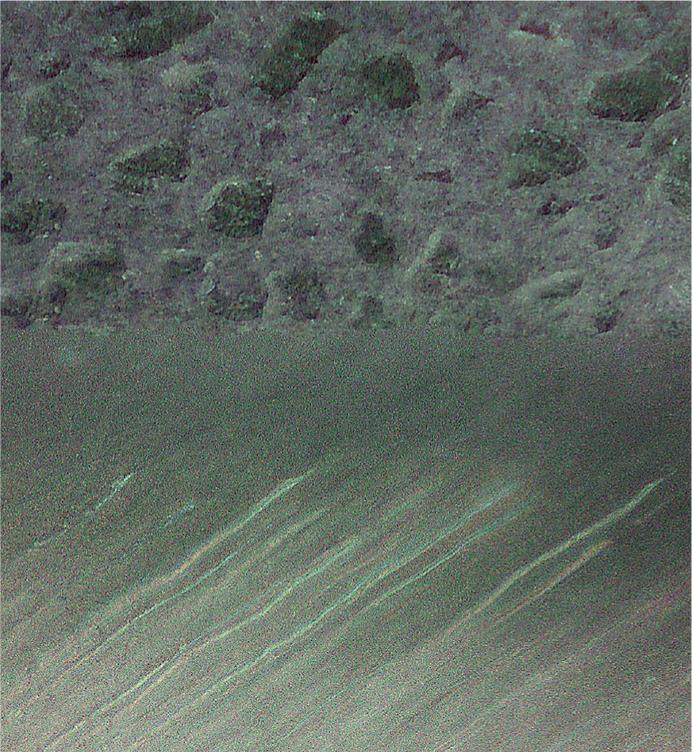
Contemporary adhesive systems rely on the formation of a zone made up of both dentinal collagen and polymerized adhesive resin. This is known as the hybrid layer and its formation aims to fulfil the following functions (Figure 6):
The cavity seal minimizes bacterial microleakage which may perpetuate and exacerbate pulpal inflammation;1
The seal also arrests progression of carious lesions by isolating bacteria from their fermentable carbohydrate nutrient source;
Facilitates defence reactions of tubular mineralization and tertiary dentine formation;1
Resistance of shrinkage forces created when resin-based materials are polymerized;
Forms a strong, immediate and resilient bond between tooth tissue and the restoration;
Reduces the risk of secondary caries;
Reduces the risk of marginal staining;
Resists microbial, hydrolytic and enzymatic degradation;
Ease of use.
Figure 6. Micrograph demonstrating the collagen/resin hybrid layer.
Although it is possible to bond to caries affected dentine successfully, hybrid layers tend to be thicker and more poorly infiltrated (regardless of the type of adhesive used).23
Classification of adhesives
While the last decade has seen dramatic improvements in dental adhesives,1 classification of the ever-increasing range of bonding agents has now become impossibly complicated. Fortunately, all adhesive systems are compatible with any composite and meticulous attention to following the manufacturer's protocols may be considered more important than the type of bonding resin selected.12
Two-step etch and rinse (aka total etch) systems are the most popular wordwide.7,12 The adhesive systems that have been shown to deliver the highest bond strengths comprise three steps: etch followed by separate primer and adhesive stages.23 These ‘gold standard’ materials are recommended where restoration retention relies primarily on the adhesive bond and in clinical situations where the functional forces are expected to be high.
The main problem with three-step adhesive systems is their widely reported ‘technique sensitivity’ and the recognition that failure to optimize every stage is likely to affect bond quality, strength and durability.24,25
Etch and rinse systems that combine the primer and adhesive in one bottle are the most commonly used,7,12 and may be recommended for deep cavities because of their reduced technique sensitivity.23
A range of bonding agents with simplified adhesive protocols are now available but may exhibit lower bond strengths and poorer durability.1,23
Practical guidelines for adhesives
While the most important factor governing the success of bonding procedures is how closely the operator follows the manufacturer's instructions,12 widely accepted general guidelines for etch and rinse systems are presented in Table 1.
Stage
Technique
Isolation
As contamination with saliva, blood and gingival crevicular fluid will all affect adhesion, moisture control should be maintained throughout bonding procedures
Clean and wash
The cavity should be washed with copious water spray to remove any loose debris
Etching
The whole cavity (enamel and dentine) should be covered with 30–40% phosphoric acid gel
Care should be taken not to extend etch too far beyond cavity margins (<1.0 mm) as unbonded excess is much easier to remove
Although enamel may be etched for up to 30 seconds, etch should not be left on dentine for more than 15 seconds
Etching too deeply will not allow the primer/adhesive to penetrate and hybridize the deepest layers
Phosphoric acid removes the amorphous smear layer (~10 μm) that is left after cavity preparation
Dentinal hydroxyapatite is almost completely dissolved to an approximate depth of 2–4 μm, exposing dentine tubules and a ‘sponge-like’ matrix of intertubular collagen
Under etching dentine will result in insufficient adhesive penetration
Washing
Etchant should be thoroughly washed off with copious water spray as residual etch will compromise bonding
Drying
The cavity should then be dried with gentle airflow
Great care should be taken to avoid the common error of over-drying the dentine
Dentine desiccation will cause the collagen web to collapse, preventing the infiltration of adhesive and increasing the risk of post-operative sensitivity
Conversely, excessive residual moisture can cause phase separation of monomers, irregular resin infiltration, blister/void formation at the interface and reduced monomer conversion
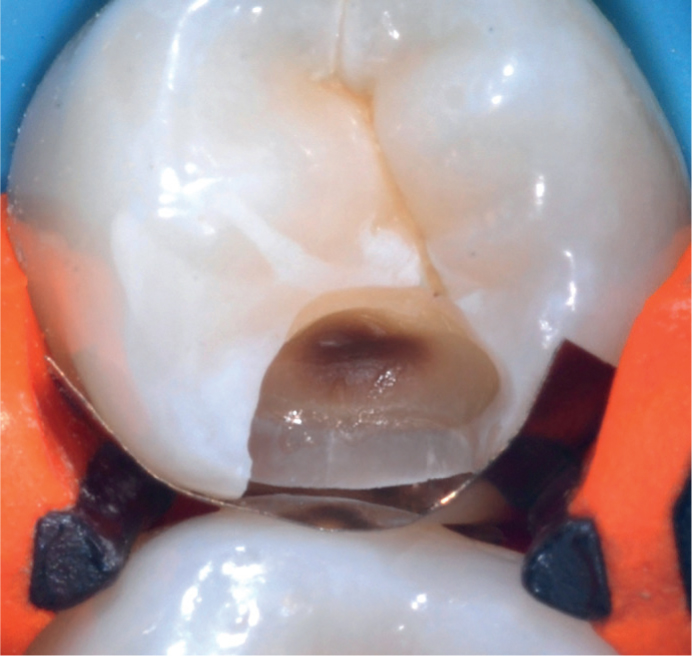
The cavity should appear moist but with no obvious pooling before the primer/adhesive is applied (Figure 7)
Adhesive preparation
Primer/adhesive containers should be shaken to eliminate phase separation of the components
As primers/adhesive contain solvents, they should be dispensed only when ready for use and bottles should be re-capped immediately
Primer
Application of the primer (as a separate or combined step) infiltrates the demineralized collagen network in preparation for the adhesive (repeat application is recommended for some systems)
Gentle airflow across the cavity evaporates the primer's solvent along with residual dentine moisture
Adhesive
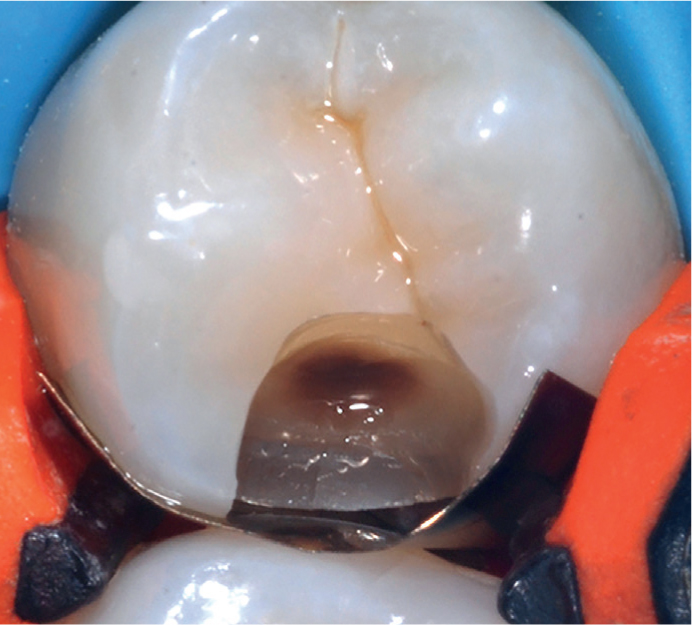
Adhesive is applied until the entire cavity appears glossy/shiny (Figure 8)
Any ‘dry areas’ should receive another layer of adhesive
Evaporation
The solvent in the adhesive should be evaporated using gentle airflow
Evaporation should be continued until the adhesive no longer ripples
Light curing
The adhesive is then light cured following the manufacturer's instructions (usually 10–20 seconds) at full power keeping the light tip as close and as perpendicular to the cavity floor as possible
As with all adhesives, the surface layer (~10 µm) remains unpolymerized due to inhibition of the setting reaction by oxygen
This reactive surface layer integrates seamlessly with the initial increment of composite resin which, along with all subsequent increments, possesses its own oxygen-inhibited surface layer
Figure 7. Dentine should appear moist with no obvious pooling prior to primer/adhesive application.Figure 8. The entire cavity should appear glossy/shiny prior to restoration.
Self-etch adhesives
Since the 1990s, attempts have been made to simplify bonding by the development of more ‘user-friendly’ self-etch systems that do not require a separate phosphoric acid etching stage, as they have acidic molecules contained within the bonding resin. Smear layer components become incorporated with the hybrid layer, which has been demonstrated to be thinner and less well-defined. Self-etching adhesives exhibit reduced microtensile bond strength compared to etch and rinse systems, mainly due to their limited depth of enamel etching.25 For this reason, the latest innovative self-etch materials are more strongly acidic. They are known as universal adhesives and have been defined as:
‘An adhesive system which is capable of being used with whichever adhesive protocol the clinician feels most appropriate – self-etch, total etch or selective enamel etch’.24
Bond failure
While enamel bonds are predictable and long-lasting and immediate bond strengths to dentine are high, loss of dentine bond integrity over time is widely reported.25 Bond failure may lead to secondary caries, which is the most commonly cited reason for restoration replacement. Research has identified a complex range of mechanisms that cause breakdown of one or both components of the hybrid layer (dentinal collagen and adhesive).23 The latest developments in adhesive technology aim to stabilize the dentine-bonded interface by resisting hydrolytic degradation of collagen fibrils and the hydrolysis of resin polymers.23
Matrix systems
Matrix technique has been demonstrated to be the most important determinant in the restoration of tight, anatomically correct proximal contacts and contours.4
Unfortunately, high failure rates are reported for Class II posterior composites6,26 and a high percentage of dentists complain of regular problems with open contacts.7 This is primarily as a result of reliance on out-moded matrices designed for amalgam, for example the notoriously unsuitable Siqveland matrix system.8
A range of specialized matrices, wedges and contact forming instruments are available and are designed to:1,8,17
Promote tight, suitably-positioned contacts using thin, contoured, burnishable matrices;
Reduce the risk of food trapping, subsequent periodontitis and secondary caries;
Reduce the risk of adhesive failures that have commonly been tracked to the cervical margins of proximal boxes;
Recreate self-cleansing, easy to clean, embrasure anatomy that promotes interdental papillary health;
Reduce the risk of composite extrusion;
Promote tooth separation to compensate for matrix thickness (which may be maximized by immediate pre-wedging at the start of restorative procedures);
Provide moisture control and haemostasis in clinical situations where rubber dam isolation is not used;
Prevent orthodontic movement of restored teeth.
Sectional matrix systems
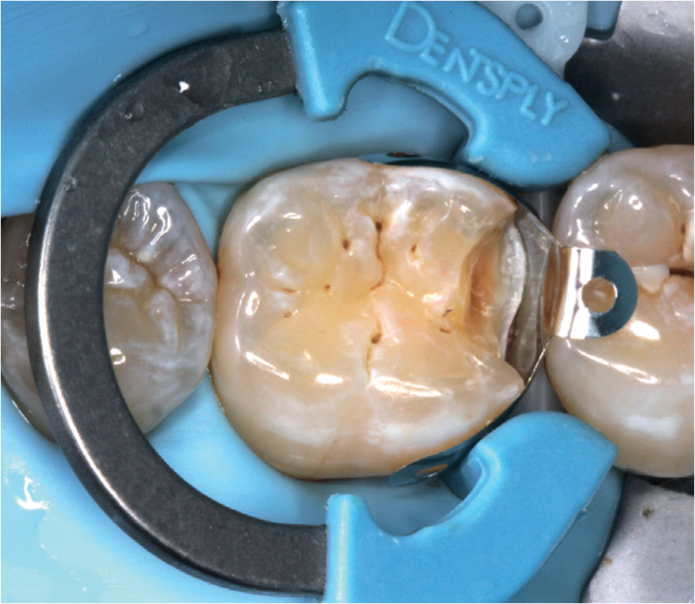
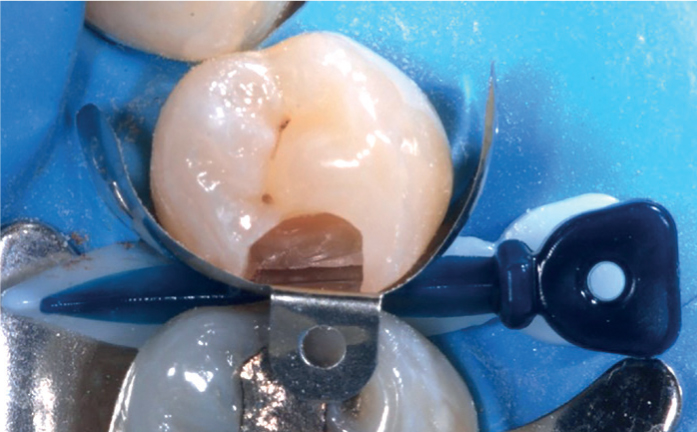
Specialized sectional matrix systems have been demonstrated to give the best proximal contacts when placing posterior composites. They comprise a thin, contoured sectional matrix, a wedge and a separation ring (Figure 9) which, along with the wedge, separates the teeth to account for matrix thickness. The separation ring also seals the matrix laterally to reduce the risk of marginal excess. In cases with wide proximal boxes, matrix deformation may be avoided with the use of broad face separation rings (Figure 10).
Figure 9. Sectional matrix, wedge and separation ring (Composi-Tight 3D system Garrison Dental Solutions, Springlake, MI, USA).Figure 10. Palodent V3 sectional matrix system (Dentsply Sirona, Konstanz, Germany).
Matrices must be burnished against adjacent teeth because, unlike amalgam, composite will not readily push matrices out.
Despite being taught at the majority of dental schools, usage of sectional matrix systems has only been adopted by a small fraction (<10%) of practices.7,8 As the UK amalgam phase-down continues, it is essential that clinicians equip themselves with one of the wide range of sectional matrix systems. They are used with the following general instructions:4,17
Thin, contoured sectional matrices are placed with their concave edge orientated towards the occlusal surface and the convex side towards the adjacent tooth;
A wedge is applied to seal the matrix cervically;
A separation ring is then applied using the designated forceps. Care must be taken to ensure that the cervical seal has not been compromised by ring placement.
Removal of sectional matrices can be difficult as this technique generates very tight contacts but specialized forceps (+/- specialized matrices) or artery forceps may be used to facilitate removal.
Circumferential matrices
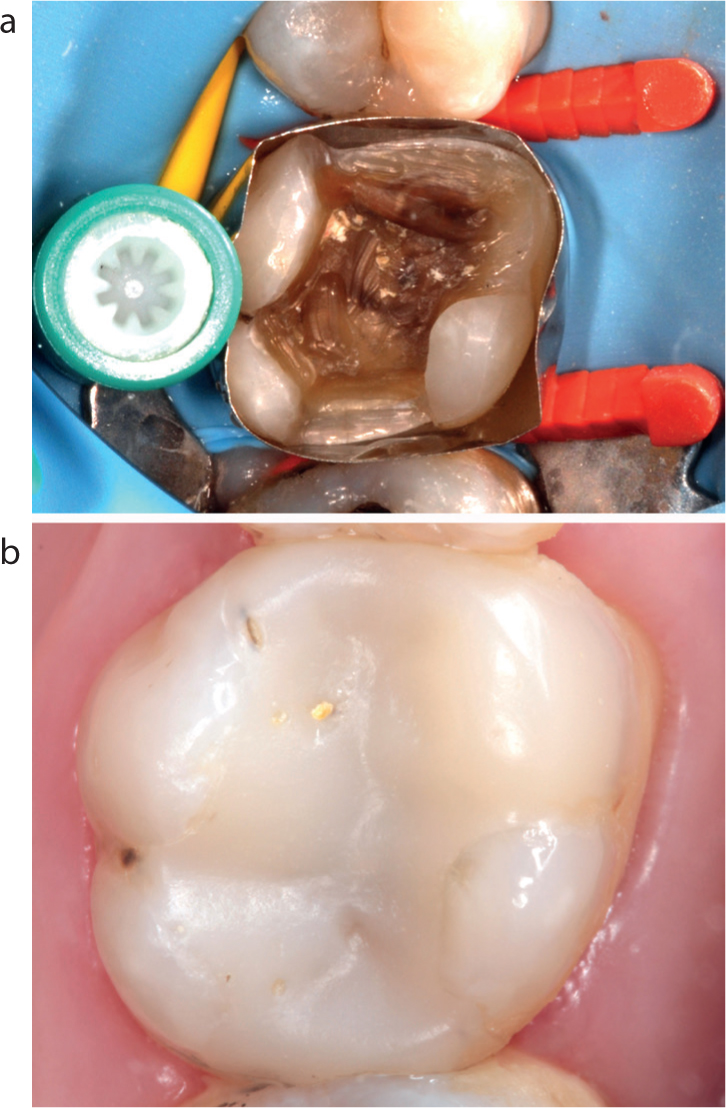
In larger cavities and those with wider proximal boxes, specialized circumferential matrices, eg SuperMat™ (KavoKerr, Bioggio, Switzerland) are recommended as they confer a number of advantages13 (Figure 11):
Single use eliminates cross-infection risk;
Simple to use and make ideal contacts easier to form;
On tightening they impart a more natural, rounded proximal contour and are less likely to flex weak cusps;
The tightening spool may be placed buccally or lingually/palatally and absence of a matrix holder permits wedge placement from any direction;
They help to hold rubber dam in place and offer improved access;
They are cost-effective and may also be used for amalgam restorations.
Figure 11.
(a) The SuperMat™ matrix system optimizes the direct composite restoration of complex cavities. (b) MODB composite at ten years post-operatively.
Matrices are applied to the tooth, tightened with the matched instrument and should be burnished against the adjacent tooth with a suitable instrument as composite will not push matrices out. Only metal matrices are recommended for posterior composites as transparent versions are thick, difficult to insert and stabilize and cannot be burnished.6 Light-transmitting wedges are also unnecessary.4
In extensive cavities with limited residual coronal tissue, freehand build-up of missing cusps may be carried out to facilitate circumferential matrix retention and stabilization.
Wedging
Wedging matrices is essential to create a tight cervical seal. The wedge also separates the teeth slightly to compensate for matrix thickness. When working without rubber dam isolation, wedging assists haemostasis and improves moisture control.
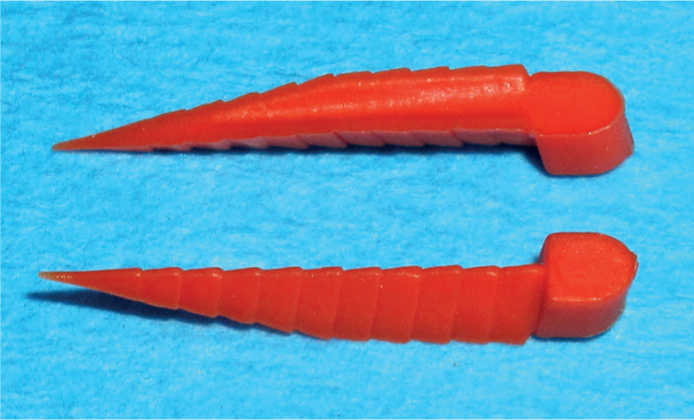
Specialized plastic wedges, eg FlexiWedges™ (Common Sense Dental Products Inc, Springlake, MI, USA) are recommended over traditional wooden wedges as they are easier to place and stay firmly in position. They are concave on the gingival surface so that, while optimizing the cervical seal, they compress the interdental papilla and do not deform the matrix or encroach on the contact area (Figure 12).
Figure 12. Plastic FlexiWedges™.
Occasionally, more than one wedge may be necessary. They may be placed from opposite embrasures and certain systems are also designed to allow stacking (Figure 13).
Wedges may also be introduced early in the operative procedure (pre-wedging) to initiate tooth separation.17
Contact forming instruments
Suitably shaped or specially designed hand instruments, eg TriMax™ (Adent Inc Danbury, CT, USA) are very useful in helping to create tight contacts. They are applied to the initial composite increment and push the matrix against the adjacent tooth (Figure 14).
Figure 14.
(a, b) Use of a contact forming instrument (TriMax™, Adent) to ensure contact tightness.
Once light cured, the proximal composite holds the matrix in position while further increments are placed. Additionally, by dividing the proximal composite into two halves, the tendency for the forces of polymerization shrinkage to pull on both proximal walls simultaneously is reduced.
Material selection
Most modern composites have a similar chemical composition/formulation and are suitable for use in all areas of the mouth.5,14
Highly-filled hybrid materials with a combination of large and small filler particles are recommended for load-bearing direct posterior restorations. Another factor determining the successful long-term performance of modern posterior composite restorations is that they now have similar mechanical properties to amalgam and feldspathic porcelain.14
Unfortunately, when choosing a posterior composite there is little correlation between laboratory studies and clinical performance.13 After long periods of evaluation, the type of composite used has been shown not to play a significant role in restoration survival, compared to the number of surfaces restored, the amount and quality of residual tooth structure, caries risk and operator factors.5
For these reasons it is recommended that clinicians select composite materials based on personal preference with regard to the following:4
Handling characteristics, eg sculptability, resistance to slumping, non-stickiness;
Syringe or compule delivery (the latter has been demonstrated to give better marginal adaptation as long as the tip can reach the cavity floor);
Shade range (a very limited shade range, eg A2/A3 may be suitable for the majority of posterior composite restorations);
Good working time under ambient light conditions.
It is also recommended that clinicians choose vigorously tested composites from well-established manufacturers, rather than cheaper alternatives, which the authors consider to be a false economy and may deliver suboptimal clinical outcomes.
Polymerization shrinkage stress
When composite resin is light cured there is volumetric shrinkage (average 2–3%) as approximately 60% of the resin constituents convert from monomer to polymer molecules.
As composites shrink it is inevitable that internal stresses are generated within the material and are transferred to bonded interfaces. The amount of polymerization shrinkage stress is dependent on the volume of shrinkage, the modulus of elasticity of the material and the degree of conversion to polymer. The stress is more important than the actual dimensional change and may result in a range of complications, the most common of which is post-operative sensitivity. This results from gap formation at debonded interfaces, which fill up with dentinal tubular fluid, which in turn reacts to thermal stimuli and pressure from occlusal loading.
The risk of post-operative sensitivity should be minimized as treatment of persistent problems usually necessitates removal of the entire restoration.4 Other complications of polymerization shrinkage stress include cuspal flexure, enamel cracking/fracture, reduction in the mechanical properties of the material and marginal gap formation, which may subsequently allow the ingress of cariogenic bacteria or stain.
Stress also results as the restoration cools from the elevated temperature caused by the reaction exotherm and heat from the light curing unit.
Development of low shrinkage stress composites is an area of ongoing research and aims to produce composites with a targeted shrinkage of 0.5–1.0% by volume, which will counterbalance post-operative water absorption and result in a negligible net volumetric change.22
Composite placement
Placement technique is one of the most important determinants in the long-term success of adhesively bonded restorations. Operator skill and experience are important factors governing the quality of marginal adaptation, the elimination of non-homogeneous layers and the shaping of an anatomically correct final layer.22
For a long time, incremental placement technique has been recognized as the standard of care when placing composite restorations.22 The successive placement of small (≤2.0 mm) increments has been shown to:
Give a more effective and uniform volumetric polymerization;
Mitigate the effect of polymerization shrinkage stress;
Help control the final shape of the restoration (eg successive cusp build-up technique);4
Produce a restoration with enhanced physical properties;
Improve marginal adaptation;
Reduce polymerization shrinkage stress by reducing the coefficient (C-) factor, which is the ratio of bonded to unbonded areas of the cavity preparation.
Incremental placement technique has some disadvantages as it is inherently time-consuming, increases the risk of incorporation of voids, and of contamination when rubber dam is not used.21
A wide range of specialized instruments is available, that are designed to simplify placement and shaping (Figure 15).
It is important that they are kept spotless and remain unscratched to prevent composite from sticking to them. While specialized instrument wetting resins are available, the use of bonding resins to lubricate instruments is contra-indicated, as they contain solvents that will degrade the properties of the restorative material.
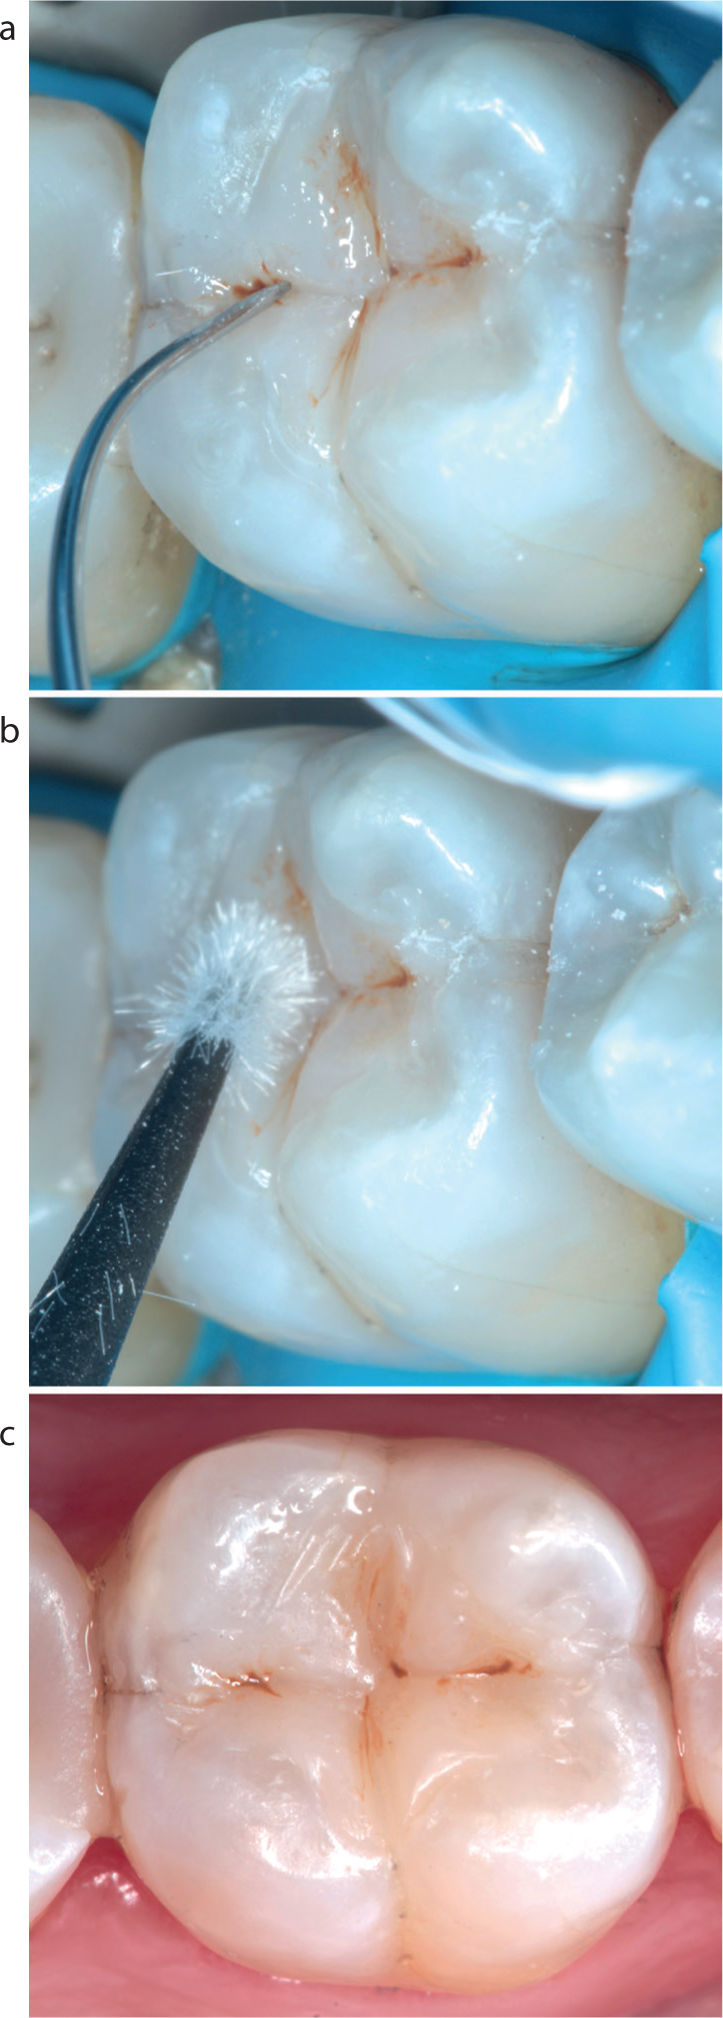
The aesthetics of posterior composite restorations may be enhanced by the use of polychromatic layering techniques and/or application of tinted flowable composite materials (Figure 16).
Figure 16.
(a–c) Tinted flowable composite may be used (sparingly) to accentuate fissure patterns. Excess stain should be blotted with a dry microbrush before light curing.
Based on current evidence there is currently no laboratory or clinical data to prove decisively the most appropriate placement technique for posterior composites.14,22
Bulk-fill placement technique
Over the last ten years, the successful long-term clinical performance of posterior composites has been attributed to an improvement in the physical properties of composite materials and the effectiveness of bonding agents.
The most recent innovations are the introduction of bulk-fill materials, which have further reduced technique sensitivity by partially or completely eliminating the need for traditional incremental placement techniques. Development of these ‘low shrinkage stress’ materials is one of the fastest developing areas in materials research. Low shrinkage stress is achieved by designing bulk-fill materials that:27, 28, 29
Alter the chemical formulation of the resin monomers;
Slow polymerization reaction kinetics;
Incorporate stress-relieving additives;
Alter the concentration of polymerization initiators/promoters.
Bulk-fill materials may be divided into two groups, depending on their one or two stage placement protocol.28
Bulk-fill base materials, eg SDR™ (Smart dentine replacement, Dentsply Sirona, Konstanz, Germany) which, due to their high translucency, lower hardness and flexural modulus, require ‘capping’ with an overlying hybrid composite material;
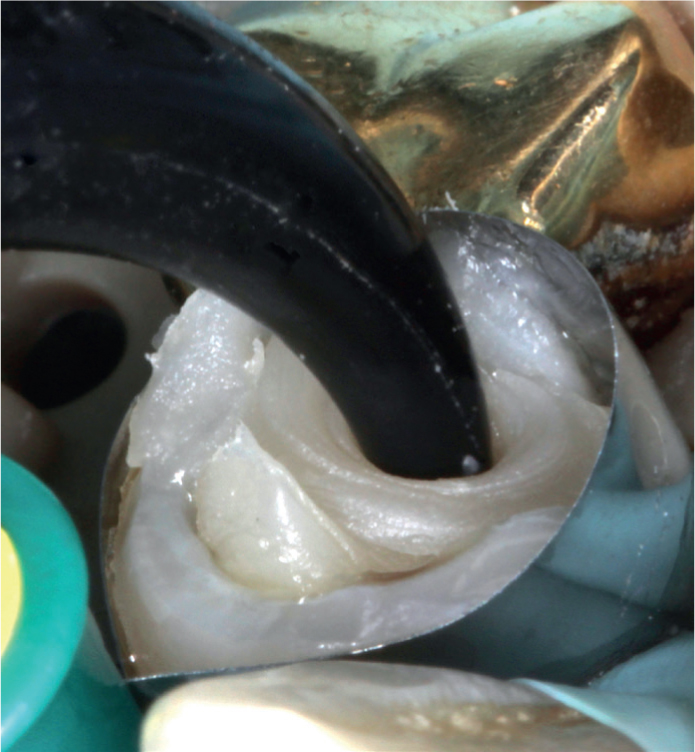
Restorative bulk-fill materials, eg SonicFill™ (KaVo Kerr, Bioggio, Switzerland), which allow cavities to be completely filled up to the occlusal surface in one increment (Figure 17).
Figure 17. Injectable bulk-fill composite material (SonicFill™).
Bulk-fill materials are proving popular with clinicians worldwide and an increasing number of independent studies have been published reporting their significant advantages, which include:6,20,28,29
Innovative polymer chemistry lowers polymerization shrinkage stress at bonded interfaces;
The use of large or single increments offers significant time savings;
Increased light sensitivity enhances depth of cure, eg 4–5 mm, depending on formulation;
No increased risk of post-operative sensitivity;28
Injection technology obviates the need for instrumentation and reduces the risk of voids between layers or at margins.
Good matrix technique is essential when using low viscosity materials to reduce the risk of ledges and overhangs,29 and translucent bulk-fill materials will not mask darkly stained cavity floors.
Regardless of material, it is recommended to shape the final increment as anatomically as possible to minimize finishing time and marginal excess, which may be difficult to visualize and remove with accuracy after light curing.
Light curing
Optimal light curing is a vitally important stage of direct composite restorations. Numerous studies have reported that suboptimal light curing may result in a range of significant disadvantages:30
Impaired mechanical and physical properties;
Weaker bonding;
Increased risk of secondary caries;
Increased risk of fracture or de-bond;
Increased risk of excessive wear;
Increased bacterial colonization of resins;
Reduced colour stability.
Various regimens have been proposed for light curing (eg soft start, ramp and pulse), but the clinical significance of these protocols is questionable and may not be practical, or may have a limited effect on polymerization shrinkage and therefore stress.22
When light curing, the following generally accepted guidelines should be followed:31
Use high quality lights, ideally with a minimum irradiance of 1000MW/cm² and uniform beam profiles that preclude any ‘cold spots’ on the light tip guide;
The light tip should be placed as close and as perpendicular to the restoration surface as possible (Figure 18);
The light guide lens should extend 1.0 mm beyond the intended polymerization zone;
LED lights are recommended as they offer a range of significant advantages over traditional halogen lights;
While resin composite cannot realistically be over-cured (25–40% remains as unreacted monomer), care must be taken not to overheat the dentine-pulp complex;
Lighter shades will cure more readily than darker shades, as they absorb more light;
Light curing units (LCU) should be regularly meter-tested as low intensity lights (≤ 300–400 MW/cm²) still appear bright;
Care must be taken to prevent premature polymerization by the overhead light;
Fixed lens light tips requiring barrier protection may reduce light output by 10% or more;
Eyes must be protected from the acute and cumulative effects of LCUs;
LCUs should be well maintained and light tips should be regularly checked for damage and contamination;
Exposure time should be extended when using larger light tips;
Increased exposure time should also be considered in deep/undercut cavities;
When light curing Class II composite restorations, supplementary buccal and lingual/palatal irradiations are recommended following matrix removal.
Figure 18. When light curing the light tip should be placed as close and as perpendicular to the restoration surface as possible.
Light curing of final composite increments may be carried out through a layer of translucent material, eg glycerine, to eliminate the approximately 10 μm surface oxygen inhibition layer of unreacted resin.
Shaping, finishing and polishing
Accurate shaping of posterior composites demands good understanding of tooth anatomy,32 and can be challenging and time-consuming when restorations are large or complex.11
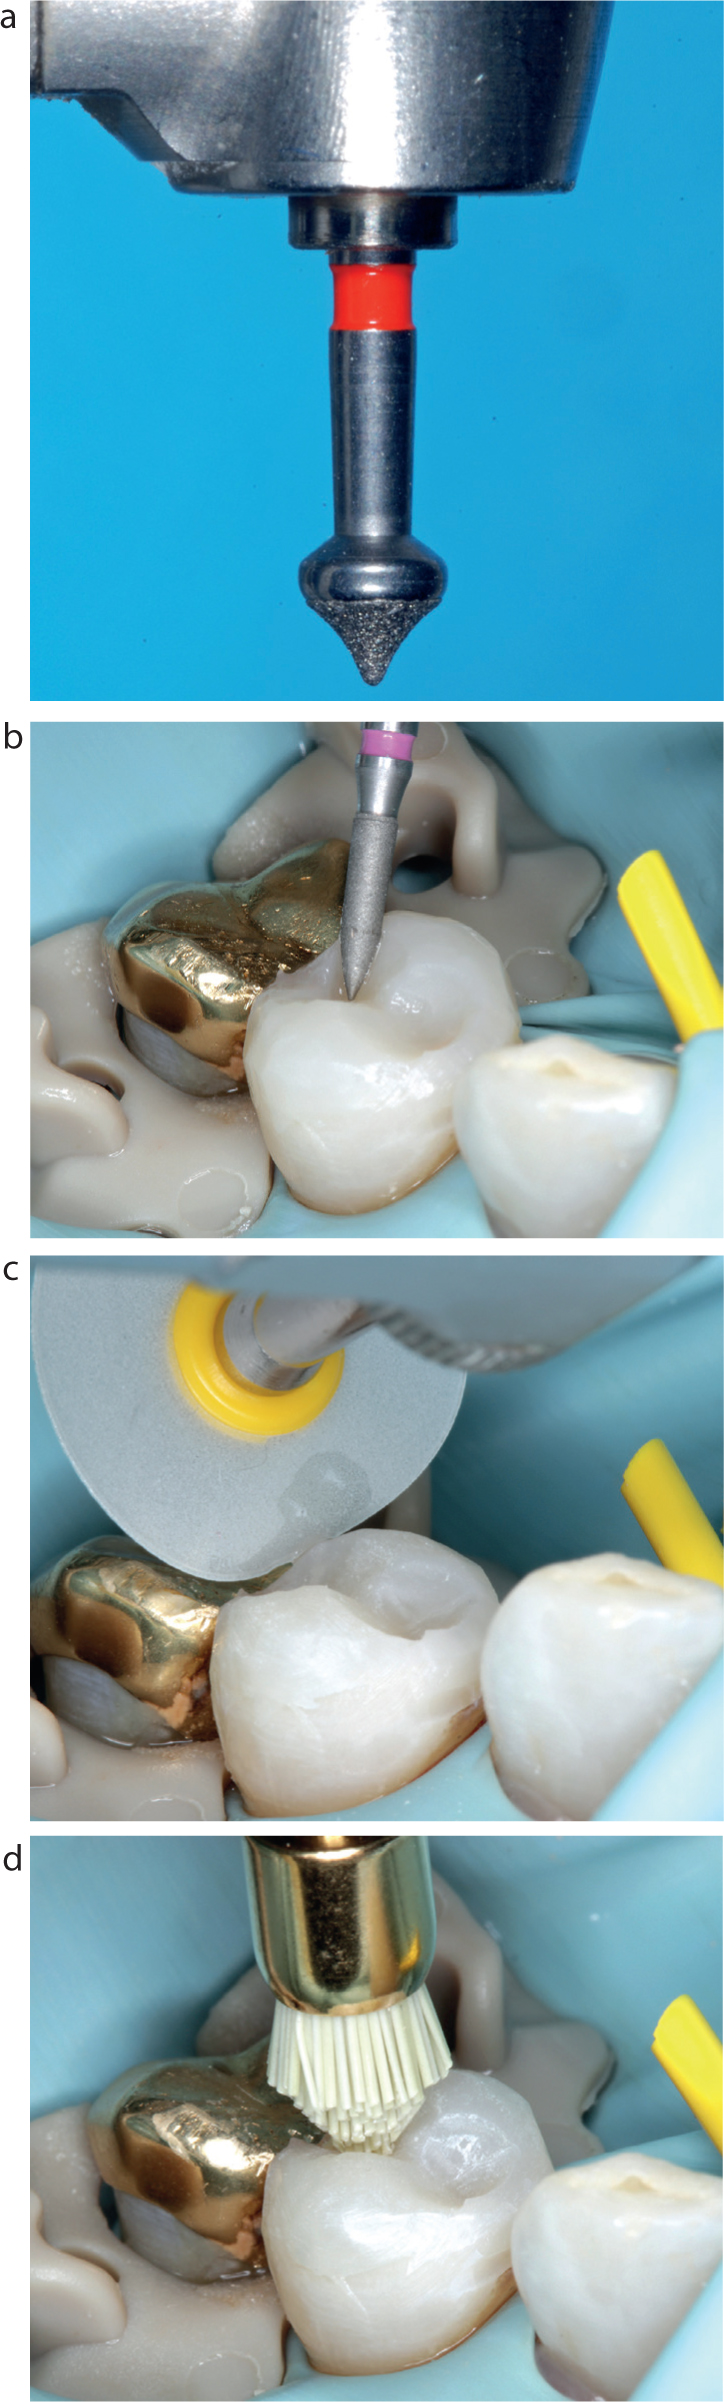
Despite best efforts, functional and/or aesthetic adjustments are usually necessary and a range of specialized burs and finishing and polishing discs and tips are available to facilitate this (Figure 19).
Figure 19.
(a, b) Composite finishing burs. (c) Finishing discs may be used for the minimally invasive shaping of marginal ridges. (d) Multi-use, diamond-impregnated silicone points may be used to polish occlusal fossae (OccluBrush™ KaVo Kerr, Switzerland).
Finishing burs should be applied intermittently, with light pressure and copious water spray to prevent overheating and potential pulpal irritation. Heavy immediate finishing increases the risk of ‘white line’ enamel fractures, which occur 10–50 μm from restorative margins.
Finishing discs may be used to round line angles and shape marginal ridges where they will reduce the risk of iatrogenic damage to adjacent teeth. As with all clinical stages, the use of magnification facilitates finishing procedures and reduces the risk of iatrogenic damage when removing marginal excess.1
Specialized low viscosity liquid polishes, eg Biscover™ (Bisco Inc, Schaumburg, IL, USA) may be applied to seal surface defects, impart a smooth finish, improve aesthetics and eliminate the oxygen-inhibited surface layer (Figure 20). NB: Bonding resins should not be used for this purpose as their oxygen inhibition layer will collect stains.
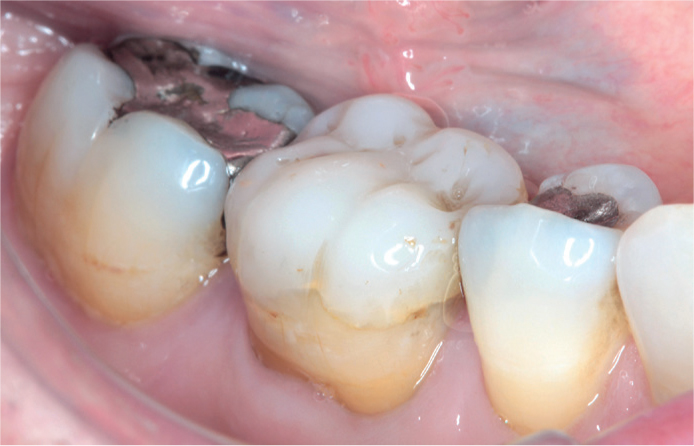
Figure 20.
(a) Pre-operative appearance of a MODBL cavity in a mandibular right first permanent molar. (b) Complex direct restoration sealed with a composite polish (Biscover™). (c) Restoration at one year post-operatively.
Maintenance
As well as restoring function and aesthetics, restorations should be designed so that they are easily maintained by patients. Oral hygiene instructions given at the planning stage should be reinforced and monitored at regular intervals.1
The surfaces of all composites will roughen over time.14 While most modern materials are designed to remain below the threshold for plaque accumulation (0.2 μm),14 the majority of composite restorations will demonstrate age-related degradation of their aesthetic properties (Figure 21).
Figure 21. The same restoration as in Figure 20 at six years post-operatively, demonstrating some marginal and surface staining.
Marginal staining is the most commonly occurring complication, but it is very important to remember that:
Marginal stain is a poor predictor of secondary caries;18
A significant number of restorations are unnecessarily replaced due to a mis-diagnosis of secondary caries;15
Replacing restorations increases cavity sizes with a considerable waste of healthy tooth tissue.15
Renovation and repair
Over 50% of all dental restorations are replacements of existing restorations, with secondary caries cited as the most common reason for replacement.15 It is widely reported that many failing composite restorations are amenable to minimally invasive renovation/repair techniques that will increase their functional longevity at minimal biological cost.1,13,15
Repair/renovation of composite resin with defective margins may now be regarded as state-of-the-art care,14 and repair rather than total replacement should always be considered as it delivers a range of significant advantages:13,15,33,34
Considerable global reduction in operative dentistry will accrue if restorations are renovated/repaired rather than replaced;
Cavity size increases when restorations are removed (regardless of material);
Renovation/repair places focus on tooth survival rather than restoration longevity.
The generally accepted technique for repairing composites is as follows:
Remove any loose fractured/defective part(s) of the tooth/restoration complex;
Roughen the restoration surface with a bur (+/- air abrasion);
Acid etch, wash and dry to clean the restorative surface and etch any adjacent hard tissues for bonding;
Application and light cure of a thin layer of bonding resin to enhance adaptation to the roughened surface area;
Placement, light curing, shaping and finishing of the direct composite repair.
Practising posterior composites
Carefully recording which materials, equipment and clinical techniques have been used will enable a long-term clinical audit of restorations.4
A vast array of educational resources is available to help clinicians learn and practise techniques with posterior composites. Repetitious independent practice on plastic and extracted natural teeth (Figure 22) is recommended to allow clinicians to refine practical skills, improve confidence and expand their range of predictable applications to include:
Restoration of posterior teeth with extensive tooth tissue loss;
Direct restoration of endodontically treated teeth;
Replacement of missing teeth using fibre-reinforced composite materials;
Complete rehabilitation of worn dentitions.
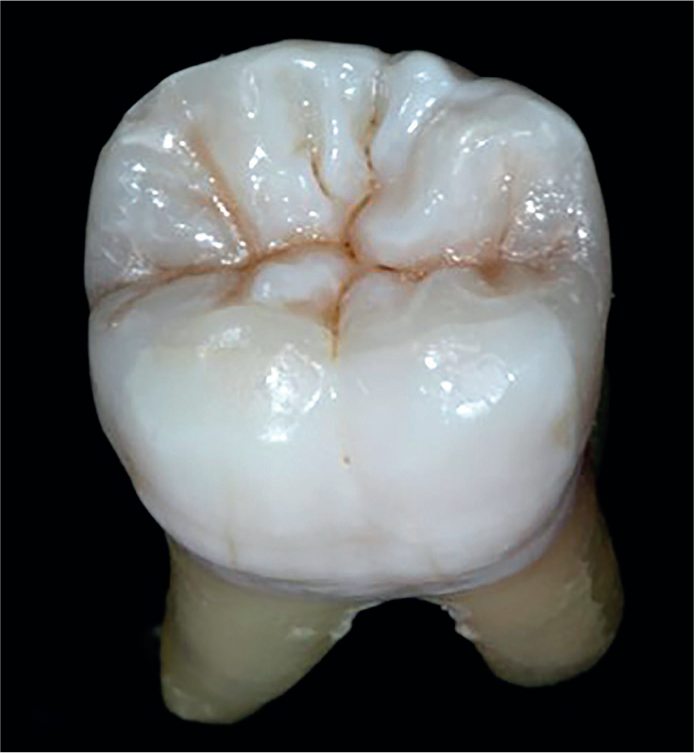
Figure 22. Undergraduate training exercise. Complex direct composite restoration of an extracted mandibular second molar.
Direct composite restorations are easier to monitor than metallic/indirect restorations and may generally be expected to have more retrievable modes of failure (Figure 23).
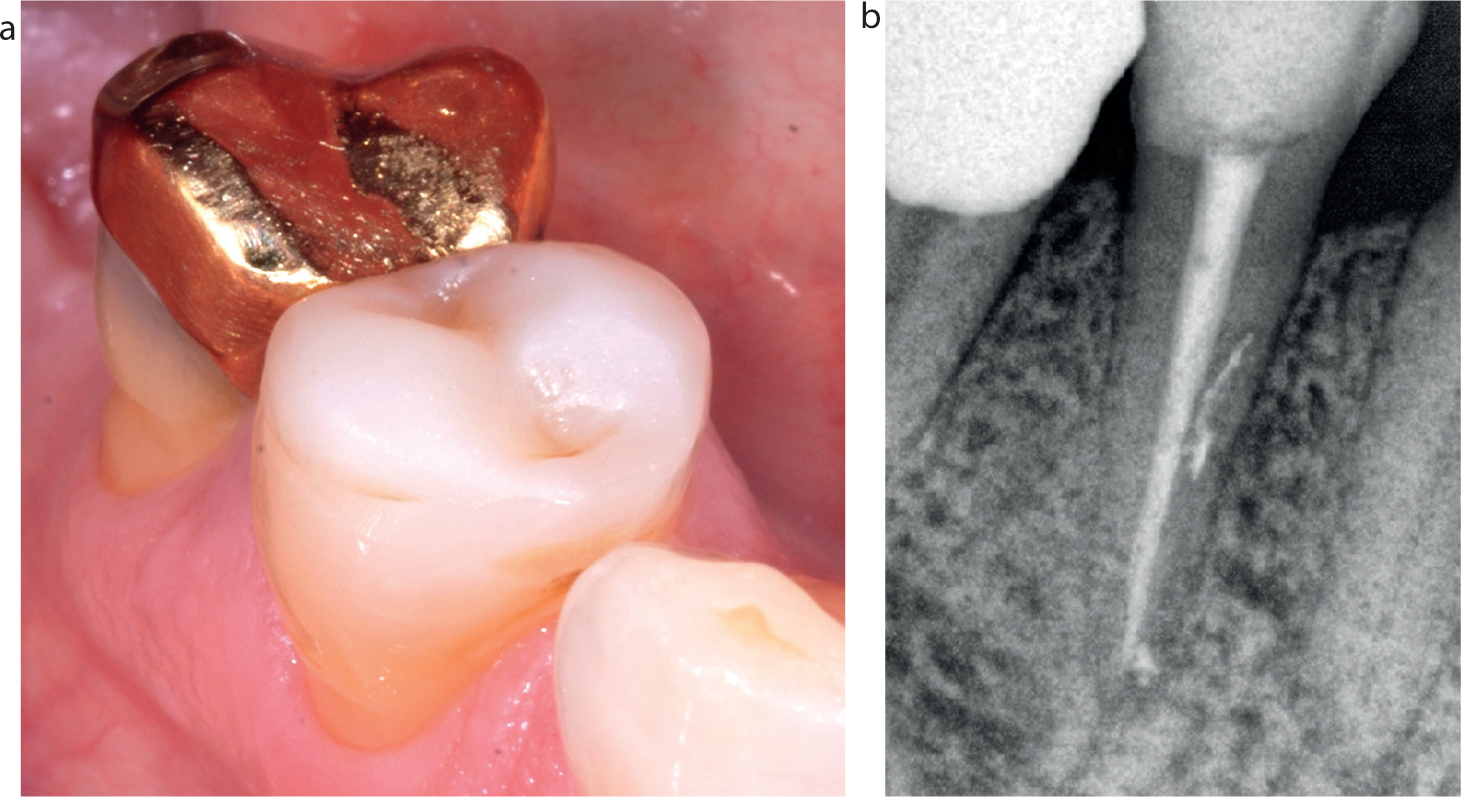
Figure 23.
(a) The direct composite restoration of an endodontically treated tooth (from Figures 17 and 19) (b) Monitoring at three years post-operatively.
Routine reviews of posterior composite restorations, ideally aided by magnification and clinical photography, will enable detailed reflection on restorative outcomes and assist refinement of clinical techniques to world class levels.
Summary
Direct posterior composites have revolutionized restorative dentistry and form an integral component of contemporary oral healthcare.
Improvements in materials, equipment, clinical techniques, teaching and operator experience allow direct composite to be used to solve a comprehensive range of restorative problems and, in many clinical situations, may obviate the need for more destructive, irreversible indirect restorative techniques.
By optimizing the evidence-based clinical stages described in this paper, dental teams will be able to enhance patient care by using minimally invasive treatments designed to conserve biological tissues, ensure the life-long health of the teeth that they restore and leave future options open for minimally invasive renovation and repair when signs of failure occur. The time taken to equip practices and refine and master posterior composite techniques will be rewarding for patients and clinicians alike.