References

Sabbagh J, McConnell RJ, Clancy McConnell M. Posterior composites: update on cavities and filling techniques. J Dent. 2017; 57:86-90
Kopperud SE, Rukke HV, Kopperud HM, Bruzell EM. Light curing procedures − performance, knowledge level and safety awareness among dentists. J Dent. 2017; 58:67-73
Platt JA, Price RB. Light curing explored in Halifax. Oper Dent. 2014; 39:561-563
Watts DC. Let there be More Light!. Dent Mater. 2015; 31:315-316
Shortall AC, Price RB, MacKenzie L, Burke FJ. Guidelines for the selection, use, and maintenance of LED light-curing units − Part 1. Br Dent J. 2016; 221:453-460
Shortall AC, Price RB, MacKenzie L, Burke FJ. Guidelines for the selection, use, and maintenance of LED light-curing units − Part II. Br Dent J. 2016; 221:551-554
Price RB, Strassler HE, Price HL, Seth S, Lee CJ. The effectiveness of using a patient simulator to teach light-curing skills. J Am Dent Assoc. 2014; 145:32-43
Shimokawa CA, Harlow JE, Turbino ML, Price RB. Ability of four dental radiometers to measure the light output from nine curing lights. J Dent. 2016; 54::48-55
de Jong LC, Opdam NJ, Bronkhorst EM, Roeters JJ, Wolke JG, Geitenbeek B. The effectiveness of different polymerization protocols for class II composite resin restorations. J Dent. 2007; 35:513-520
Mazhari F, Ajami B, Moazzami SM, Baghaee B, Hafez B. Microhardness of composite resin cured through different primary tooth thicknesses with different light intensities and curing times: in vitro study. Eur J Dent. 2016; 10:203-209
Price RB, Labrie D, Bruzell EM, Sliney DH, Strassler HE. The dental curing light: a potential health risk. J Occup Environ Hyg. 2016; 13:639-646
Bruzell EM, Johnsen B, Aalerud TN, Christensen T. Evaluation of eye protection filters for use with dental curing and bleaching lamps. J Occup Environ Hyg. 2007; 4:432-439
Janoowalla Z, Porter K, Shortall AC, Burke FJT, Sammons RL. Microbial contamination of light curing units: a pilot study. J Inf Prev. 2010; 11:217-221

Essentials of light curing

From Volume 45, Issue 5, May 2018 | Pages 400-406

Authors

Richard B Price

BDS, DDS, MS, FRCD(c), FDS RCS(Edin), PhD

Professor, Department of Dental Clinical Sciences, Dalhousie University, Halifax, Nova Scotia, Canada, B3H 4R2

Articles by Richard B Price

Adrian C Shortall

DDS, BDS, FFD RCSI(Rest Dent) FDS RCPS(Glasg)

The University of Birmingham, School of Dentistry, 5 Mill Pool Way, Birmingham, B5 7EG, West Midlands, UK

Articles by Adrian C Shortall

Abstract

Abstract: This article provides the key points for ensuring safe, effective and efficient light curing protocols in clinical practice. The article covers light curing unit selection, appropriate irradiance ranges, the effect of operator training and the importance of incorporating material requirements and clinical variables when choosing an appropriate light curing time. Practical advice is given about how to measure the light output and how to minimize the risks of thermal damage to the dental pulp and adjacent soft tissues. The need to protect the eyes of the dental team from the blue light hazard is discussed.

CPD/Clinical Relevance: This article is written because there is a wide range of technical knowledge and safety awareness about light curing procedures among dentists.

Article

Richard B Price

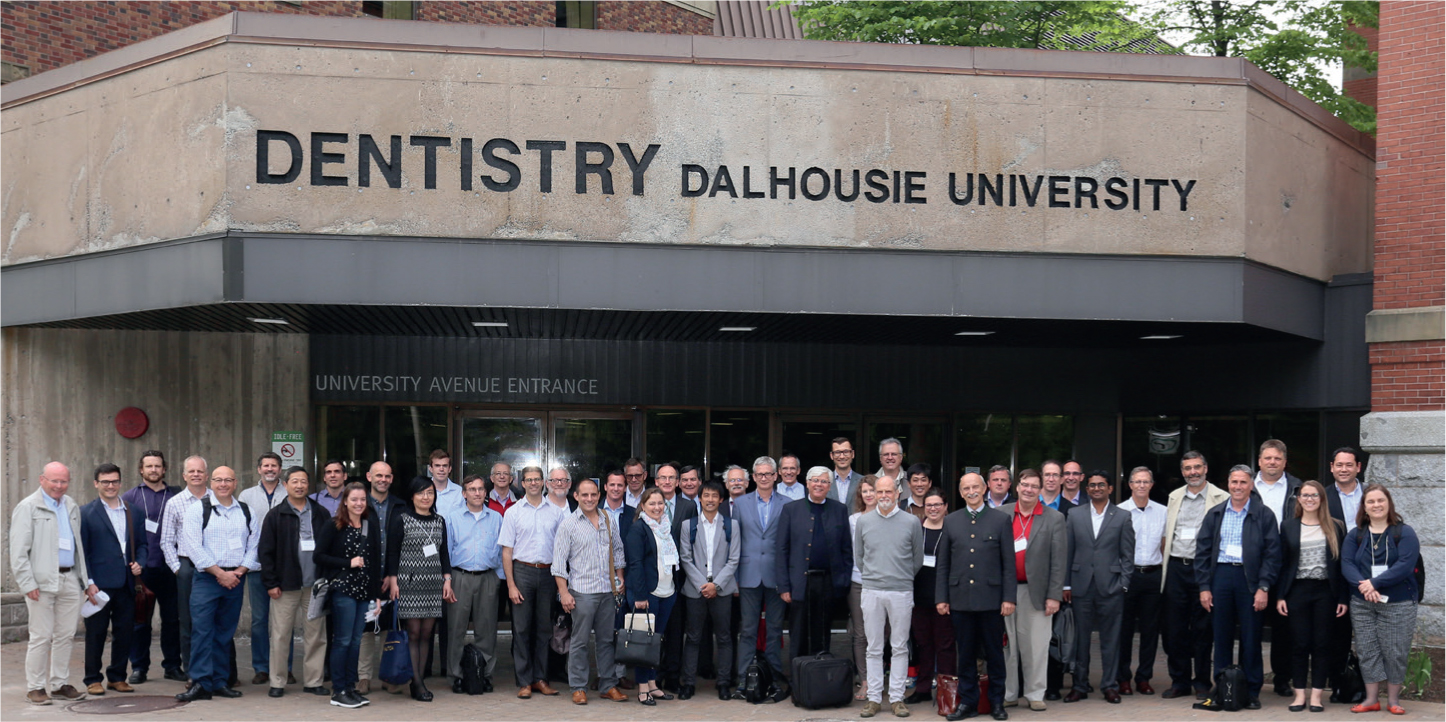
Every day, dentists use their curing lights when making resin-based composite (RBC) restorations, curing sealants, bonding brackets to teeth or cementing all-ceramic restorations. Unfortunately, light curing is seldom given the attention it deserves, as evidenced by technique articles on how to deliver successful resin-based composite restorations.1 Recent surveys have revealed that there is a wide range of technical knowledge and safety awareness about light curing procedures.2 Dental resins vary in their energy requirements for adequate curing. Undercuring resins may cause increased rates of post-operative sensitivity, increased wear and fracture, more debonding, more bulk discoloration or marginal staining, and increased incidence of recurrent caries and pulpal pathoses. The following is a brief evidenced-based list of the key points to ensure safe, effective and efficient light curing protocols in clinical practice. These recommendations are based on the research literature and a series of consensus statements developed by a group of key opinion leaders who have met regularly at Dalhousie University in Halifax, Canada for the last five years (Figure 1).3,4

Figure 1. Conference delegates outside the Dental School, Dalhousie University, Halifax, Nova Scotia, Canada on 20 June 2017.

Light curing unit selection

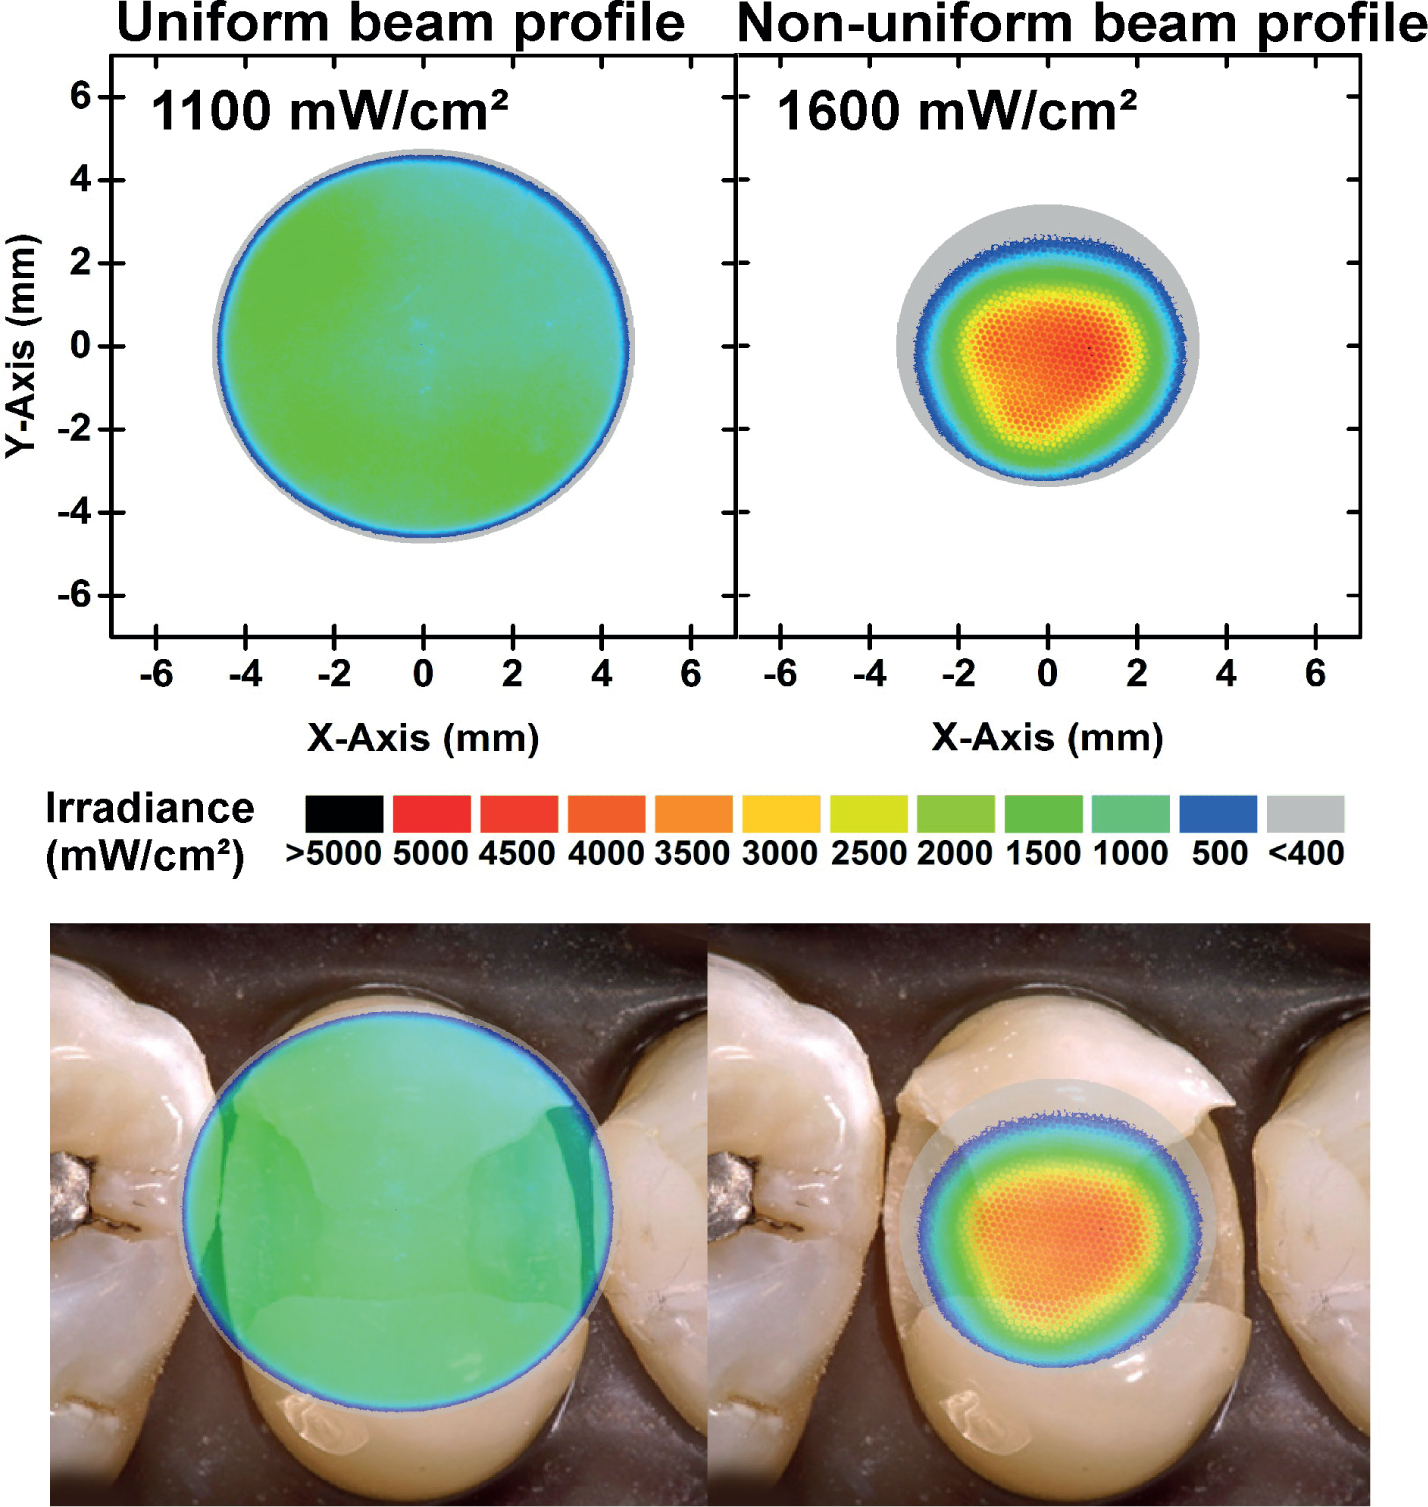
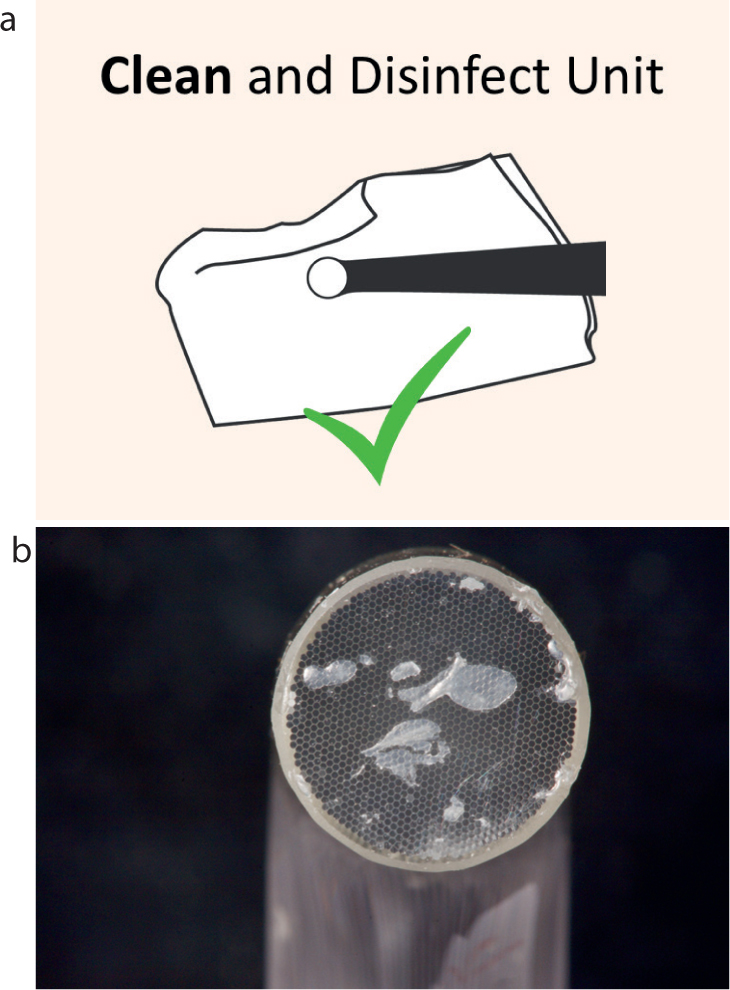
Despite many manufacturers producing excellent curing lights, the units in many dental offices are often not performing effectively and dentists generally have no accurate way of assessing their light output. LED lights are rapidly replacing the older quartz tungsten halogen lights because they are lightweight and compact, often cordless, the LEDs can potentially last for 1,000s of hours, and they are spectrally efficient. However, they have some problems. A major issue is that the light usually comes from a relatively small LED emitter and the light output is frequently not uniform across the exit face of the light source. This produces irradiance ‘hot and cold’ spots of light (Figure 2). Practitioners may be tempted to purchase uncertified units that can have poor optical designs and inferior electronics from online sources for a low price. The risks of using such an uncertified device frequently do not become apparent until it is too late.

Figure 2. Example of a LCU that has a wide and uniform beam profile compared to a light with a small tip where the light output is concentrated in the centre. For clinical relevance, the beam profile is superimposed over a premolar tooth.

Appropriate irradiance ranges

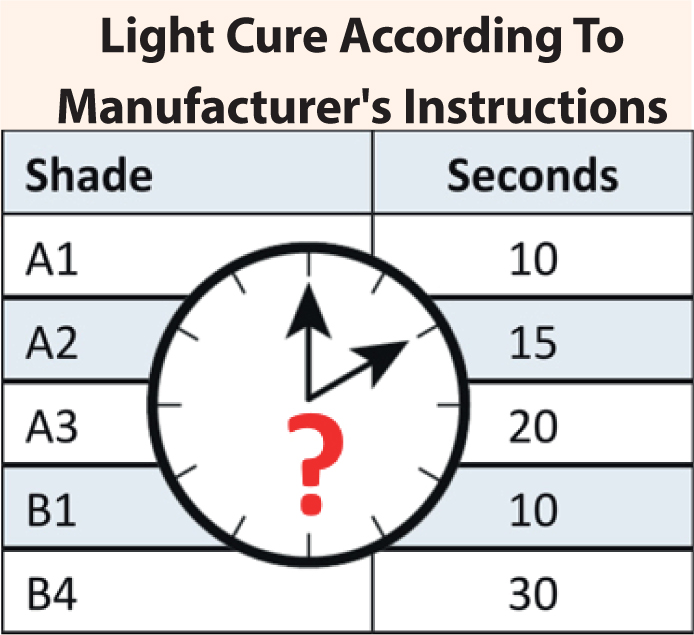
Dentists are recommended to purchase their new curing lights from major reputable manufacturers who have designed high-quality, well-tested, safe and effective equipment. The goal should be to deliver sufficient energy safely to cure the resin adequately without overheating the tooth and adjacent soft tissues. With today's resins, lights that deliver an irradiance >2,000 mW/cm2 and claiming cure times under 10 s should be used with caution. Longer cure times of 10−20 s with irradiance range 1,000−1,500 mW/cm2 are generally recommended. Blowing air or using high volume aspiration to draw air across the tooth helps to minimize temperature rise. Some guidelines to help dentists select, care for and use curing lights have recently been published.5,6

Influence of training

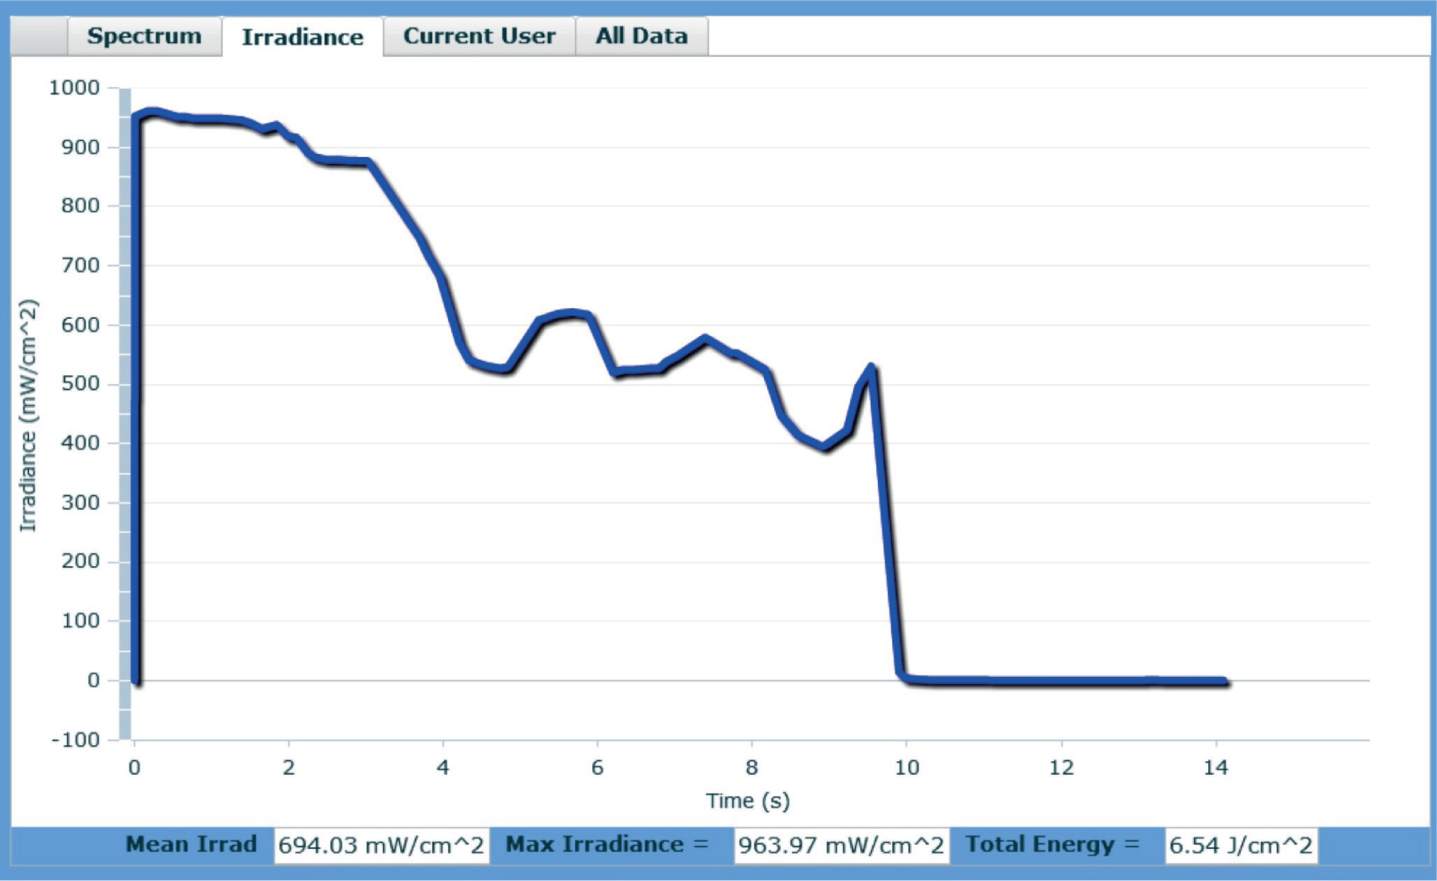
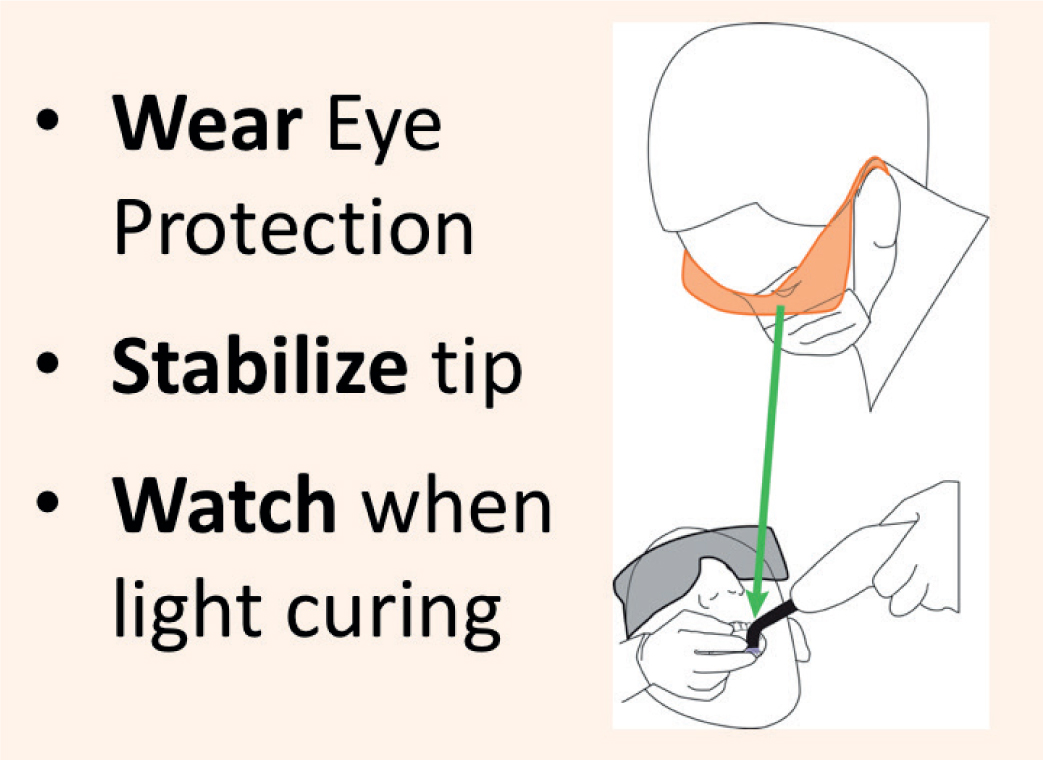
Studies have shown that successful light curing is not trivial and there can easily be a 10-fold difference between operators in the amount of energy they deliver to a standard preparation in the same time using the same curing light. It is not as simple as switching the light on, looking away, and hoping that the resin gets hard at the bottom (Figure 3).5,6,7

Figure 3. Example where the irradiance declines as the light wanders away from the tooth. The dentist was being tested on a MARC™-PS patient simulator device.

Before starting

  • Check LIGHT OUTPUT (Figure 4) by measuring the light output using a reliable dental radiometer.8
  • INSPECT the tip and CLEAN if necessary (Figure 5). Having decided upon the material and shade to be used, the practitioner should be well versed in the manufacturer's Instructions For Use (IFU) as similar products may have very different light curing requirements (Figure 6).
  • Set the light to the correct mode and time for the brand and shade that you are using (Figure 7). Different shades of the same product may require two to three times longer exposure times to be adequately cured.
  • Ensure that the increment thickness does not exceed the IFU, measure the cavity depth and determine how many increments of resin will be required.
  • Estimate the distance between the tip of the light source and the resin.
  • Check that the light tip can access all of the restoration. If the distance between the resin and the light source will exceed 4 mm, or is at an angle, increase the recommended cure time.
  • Parts of the restoration are often undercut relative to light directed normal to occlusal surfaces (Figure 8), so do not expect to bulk cure a large restoration in just one shot from one position.
  • The effective light tip diameter must exceed the surface dimensions of the material you plan on light curing because the resin beyond the light may not cure well.
  • Figure 4. Measuring the irradiance (mW/cm2) of a curing light using a reliable dental radiometer (Bluephase Meter II).
    Figure 5. (a, b) Clean and disinfect the unit. Remove any debris on light guide tip.
    Figure 6. Ensure you have read and know the Instructions For Use.
    Figure 7. Set the light to correct mode and time according to the instructions for the particular brand and shade of restorative material.
    Figure 8. Shadowed regions receive less light and may be undercured if the tip is small or held at an angle.

    When filling

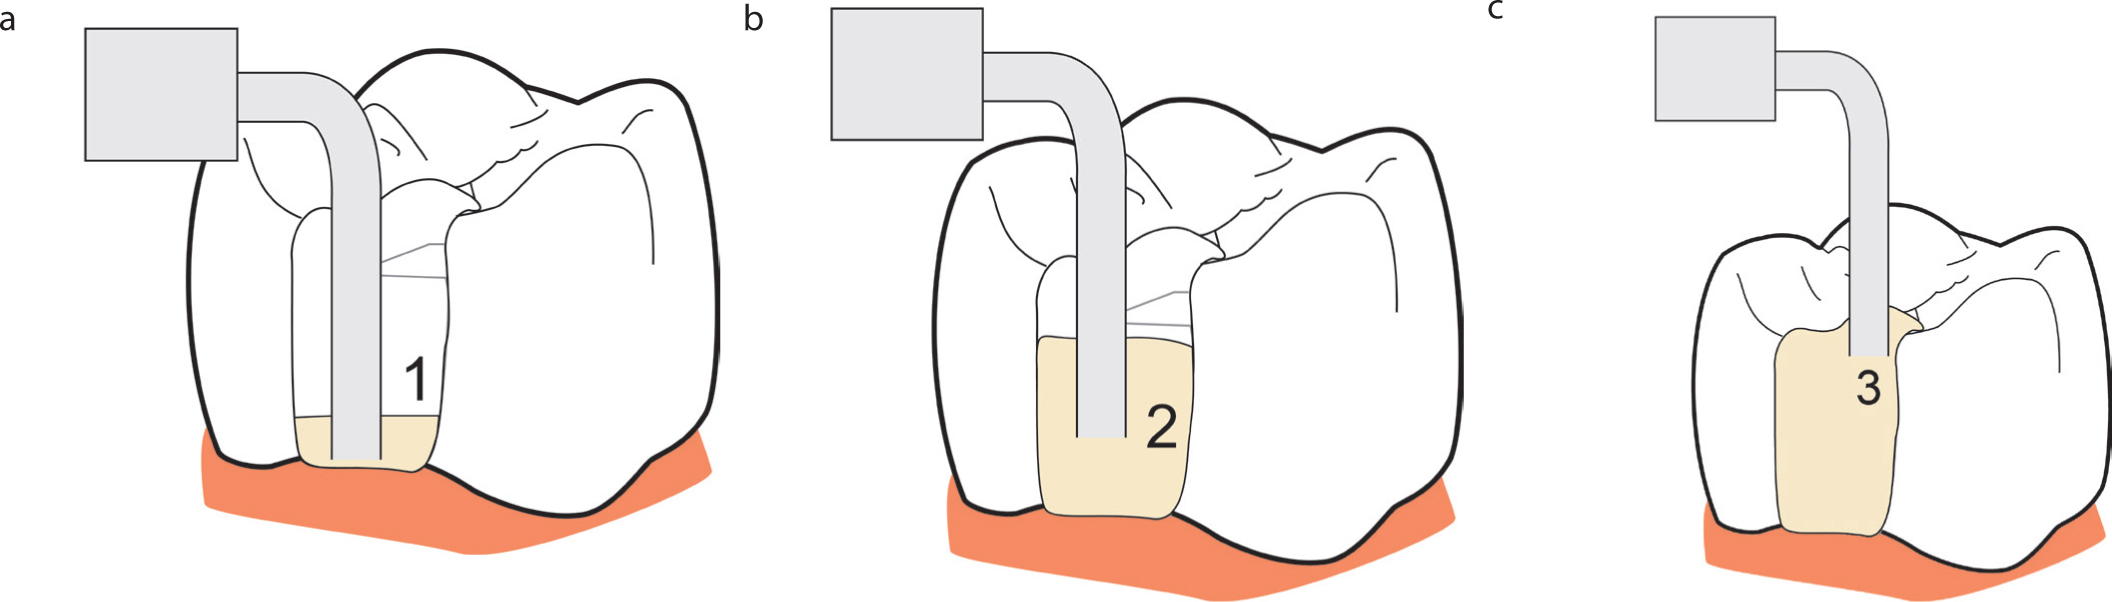
    When filling, ensure increment thickness does not exceed manufacturer's IFU. If using a flowable resin, FILL the preparation from the BOTTOM UP to minimize the risk of trapping air (Figure 9).

    Figure 9. (a-c) If using a flowable resin, fill the preparation from bottom up to avoid trapping air.

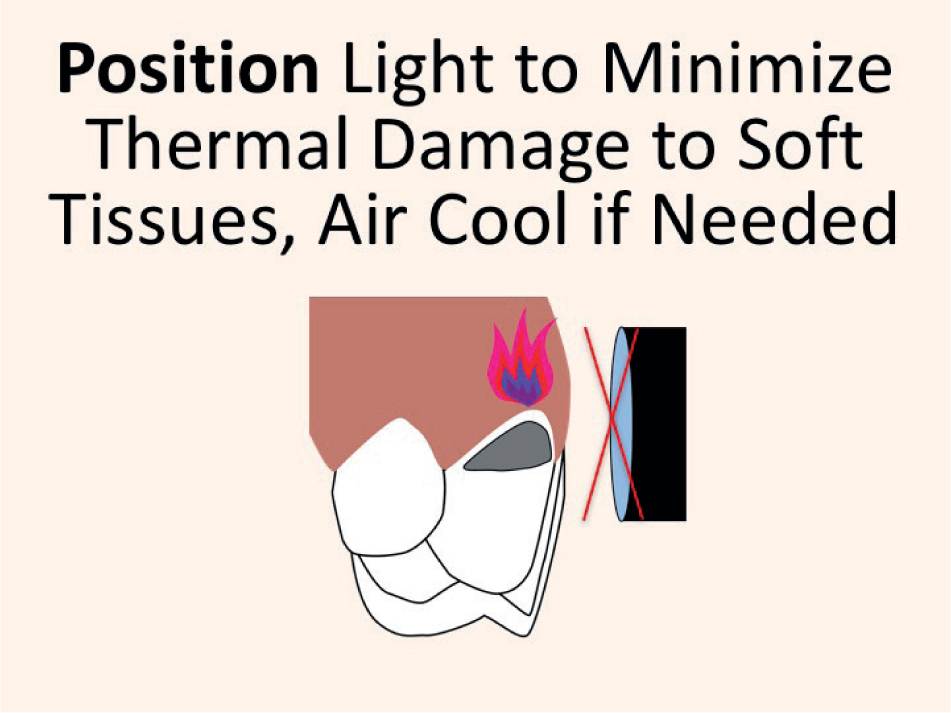
    Take aim and light cure

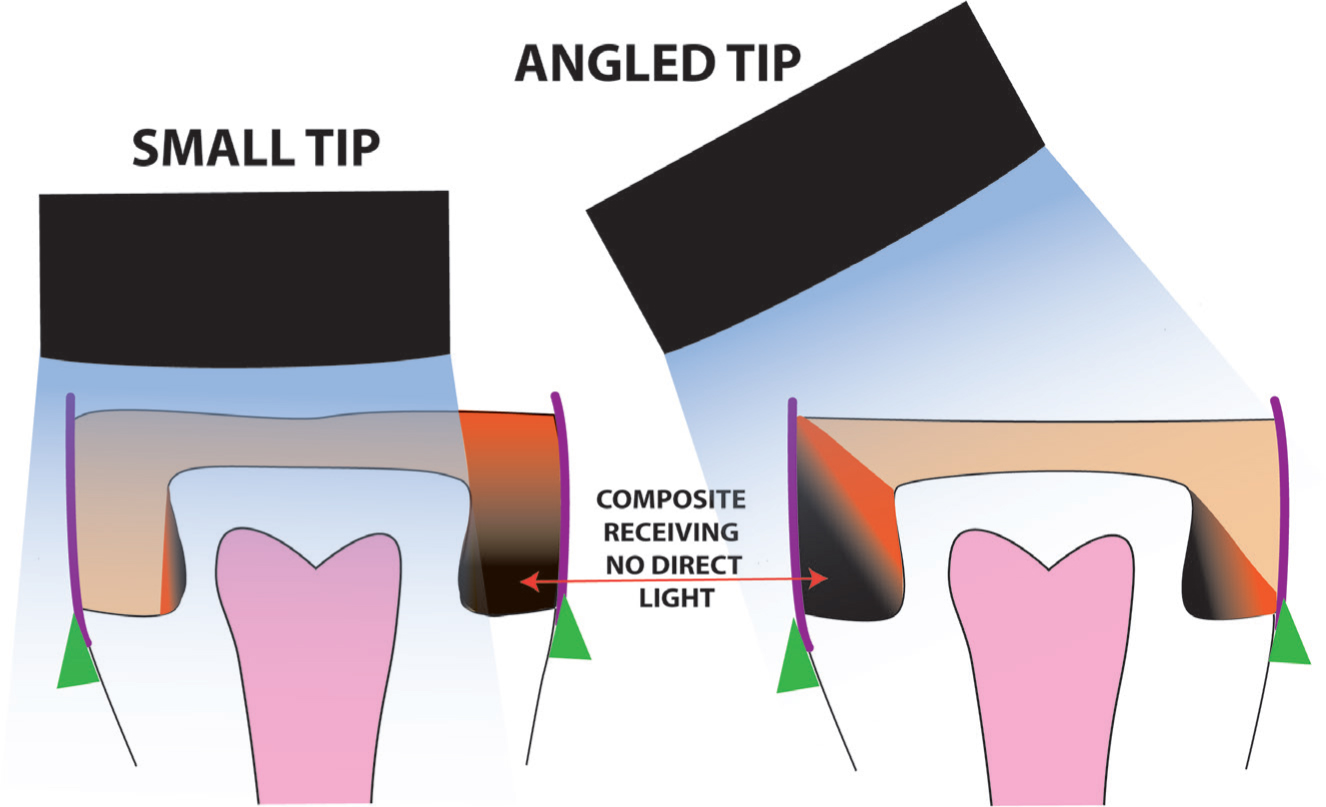
    The light source must be directed to cover all of the resin and to avoid shadows, even if this requires overlapping cure cycles. Position the light directly over the region of the restoration to be cured, making sure to minimize soft tissue coverage (Figure 10). Re-irradiation of proximal box regions from the buccal and lingual after the matrix band is removed is an effective means of supplementing curing from the occlusal surface, but it should not be relied upon to provide all the light.9,10

    Figure 10. TAKING AIM. Position the light directly over the region of the restoration to be cured making sure to minimize soft tissue coverage
  • EYE PROTECTION. To prevent both acute and chronic retinal damage, the operator and dental assistant should use appropriate EYE PROTECTION from the blue light so that they can monitor what they are doing with the curing light (Figure 11).11,12 The patient's eyes should also be protected to prevent accidental exposure.
  • LIGHT CURE. Light cure for the RECOMMENDED TIME for the material you are using.
  • THERMAL RISKS. Contrary to original claims, LED curing lights are not ‘cool lights’. Early research articles tested low power LED LCUs that produced little heat. Contemporary higher power LED units can produce significant temperature increases during light curing. This risk is greatest in deep cavities when curing the bonding agent that is close to the pulp. Do not arbitrarily increase cure times in deep cavities without considering the thermal effects of delivering large amounts of energy to the pulp. CONSIDER the use of a self-cure glass ionomer CAVITY LINING or base in regions that are close to the dental pulp. Alternatively, use the low power output mode designed for curing bonding agents.
  • CLEAN and disinfect the light unit (Figure 5).11,13 Autoclave the light guide where possible. Type II LED lights that have the emitter in the unit head require barrier protection when used intra-orally, whereas Type I units normally have an autoclavable light guide.
  • Figure 11. Use appropriate eye protection so that you can watch what you are doing and stabilize light guide tip when light curing.

    Conclusion

    This article provides a summary of the key points that should be considered when light curing RBC restorations. Practical advice is given on protocols which will allow safe, effective and efficient restorative practice.