Burke FJT, Murray MC, Shortall ACC Trends in indirect dentistry: 6. provisional restorations, more than just a temporary. Dent Update. 2005; 32:443-452
John P, Muthukumar B, Kumar MV Comparison of the effect of dentin bonding, dentin sealing agents on the microleakage of provisional crowns fabricated with direct and indirect technique – an in vitro study. J Clin Diagn Res. 2015; 9:ZC54-57
Wassell RW, George GSt, Ingledew RP, Steele JG Crowns and other extra-coronal restorations: provisional restorations. Br Dent J. 2002; 192:619-630
Banerji S, Metha SB, Millar BJ Cracked tooth syndrome part 2: restorative options for the management of cracked tooth syndrome. Br Dent J. 2010; 208:503-514
Burke FJT, Sands P Use of a novel resin composite crown as a long-term provisional. Dent Update. 2009; 36:481-487
Tjan AH, Castelnuovo J, Shiotsu G Marginal fidelity of crowns fabricated from six proprietary provisional materials. J Prosthet Dent. 1997; 77:482-485
Saunders WP, Saunders EM Coronal leakage as a cause of failure in root-canal therapy: a review. Endod Dent Traumatol. 1994; 10:105-108
Skurow HM, Nevins M The rationale of the preperiodontal provisional biologic trial restoration. Int J Periodont Rest Dent. 1988; 8:8-29
Smith BGN, Howe LCUK: Informa Healthcare(Online); 2007
Bosworth® Company.
Rickman LJ, Satterthwaite JD Considerations for the selection of a luting cement. Dent Update. 2010; 37:247-264
Millstein P, Nathanson D Effect of eugenol and eugenol cements on cured composite resin. J Prosthet Dent. 1983; 50:211-215
Campbell S, Roper MB Technique Tips – a direct wax-up technique for an immediate provisional crown. Dent Update. 2015; 42:892-893
Provisional restorations play an important role when providing indirect restorations. There are a number of materials and techniques available for their construction. Careful planning and construction can protect the prepared tooth surface, improve the periodontal condition and help plan for the definitive restoration. A good provisional restoration can save time, money and effort.
CPD/Clinical Relevance: Provisional restoration construction is an integral part of the indirect restorative process for inlays, onlays, crowns and bridges.
Article
A provisional indirect restoration, commonly referred to as a temporary or interim restoration, is described as a fixed restoration designed to enhance aesthetics, stabilization and/or function for a limited period of time, after which it is to be replaced by a definitive restoration. Often they are used to assist in determination of the therapeutic effectiveness of a specific treatment plan or the form and function of the planned for definitive restoration.1
The importance of provisional restorations can sometimes be underestimated and a poorly constructed provisional restoration can compromise the success of the definitive restoration. This article aims to provide an understanding of provisional restorations for crowns and conventional bridgework, outlining the materials used, the techniques which are commonly adopted, and how a provisional restoration can influence the outcome of the final restoration.
Why temporize?
Minimally prepared teeth that are to receive an adhesive restoration, such as a veneer or resin-retained bridge, do not usually require temporization. However, for more invasive preparations, a provisional or temporary restoration becomes necessary. A provisional restoration is an essential part of the indirect restorative procedure, placed after preparing teeth for single unit crowns or conventional bridges, and should remain in situ until delivery of the final restoration.2 Provisional restorations serve biological, mechanical and aesthetic functions, which are outlined in Table 1.2,3,4,5,6,7,8,9
Comfort and pulpal protection
Cover exposed dentine and protect the prepared tooth from dentine sensitivity and plaque accumulation on freshly prepared dentine with open dentinal tubules which may cause subsequent pulpal pathology.3 It has been suggested that the application of a dentine bonding agent prior to cementation of the provisional restoration may give added protection.
Coronal seal
In root-filled teeth, maintenance of a good coronal seal can be pivotal in a successful outcome to root canal treatment.9
Occlusion and positional stability
Maintain optimal proximal and occlusal contacts and prevent unwanted tooth movement. They should resist forces of removal and loading to maintain their role in situ.
Periodontal health
Provide cleansable margins with appropriate emergence profile to facilitate oral hygiene and stabilize gingival health as well as prevent gingival overgrowth.
Aesthetics
An acceptable appearance, which will mimic the original tooth or that of the final restoration, is essential and can help prevent unwanted problems with tooth shape when fitting the definitive restoration.
Diagnosis
Can be used to help assess the effect of occlusal and aesthetic changes with the patient. The provisional restorations can be altered as required until the desired change is attained and this can then be communicated to the laboratory for incorporation into the final restoration. In some cracked cusp cases, temporization with an occlusal coverage restoration can be a useful diagnostic tool.
Other
Provisional restorations can also be used to help measure tooth reduction, assess a tooth’s long-term prognosis and improve isolation during endodontic treatment.
As demonstrated in Table 1, provisional restorations serve a varied and important role, which should be reflected in the time and effort taken in their construction. Wassell et al highlighted the importance of a well-constructed provisional restoration, stating that equal time should be spent on temporization as is spent on tooth preparation and that it should not just be an afterthought once the definitive impression is taken.4
Chairside provisional restorations should be constructed following tooth preparation and before the definitive impression is taken, as it allows assessment of tooth reduction and refinement of tooth preparation before the final impression is made, potentially saving time, producing a better end result for both patient and clinician (Figures 1 and 2). Some clinicians even advocate taking the definitive impression at a later appointment, as this allows for tissue healing and a well-adapted provisional restoration can improve gingival tissue management, leading to a more accurate definitive impression and definitive restoration fit.10
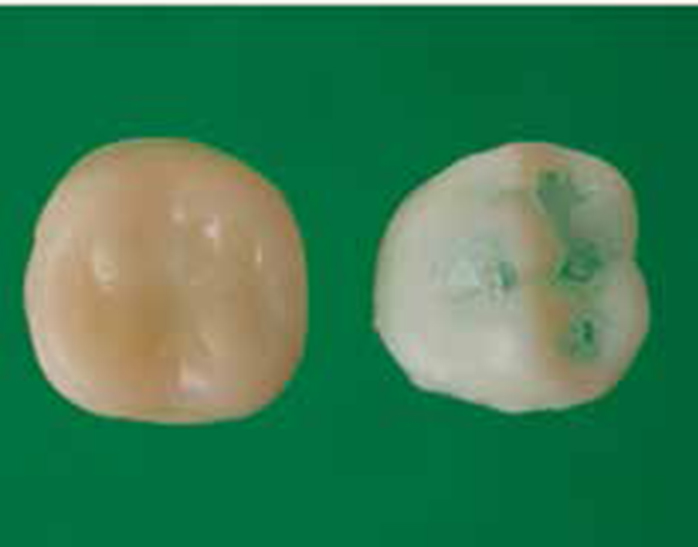
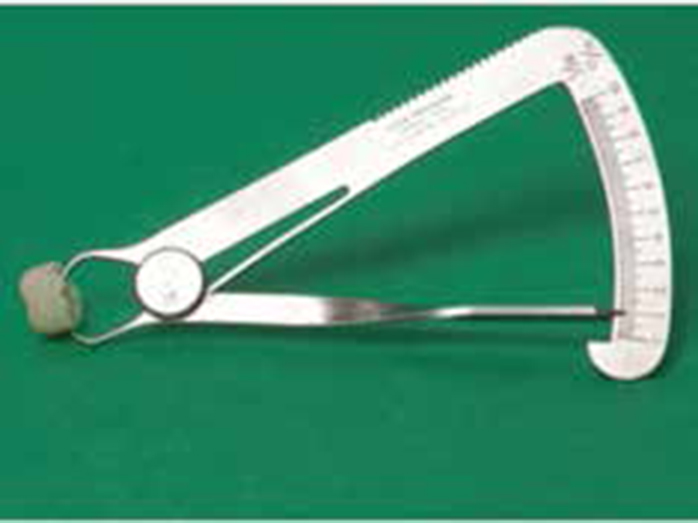
Figure 1. Custom-made provisional crowns. The provisional crown on the right is too thin and is a sign that the preparation may require further reduction.Figure 2. Callipers can be used to measure thickness of provisional restorations and therefore preparation reduction.
Materials available
Broadly speaking there are two types of provisional restoration:
Direct (chairside); or
Indirect (laboratory made).
Direct provisional restorations are commonly made from one of the following categories:
Preformed crowns;
Powder/liquid acrylic;
Composite-based resin.
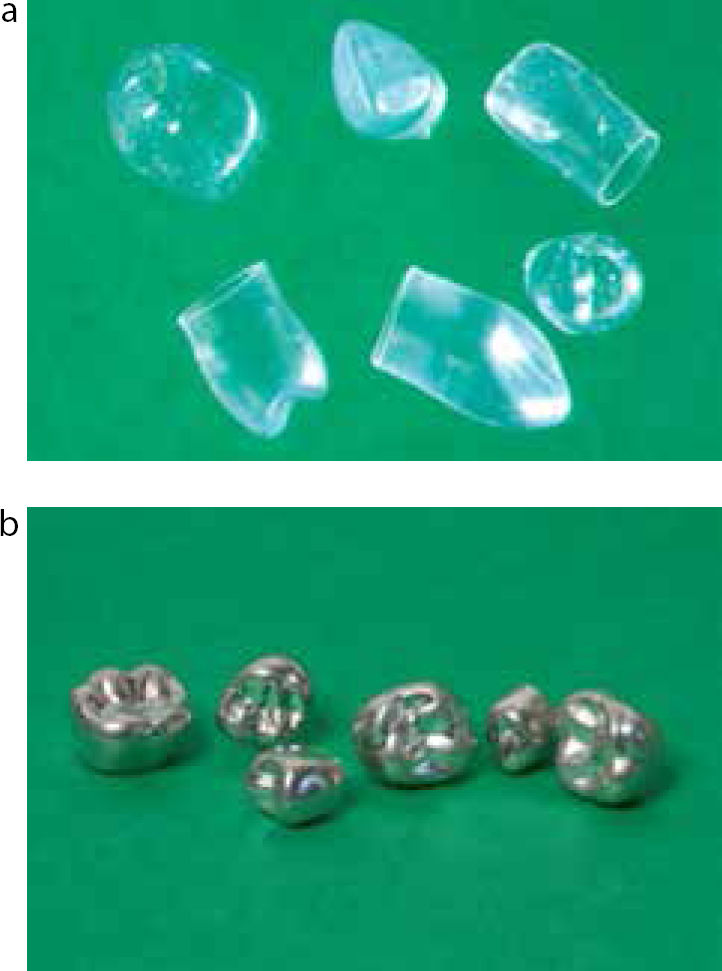
Preformed crowns can be made in tooth-coloured polycarbonate shells (clear shells to be filled with a tooth-coloured temporary material) or they can be metal shells, including stainless steel, nickel chromium and aluminium (Figures 3 and 4). They come in different shapes and sizes and require marginal, occlusal and internal adjustment to fit the prepared tooth. As the crowns are of predetermined configuration (by the manufacturer), it is unlikely that a perfect fit into the prepared space is obtained without manipulation and it can therefore be difficult to establish occlusal and proximal stability.2,3,4,5,11 Use of these preformed crowns means that a wide range of stock (tooth type, quadrant and sizes of each) is required, which can have a significant financial cost initially.
Figure 3.
(a) Preformed clear crowns. (b) A selection of stainless steel crowns.Figure 4.
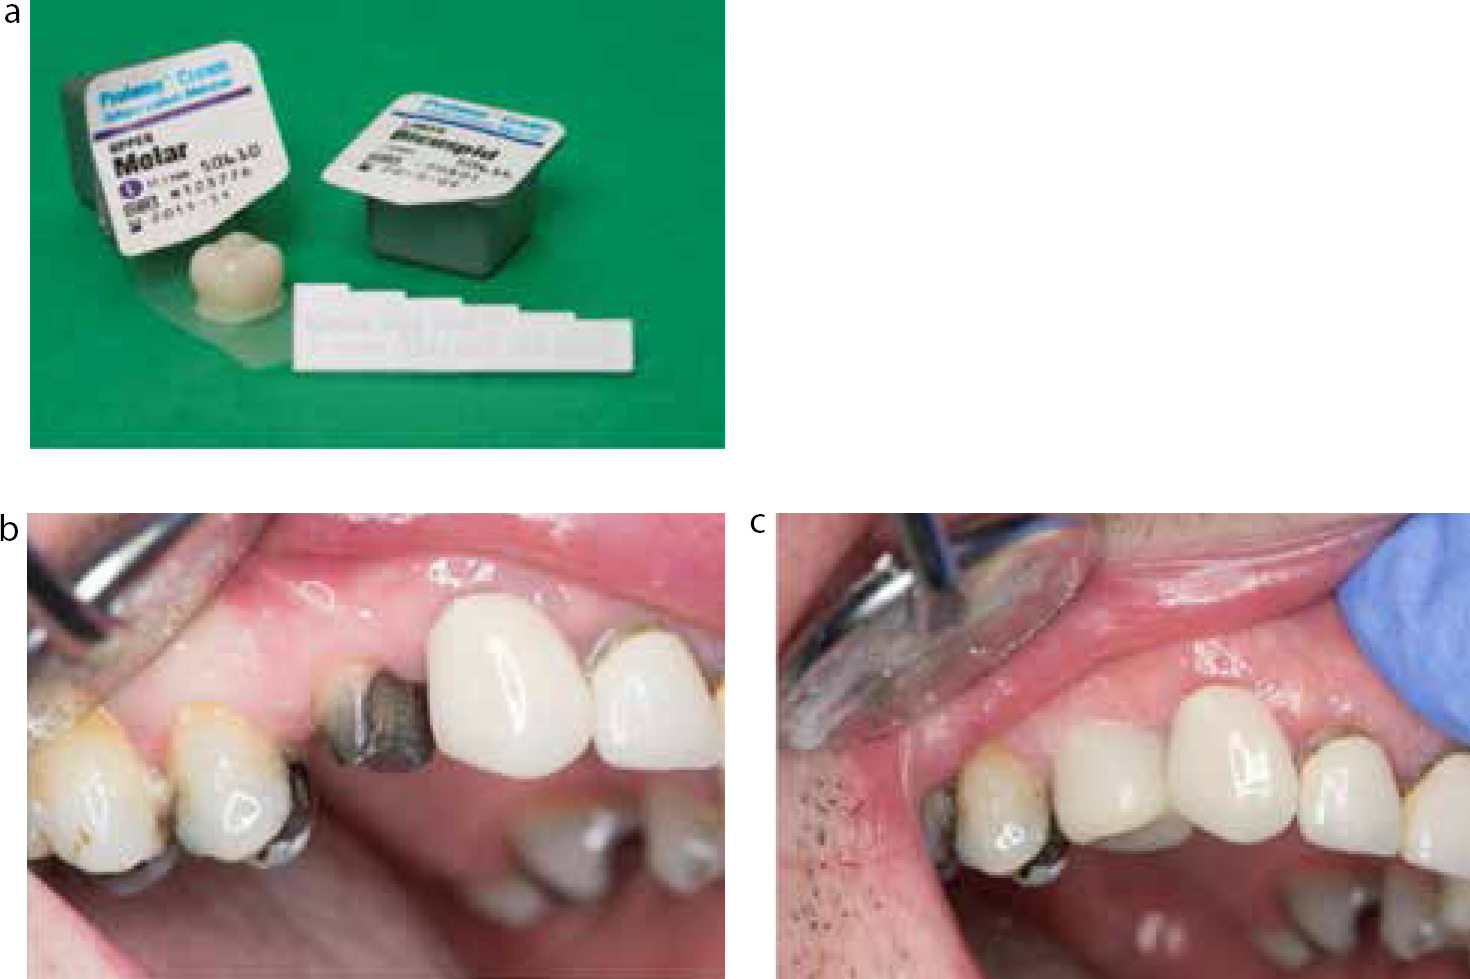
(a–c) Protemp™ preformed SMC crowns used to temporize tooth UR4.
Developments in materials have led to the availability of self-supporting, malleable and light-cured (SMC) preformed provisional crowns, such as Protemp™ crowns (3M ESPE, St Paul, USA).7 These have a wax-like texture before being light-cured and can be used on premolar and molar teeth (Figure 4). Although no solid evidence as to the long-term use of these types of provisional crowns has been published, case studies suggest that they have good fracture and wear resistance, and it has been suggested that they can be used as long-term provisionals in cases where teeth are of a questionable prognosis. The wear rate and physical properties are comparable to that of composite resin and they perform as well as Protemp™ (3M ESPE) and better than Trim® (Bosworth, IL, USA) in a masticatory simulator.7
When Protemp™ crowns have been moulded marginally with a flat plastic instrument and occlusally by asking the patient to bite together and sliding side to side, the crown can be ‘snap set’ by light curing for a second or two from buccal, occlusal and lingual sides. Once done the crown can be removed and fully light cured outside of the mouth. On reseating, the fit surface may need adjustment due to any polymerization shrinkage which, if set fully in the mouth, could prevent its removal without sectioning.
Polymethylmethacrylate (PMMA) is a self- or heat-cured acrylic, such as Jet™ (Lang Dental, IL, USA) and Trim®Plus (Bosworth, IL, USA). It is an older style material and is mainly used in the manufacture of indirect provisional restorations in the laboratory. It has good aesthetics and strength but has high polymerization shrinkage, is highly exothermic on setting and releases free monomer. This may compromise prepared margins and lead to pulpal damage if used intra-orally.2,3,4
Polyethylmethacrylate (PEMA) is a monofunctional acrylate monomer, such as Snap™ (Parkell Inc, NY, USA) and Trim® (Bosworth, IL, USA). They have more direct applications as they have less polymerization shrinkage and produce less exotherm on setting than PMMA. They do, however, have less wear resistance and reduced aesthetics.2,3,4 It is also recommended that these materials are not used during pregnancy as dibutyl phthalate is a presumed human reproductive toxicant12 and, for these reasons, they have decreased in popularity, with materials such as Trim® becoming increasingly harder to purchase.
Bisacrylate composite materials, such as Protemp™ Garant 4 (3M ESPE), Luxatemp™ (DMG, Germany) and Cool Temp® (Coltene, Switzerland) provide good aesthetics, come in a range of shades and have reduced heat and shrinkage on polymerization. They are, however, difficult to add to and can be expensive owing to their gun cartridge and double helix mixer tip delivery system.2,3,4 Patients should also be warned that this type of provisional may stain with certain food and drink.
Light-cured materials, such as restorative composite and urethane dimethacrylate, can also be used for provisional restoration, facilitated through the use of a preformed clear matrix constructed from a diagnostic wax-up.3,4
How to do it
Most provisional restorations for crowns and bridges are constructed intra-orally. However, some are made indirectly in the dental laboratory.
Direct technique: preformed crowns and replica technique (using matrices Figure 5)
Figure 5.
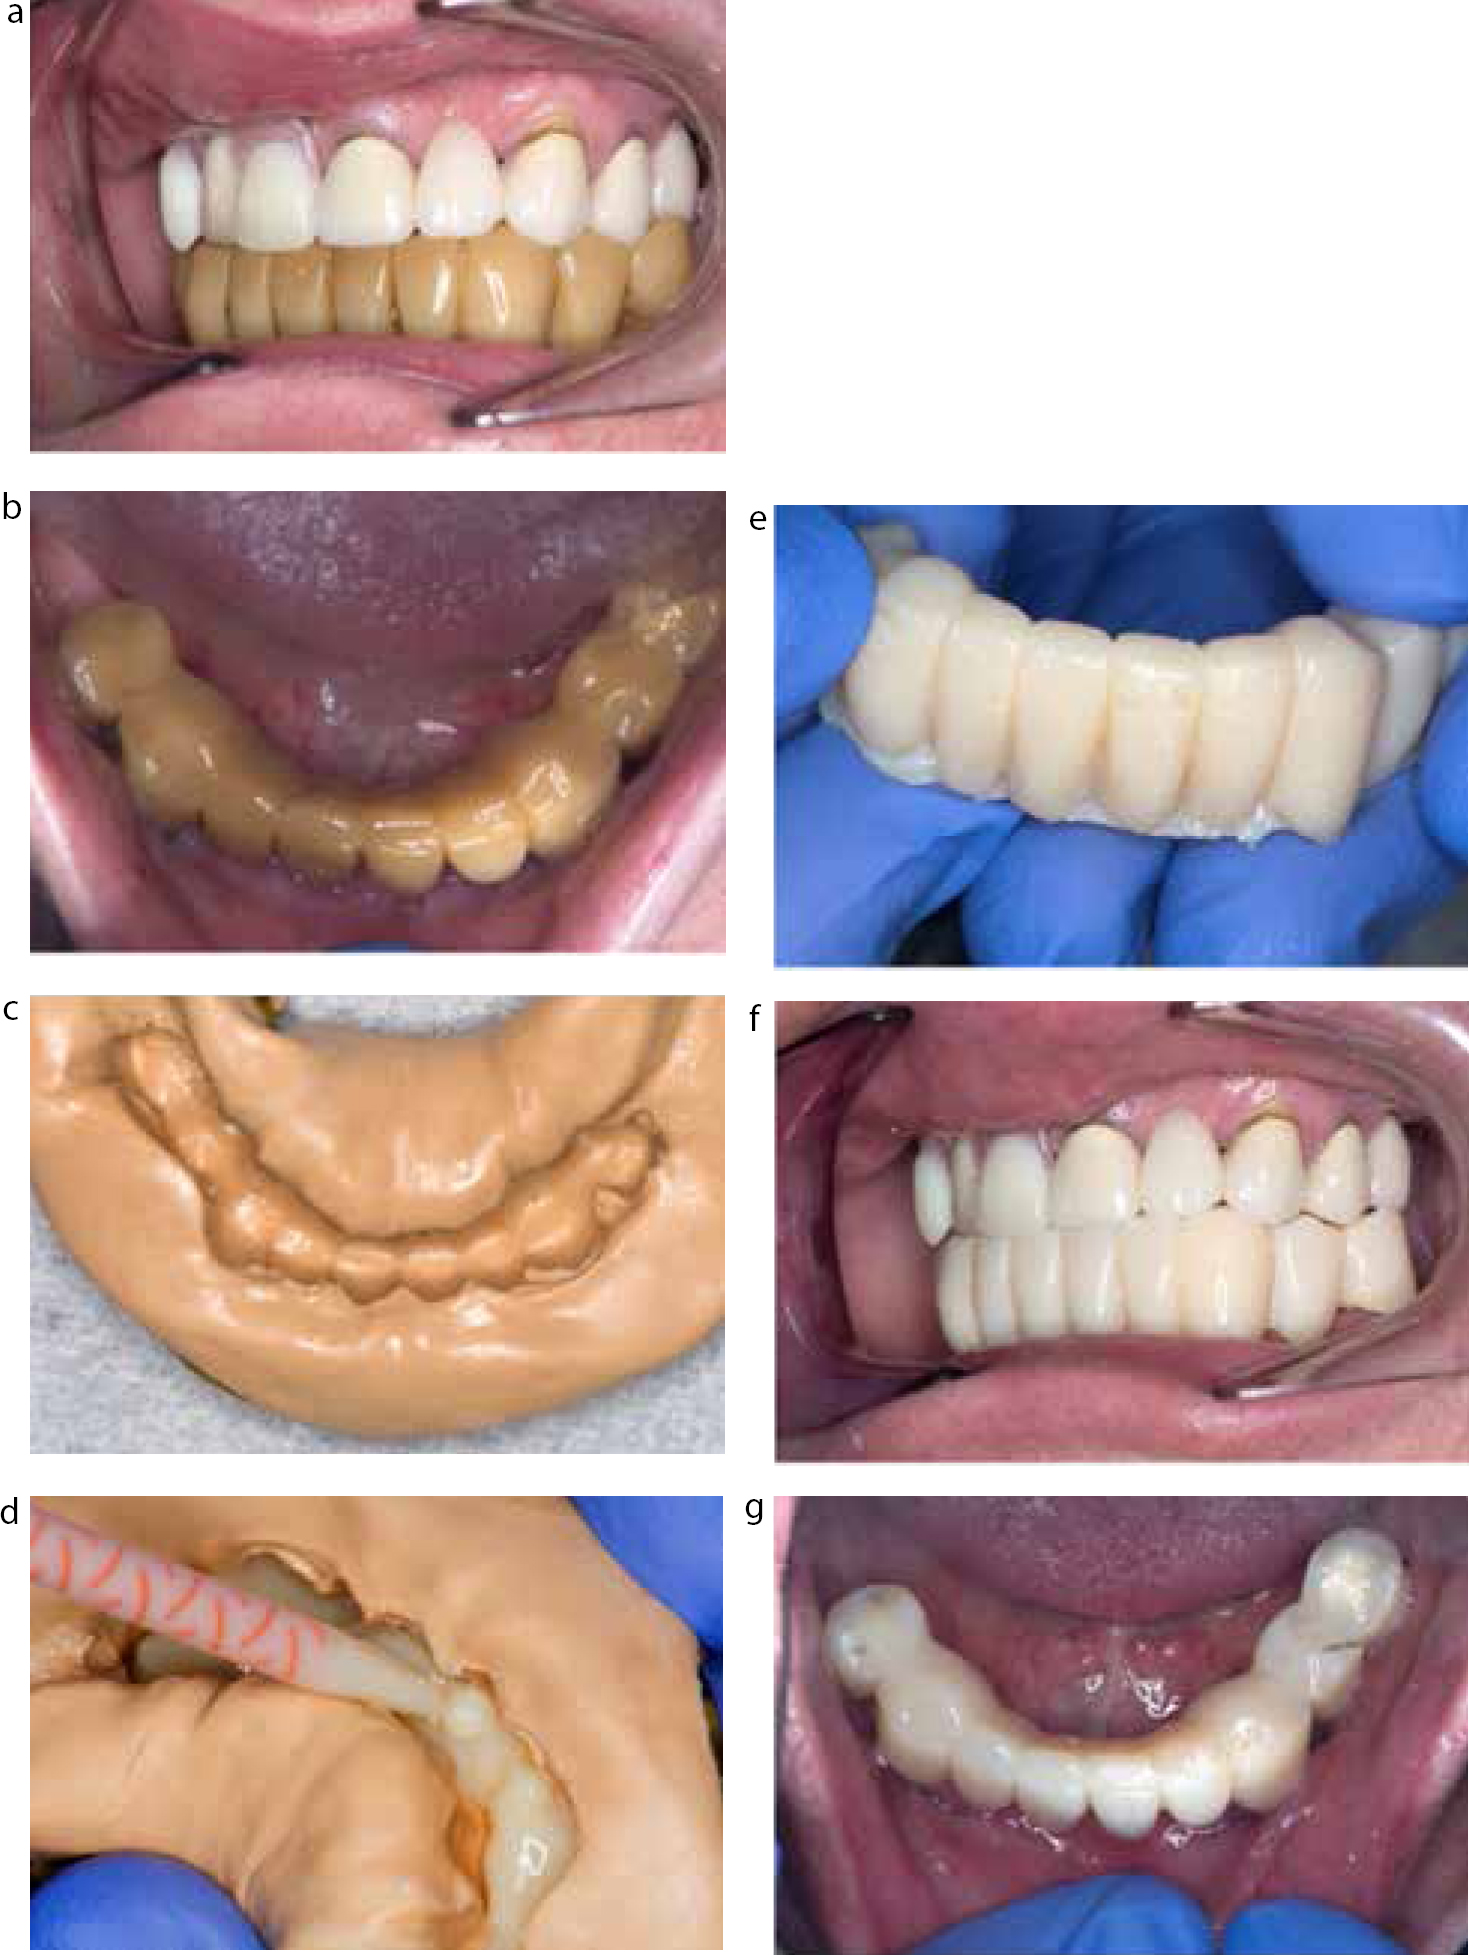
(a, b) Patient with large provisional restoration, which has been in use for 8 years and heavily stained. (c) Prior to dismantling restoration, a putty matrix was constructed. (d) Temporary material (Protemp™ 3M ESPE) placed in the matrix and placed on prepared teeth. (e) Provisional bridge before adjusted, trimmed and polished. (f, g) Final provisional restoration in place.
Preformed crowns will nearly always require some form of adjustment to the cervical margins, occlusion and internal fit surface. A crown is chosen with an appropriate mesial/distal width to achieve a contact point with the adjacent teeth; some manufacturers supply measuring tools to aid this selection.4 The margins are trimmed as appropriate to ensure that the crown seats fully over the tooth preparation without impinging on the gingival soft tissues and requires as little occlusal adjustment as possible. Preformed metal crowns also require marginal adjustment via crimping, burnishing and use of stones. Clear crown formers can be adjusted with slow speed steel burs, tungsten carbide burs, scissors or Sof-Lex™ discs (3M ESPE) to avoid the melting problem that a high speed diamond causes.4 Once trimmed, the crown will normally have an undulating cervical contour, more apical buccally and lingually and rising interdentally to avoid trauma to the interdental papilla.
Once the preformed crown has been trimmed, the prepared tooth can be coated in a thin smear of Vaseline and the preformed crown filled with a self-curing material such as Trim® (Bosworth), ideal for use in conjunction with polycarbonate crowns, or Protemp™ (3M ESPE), ideal for use with clear plastic crown formers. When using the clear plastic crown formers it is advisable to make a pinpoint hole at the incisal angles or canine or cusp tips with a sharp probe to allow any trapped air to escape, so preventing a bubble in the set material. The filled crown form is then seated fully over the tooth preparation and the excess is removed, particularly interproximally, before fully set. When the material starts to thicken, the provisional restoration should be partially removed and re-seated a number of times to avoid the material setting and locking into any undercuts. Once set and removed, the restoration can be adjusted and polished as described later in the article. Preformed metal crowns are preferred for metal crown preparations as acrylic or resin materials are weak in thin section.11
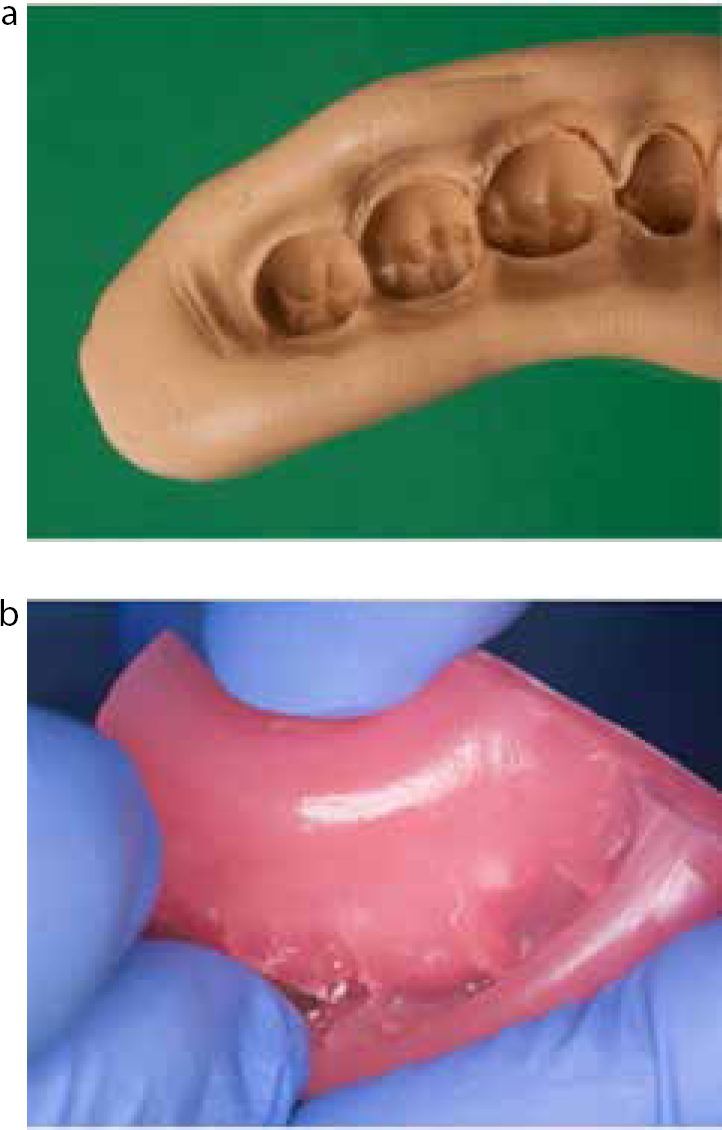
The replica technique is probably the most commonly used technique to make a provisional restoration, as it is quick and relatively inexpensive and customizes the crown or bridge to the individual tooth or teeth. This technique provides a provisional restoration of close fit as it is made specifically for the prepared tooth and replicates aspects of the occlusion and aesthetics, as desired. A pre-preparation impression (matrix) is taken using alginate, a silicone putty (Figure 6a) or pink modelling wax (Figure 6b) of the tooth to be prepared and adjacent teeth. Whilst silicone putty could be moulded free hand around the teeth in question and allowed to set, use of an impression tray helps to support and reseat the impression material and would be essential when using alginate. Alginate is good at absorbing heat of polymerization of the material used and is a cheaper alternative, however, it is dimensionally unstable over time and cannot, unlike a silicone putty, be disinfected and reused as necessary should a new provisional be required.
Figure 6.
(a, b) Pre-operative putty and wax matrix used in the replica technique. The wax matrix can be carefully adjusted with a hot instrument to alter the anatomy, if required.
Often the tooth to be prepared, together with its core, may not be the ideal shape to replicate in the pre-preparation impression. For example, a core may have been placed with less than ideal contours due to difficulties in placement intra-orally; it may lack proximal contour and contact points, and in areas it may not be in occlusion. In these areas little or no tooth reduction may be necessary during crown preparation, and using the replica technique without any modification will produce a provisional which is incomplete in areas (perforated) and weak. These problems can be overcome by either adjusting the impressions or re-contouring the tooth and core with wax prior to taking the pre-preparation impression. Where considerable change to the tooth contour is required in more extensive restorative work, a diagnostic wax-up is necessary.
Adjusting the matrix
The matrix can be trimmed internally to ease insertion and to increase bulk of material around prepared teeth. However, when the matrix is constructed of an impression material, often some of this material will become embedded in the temporary restoration. This can be avoided by using a wax matrix which can be smoothed with a hot instrument once adjusted (Figure 6b).
Re-contouring the tooth and core prior to impression
In areas requiring building up of the provisional restoration, or if a patient has lost a previous provisional restoration, soft red wax can be used; using an adhesive varnish on the prepared and isolated tooth will allow the wax to stick whilst moulding and construction of a new matrix (Figure 8). Avoid using a bis-acrylate composite if doing this as it will adhere to the prepared surface.3,4
Figure 7.
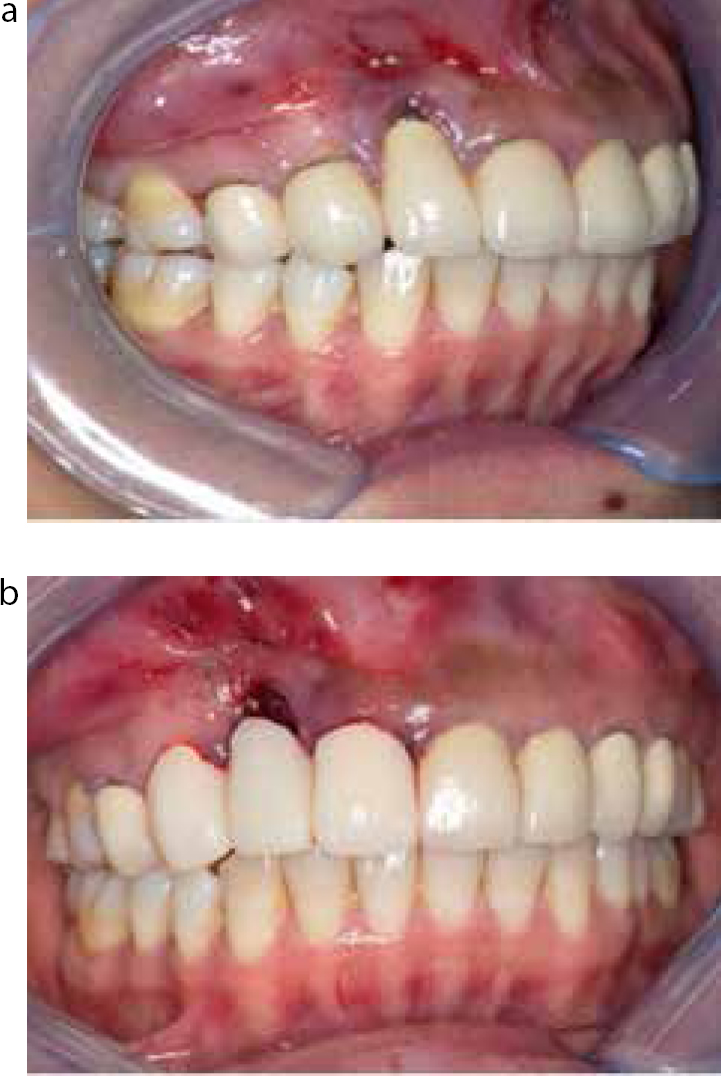
(a, b) Patient with perimplantitis in UR2, large span bridge dismantled provisional bridge constructed UR1–3 with a hygienic pontic, which allowed soft tissue healing following removal of dental implant.Figure 8.
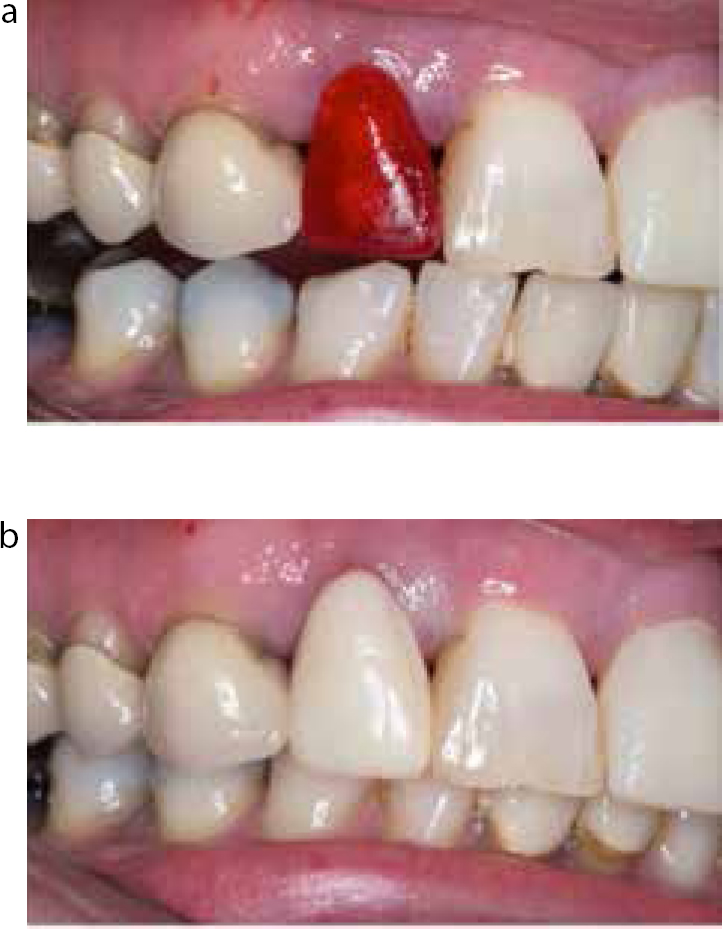
(a) This patient lost the temporary restoration used on tooth UR2. There was also no pre-operative putty available so a chairside waxup was made in soft red wax.15(b) A putty matrix was taken of this wax-up and a new temporary restoration was constructed in Trim® (Bosworth).
Using a diagnostic wax up
If creating a provisional restoration from a diagnostic waxup, a clear matrix can be made in the laboratory and used in the same way as the impression material. This helps patients visualize the planned restorative changes and assess their acceptance and function of any necessary occlusal changes. Apply Vaseline to the prepared teeth; dry the matrix and syringe material into the deepest part of the tooth being prepared for the provisional restoration, avoiding incorporating air bubbles. Polyethylmethacrylate or, more commonly, bis-acrylate composite is used. Once at the rubbery stage, remove, adjust and polish accordingly.
When using polyethylmethacrylate it is possible to remarginate the temporary restoration ensuring an adequate marginal fit, which will help maintain and promote healthy gingival tissues. Once the temporary is constructed and adjusted, the tooth is dried and polyethylmethacrylate is drizzled around the margins. The temporary crown is then reseated and the material is allowed to set. Once set again this is adjusted before final polishing. Remargination in this way is more difficult to achieve with bis-acryl. Polishing is completed using polishing discs and, when using bis-acryl, applying an unfilled resin buccally to produce a smooth, light reflective surface.3 If using this technique for provisional bridges, pay particular attention to the pontic margins, making sure that they are easily cleaned by the patient. Also, the fitting surface of a pontic can be added to (remargination) applying pressure to the underlying tissues, producing a socketed effect to the soft tissues and allowing an enhanced emergence profile of the pontic for both the temporary and definitive restoration (Figure 7). This technique is particularly effective when using a PEMA material.
Indirect technique: laboratory-based from study casts and diagnostic wax-ups
In this case, interim direct provisional restorations will still be required. Laboratory-made provisional restorations have their place, particularly for long-term provisional restorations. They are more expensive and a chairside provisional restoration is still required whilst they are being made. For complex multi-unit crown and bridgework, polymethylmethacrylate or composite is often used as it has good colour stability, is cost-effective and has good flexural strength.
Polishing temporary crowns and bridges
In order to achieve a well contoured and polished provisional there are a number of important phases. First, the restoration is carefully trimmed using appropriate composite finishing burs (fine red banded diamond) with particular care taken to ensure that the margin is not altered. Secondly, once this initial trimming is completed, there is a range of commercially available ‘sandpaper’ discs (Shofu, Shofu Dental Corporation, CA, USA and Sof-Lex™ discs, 3M ESPE) available to achieve a smooth surface. Finally, a layer of glaze, such as Biscover™ (BISCO) or Luxatemp glaze (DMG) painted on the temporary will produce an aesthetic end result.
Inlays
There are a number of materials available for the temporization of inlay preparations. Clip (VOCO, Germany) is a hydroxyethylmethacrylate which is placed chairside, light-cured and easily removed using a rigid instrument. Clip F (VOCO, Germany) is another methacrylate-based temporary inlay material containing continuously releasing fluoride ions. These materials, once placed in the inlay cavity and contoured appropriately, are light-cured and produce a good cavity seal, so do not need to be removed for cementing with a luting cement. Care must be taken when using these materials in a cavity which contains composite, as these may bond and create difficulties, removing the temporary inlay. In this case, coating the resin composite with Vaseline before placing and curing the material is recommended.
Luting
Once constructed, provisional restorations need to be cemented into place using provisional soft cement that can be easily removed without damaging the prepared tooth surface.3 There is a range of luting products available, specifically marketed at provisional restorations, including TempBond™ (3M ESPE), TempBond™ (Non-Eugenol) NE (3M ESPE) and Temposil®2 (Coltene), the texture of which can be altered depending upon the inherent retentiveness of the provisional restoration; adding Vaseline softens these while adding zinc oxide powder hardens them. Glass ionomer and resin-based adhesive cements are contra-indicated as they will adhere to the prepared tooth surface and are stronger cements, making removal of the restoration and cementation of the definitive restoration more problematic. Other materials used include zinc oxide eugenol and polycarboxylate, however, these too, especially the latter, can be difficult to remove and are ill advised.3,4,11
If the final restoration is to be cemented, using a resin-/adhesive-based bonding system, it is important to avoid eugenol-containing products for cementation of the provisional restoration as it can reduce the bond strength of resin luting cements to cores.13,14 The bond strength to etched enamel and dentine, however, is unaffected if the prepared tooth surface is polished with pumice and water on removing the provisional cement.3,4,5
Once cemented into place, the occlusion and margins should be re-checked for excess cement to avoid any occlusal trauma or gingival inflammation, respectively, and adjusted accordingly.5,11 Thorough removal of luting cement to prevent periodontal problems, discomfort and poor aesthetics is extremely important. It can be useful, when temporary bridges or linked retainers/crowns are placed, to place knotted floss interdentally beneath the connectors prior to seating the temporaries, to allow removal of excess cement, as often it can be difficult to access these areas to dislodge the cement once set.
Conclusion
There are many different products and ways to construct provisional restorations for indirect restorations. It is important that we understand their purpose and importance so that we can dedicate sufficient time and effort into their construction. Should they fail, or not be well adapted, this may compromise the definitive results, ultimately leading to frustration and the use of further time and materials to rectify.