Burki Z, Watkins S, Wilson R, Fenlon M A randomised controlled trial to investigate the effects of dehydration on tooth colour. J Dent. 2013; 41:250-257
Yamashita A, Yamami T Procedures for applying adhesive resin (MMA–TBB) to crown and bridge restorations. Part 1. The influence of dental non-precious alloys and the treatment of inner surface of metal to adhesion. J Jpn Pros Sot. 1982; 26:584-591
Poyser NJ, Briggs FA The Dycal try-in technique for resin-bonded bridges. Dent Update. 2004; 31:393-397
King PA, Foster LV, Yates RJ, Newcombe RG, Garrett MJ Survival characteristics of 771 resin-retained bridges provided at a UK dental teaching hospital. Br Dent J. 2015; 218:423-428
Djemal S, Setchell D, King P, Wickens J Long-term survival characteristics of 832 resin-retained bridges and splints provided in a post-graduate teaching hospital between 1978 and 1993. J Oral Rehabil. 1999; 26:302-320
Hussey DL, Linden GJ The clinical performance of cantilevered resin-bonded bridgework. J Dent. 1996; 24:251-256
Berekally TL, Smales RJ A retrospective clinical evaluation of resin-bonded bridges inserted at the Adelaide Dental Hospital. Aus Dent J. 1993; 38:85-96
Creugers NH, Kayser AF, Van't Hof MA A seven-and-a-half-year survival study of resin-bonded bridges. J Dent Res. 1992; 71:1822-1825
PANAVIA F2.0 – Kuraray Dental [Internet]. 2011.
Creugers NH Repair and revision 5. Failures and repair of resin-bonded bridges. Ned Tijdschr Tandheelkd. 2001; 108:254-259
Briggs P, Dunne S, Bishop K The single unit, single retainer, cantilever resin-bonded bridge. Br Dent J. 1996; 181:373-379
Botelho MG, Ma X, Cheung GJ, Law RK, Tai MT, Lam WY Long-term clinical evaluation of 211 two-unit cantilevered resin-bonded fixed partial dentures. J Dent. 2014; 42:778-784
Gibson CJ A modified technique for minimal-preparation, resin-retained bridges: four case reports. Dent Update. 2001; 28:442-448
Miettinen M, Millar BJ A review of the success and failure characteristics of resin-bonded bridges. Br Dent J. 2013; 215
Resin-bonded bridges – the problem or the solution? part 2: practical techniques Jasneet Singh Gulati Sara Tabiat-Pour Sophie Watkins Avijit Banerjee Dental Update 2024 43:7, 707-709.
Professor of Cariology & Operative Dentistry, Hon Consultant in Restorative Dentistry, King's College London Dental Institute at Guy's Hospital, KCL, King's Health Partners, London, UK
This is the second part of this two-part series. The first paper discussed key aspects of case selection, planning and design of resin-bonded bridges (RBBs). This paper outlines the important clinical stages involved in the successful provision of RBBs, including communication with the dental laboratory, clinical protocols and management of the de-bonded RBB.
CPD/Clinical Relevance: This paper aims to provide the general dental practitioner with a practical guide to the successful provision of RBBs, highlighting common barriers to successful treatment and how these may be overcome.
Article
RBB clinical procedure
Shade selection
Shade selection should take place prior to the impression stage to prevent tooth dehydration which can result in transient shade change due to desiccation of enamel, leading to poor shade match of the final restoration.1
The shade-taking procedure should also take into account the use of opaque resin cement where this is planned, which may reduce the translucency of abutment teeth.
The shade-taking protocol is as follows:
Remove any distracting colours such as lipstick or cover any bright clothing with a neutral bib (blue or grey);
Switch off the operating light as this should not influence the shade selection. Ideally shade should be assessed with adequate natural daylight or colour-corrected surgery lighting for optimal result;
Ensure that the patient is sitting upright or at 45 degrees. Look at the patient at eye-level, at arms length;
When using the VITA 3D-Master® shade guide (VITA Zahnfabrik H Rauter GmbH and Co KG, Bad Säckingen, Germany) determine the value (lightness or darkness) first from 1 of 5 value groups (horizontally);
Then determine the chroma (degree of saturation, or intensity) within the value group of 2/3 choices (vertically);
Lastly, determine the hue shift depending on whether the natural teeth have a more yellow (left) or a more red (right) cast than the shade sample selected;
Remember that teeth are rarely just one flat shade, but exhibit many different shades and characterizations. Clinical photographs can be used with the selected shade tab below the teeth in question to guide the technician further. A labelled, detailed shade chart/prescription will also help the technician;
Ensure that the patient licks their teeth to keep them hydrated during shade selection. The use of an assistant is advised in the shade-taking procedure.
Clinical Tip
Place a cotton wool roll behind the chosen abutment tooth to mimic the effect of opaque resin cement. This may alter the appearance of the abutment tooth, usually giving it a creamier appearance incisally. Therefore, this must be factored in during shade selection and prescribing characterizations for the pontic to the dental technician. In some cases, a metal backing can be bonded to the contralateral tooth if it is not being used as an abutment, to match the altered shade of the abutment tooth.
Impression stage
Resurface existing adhesive restorations if required (see Part 1);
Full arch working impression with polyvinyl-siloxane or polyether to achieve high surface detail recording with dimensional stability of the material;
Opposing alginate impression, with alginate spread into the fissures with a finger prior to seating the loaded tray to improve occlusal detail;
Occlusal registration with a silicone-based registration paste, or a suitable rigid occlusal registration wax such as Moyco Beauty Wax (Moyco Technologies Inc, Pennsylvania, USA). A wax bite registration is not always necessary where there are multiple stable occlusal contacts, in which case shimstock holds should be recorded in maximum intercuspation and communicated to the laboratory. However, laboratories may prefer to be provided with an inter-occlusal record in addition to this to assist in mounting the casts.
Dental laboratory prescriptions
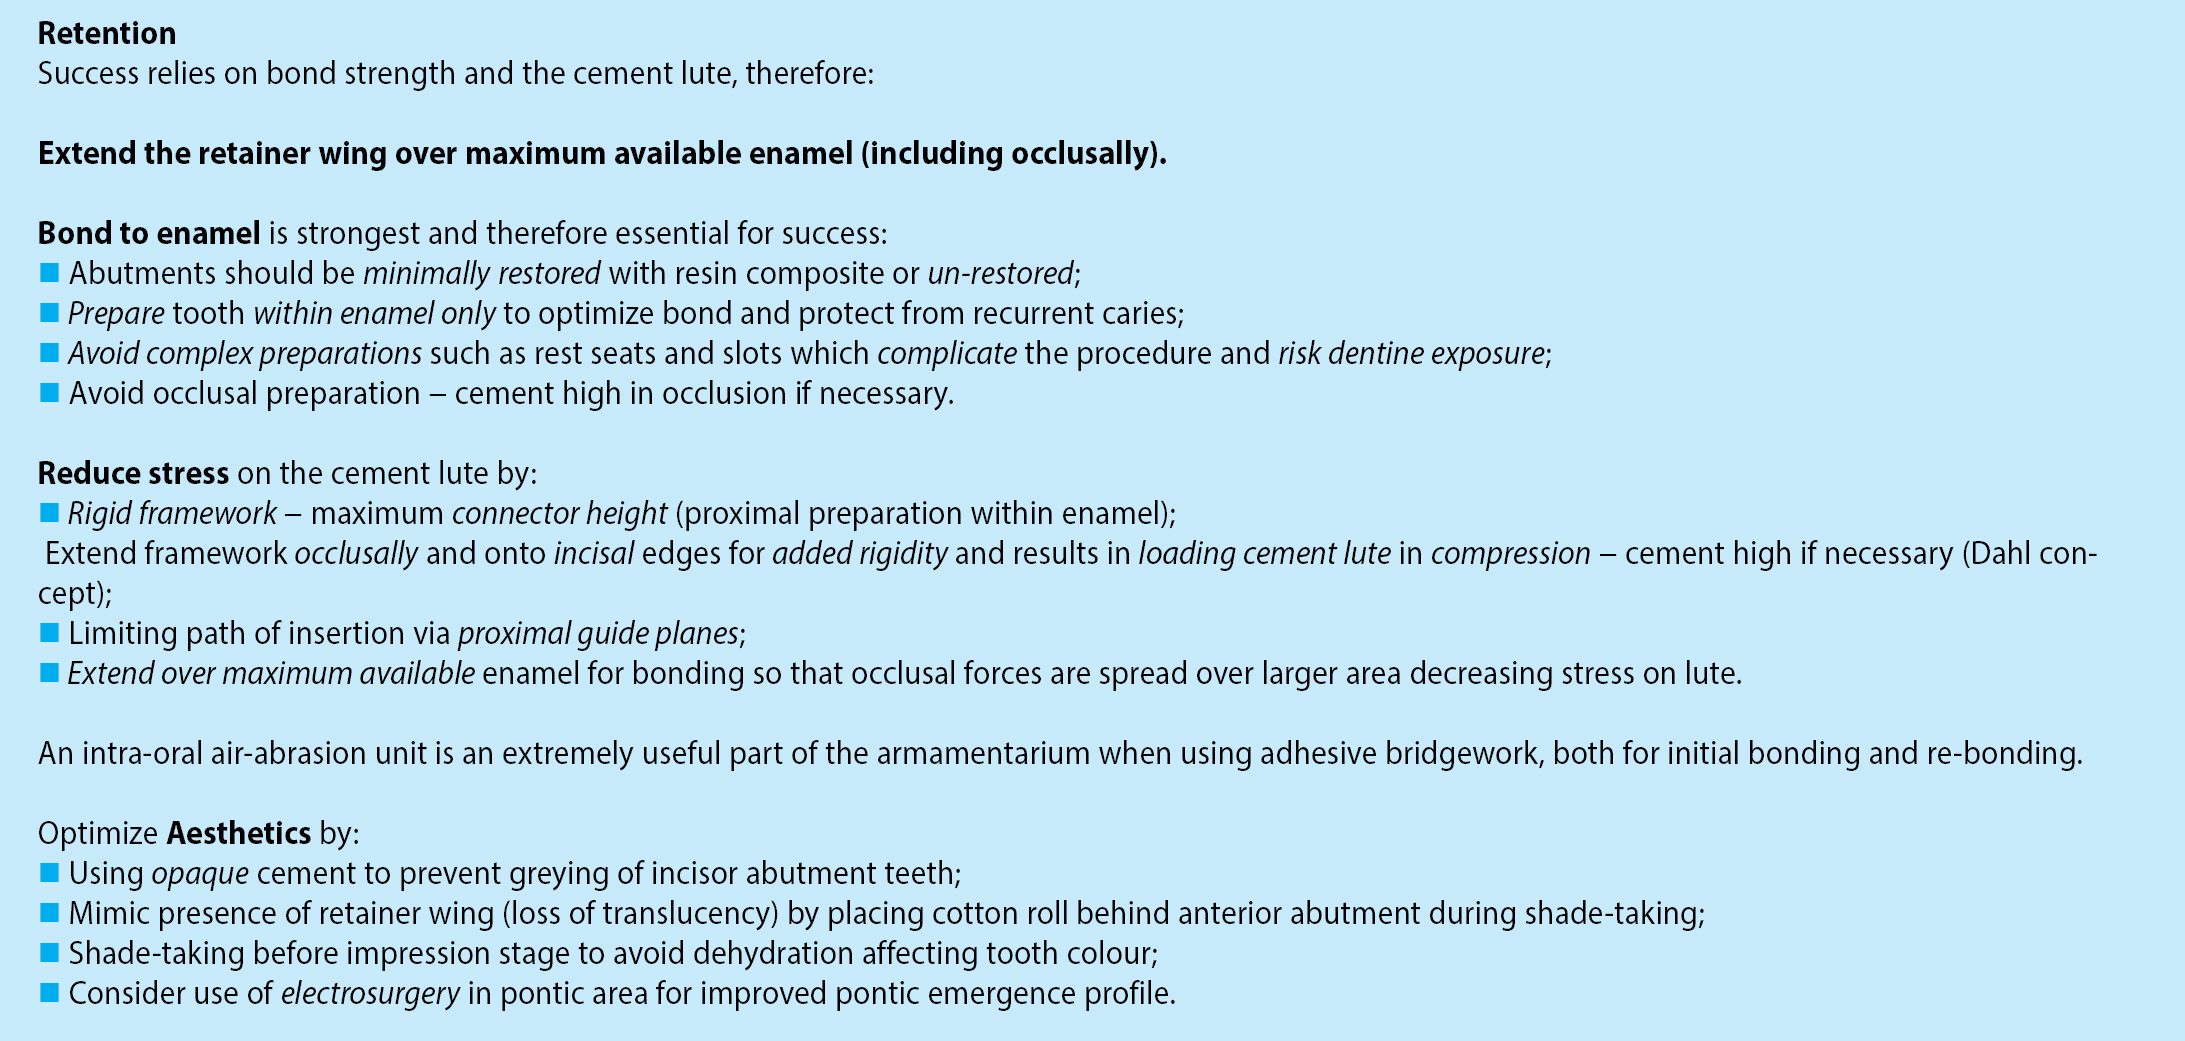
Good communication with the dental technician and attention to detail are important in the successful provision of RBBs. A pontic design should be prescribed to the technician, as well as the required thickness of the metal framework. An example laboratory card is shown in Figure 1.2
Figure 1. An example lab sheet to highlight the key points that should be communicated to the dental technician.
Clinical Tip
A detailed and prescriptive set of instructions for the dental technician is important to ensure predictability and control over the final result as well as good verbal communication. This includes the specification of the thickness of the retainer, which should be at least 0.7 mm (Figure 1).
Try-in
As with all indirect restorations, the restoration should be tried in immediately prior to cementation, to assess the marginal fit, seating, aesthetics and occlusion. However, whilst it is essential to check the fit of an RBB, as with any restoration prior to cementation, the minimal/non-preparation nature of anterior RBBs means that there is a lack of inherent retention and resistance form compared to conventional bridgework; therefore it may not lend itself to a trial fit as easily. Aesthetics can be assessed, but it is important to mimic the change in translucency resulting from the retainer wing and resin cement on the abutment teeth in order to give any idea of shade match. A method described by Poyser and Briggs uses Dycal® (Dentsply Ltd, Surrey, UK) on the retainer wing at a try-in which allows the operator and patient to observe the effect an opaque resin cement such as Panavia ‘Opaque’ (Kuraray Co Ltd, Osaka, Japan) is likely to have on the aesthetics, as well as trial the RBB in speech and smiling (although the retention offered by the Dycal® is of course limited, depending on the inherent stability of the bridge).3 Similarly, the unpolymerized base paste (Panavia ‘B paste’) can also be used to mimic the final aesthetics prior to cementation and has the added advantage of being a closer match to the shade of the final cement. Materials containing eugenol should be avoided as this may affect polymerization of the resin composite luting agent.
Assess restoration on cast for fit and overall quality;
Protect patient airway with butterfly sponge or gauze;
Assess fit and path of insertion intra-orally;
Dry retainer and tooth. Do not desiccate the tooth as this will hinder shade analysis.1
Apply Dycal® Ivory shade to retainer or use unpolymerized cement base paste;
Seat the restoration onto the abutment, pressing firmly for 30–60 seconds;
Assess for retention by removing finger pressure;
Assess aesthetics, speech and the occlusion;
Remove restoration, clean abutment surface with a sharp excavator (if Dycal® used) and with a slurry of pumice and water;
Remove Dycal®/base paste from retainer using a sharp excavator/moist cotton wool and irrigation and air abrade the retainer prior to bonding.
Bonding
Once the try-in has satisfied the operator and patient in terms of aesthetics, the try-in cement should be cleaned off and saliva contamination removed from the retainer, ideally by re-abrading using a chairside air-abrasion unit as described above. Abrading the fit surface of the non-precious metal retainer with 50 microns alumina ensures an optimal thickness of oxide layer on the roughened surface of the alloy to improve bonding to resin cements.2 Where a chairside air-abrasion unit is not available, the fit surface of the retainer wing must be cleaned thoroughly and acid-etched to remove surface contaminants such as saliva, followed by a thorough rinse.
With regard to the material for adhesive bonding, there are many resin cements commercially available that are indicated for RBBs. Much of the evidence published has used variants of Panavia, which is the authors' preferred choice of resin cement for RBB bonding.4,5,6,7,8 The most pertinent recommendation is always to follow the manufacturer's instructions for use as accurately as possible, as they vary even between Panavia 21 Ex (Kuraray Co Ltd, Osaka, Japan) and Panavia F2.0 (Kuraray Co Ltd, Osaka, Japan). Table 1 summarizes the differences between the available variants of Panavia and their clinical implications.9
Resin Cement
Panavia F2.0
Panavia 21 Ex
Curing type
Dual-cure
Self-cure
Shades available
TC (tooth colour), White, Opaque, Light
EX (white), TC (tooth colour) and OP (opaque)
Working and setting time
Up to 3 minutes working time. 3 minutes setting time for chemical cure, or 20 seconds of conventional halogen or LED light cure
Up to 4 minutes working time 3 minutes setting time
Added benefit
Releases fluoride - although there is no proven clinical benefit of its addition
Easier dispensing of the paste component
Clinical implications and tips
The Opaque paste of Panavia F2.0 need not be light-cured as it has no photo-initiator and a low curing depth. Panavia Opaque should be allowed to set chemically for 3 minutes using Oxyguard II® around the margins to prevent oxygen inhibition of setting reactionleft">Always use Oxyguard II® when using Panavia 21 Ex to allow complete chemical curingleft">There is no need to use Alloy Primer when using a non-precious metal retainer as described in this paperleft">Despite ED Primer II being a self etching primer, it is advisable to use acid etch, especially on unprepared enamelleft">Always apply ED Primer II to the abutment (tooth) and apply the paste to the restoration.left">Both Panavia F2.0 and Panavia Ex kits should be stored in a refrigerator (2–8 °C) when not in use, and should be brought to room temperature for 15 minutes before using; this will restore the normal viscosity of the paste, as well as preventing bubble formation while dispensing ED Primer II.
Clinical Tip
An intra-oral air abrasion unit is an extremely useful piece of equipment when adhesive dentistry is used and therefore an investment worthy of consideration. Air-abrade the RBB retainer after try-in/prior to bonding with 50 μm alumina. This removes surface contamination, roughens and allows optimal oxide layer formation on the surface of the alloy to improve bonding to resin cements such as Panavia F2.0.
Bonding protocol with Panavia F2.0
Isolate: consider rubber dam placement, but take care as, if the rubber dam prevents full seating of the restoration, consider using alternative means of isolation such as cotton wool rolls and retractors such as Optragate (Ivoclar Vivadent, Schaan, Liechtenstein);
Clean abutment surface with a slurry of pumice and water;
Etch (K Etchant Gel, Kuraray, Osaka, Japan) the abutment surface for 10 seconds, rinse and dry;
Apply ED Primer II to the entire abutment tooth surface with a disposable brush tip and leave it in place for 30 seconds. Dry the primer completely with gentle air flow, avoiding pooling of the primer. Do not apply ED Primer II to the RBB retainer;
Apply the mixed Panavia paste (opaque shade if anterior abutment teeth are involved) to retainer wing. Do not apply paste directly to the abutment surface, as contact with the ED Primer II will initiate chemical setting prematurely;
Firmly seat the retainer into the correct position and maintain finger pressure for 60 seconds;
While maintaining finger pressure, clean all excess cement with a small microbrush and/or a dental probe and, if practical, allow your assistant to floss the contact and under the pontic with Super Floss (Oral B, P&G, Ohio, USA);
Light cure for 20 seconds (if not using Panavia Opaque), or apply Oxyguard II with a disposable brush tip at the margins for 3 minutes to achieve a complete cure. After completion, clean off Oxyguard II with water spray and cotton rolls;
Check and adjust occlusion if appropriate, to achieve light contact of the pontic in ICP, and avoiding contact in excursions. If contact cannot be avoided in excursions, they should be shared with other teeth. Contacts on the retainer are expected: ensure that they are not at the retainer margin;
Educate the patient on how to clean under the pontic site with Super Floss.
Clinical Tip
Use an opaque shade of resin cement to eliminate incisal ‘greying’ of anterior RBB abutment teeth where the framework has been extended incisally.
Clinical Tip
The chemistry of Panavia 21 Ex does not allow complete curing in the presence of oxygen, therefore the use of Oxyguard II is essential. When using Panavia F2.0 Opaque shade, the use of Oxyguard for chemical curing is necessary as this relies on a chemical cure and has a low curing depth.
Review
A review appointment allows the operator to assess the following:
Re-establishment of occlusal contacts if the bridge has been cemented ‘high’ in occlusion;
Patient comfort and satisfaction;
Oral hygiene and RBB maintenance.
The appointment also provides another opportunity to reinforce the importance of regular maintenance, and extra vigilance where a fixed-fixed design has been used due to the risk of a silent de-bond of a wing described earlier.
Clinical Tip
Avoid disturbing cement lute immediately after bonding. This includes avoiding the use of an ultrasonic scaler, which should ideally not be necessary if excess cement was removed meticulously during bonding as described above.
Managing a RBB de-bond
Djemal et al defined failure as ‘any significant adverse event related to the restoration requiring remedial treatment or a remake’.5 As with all restorations, RBBs may experience failure mechanically, biologically or aesthetically, separately or, more often, in combination. This can include caries at the retainer margin, periodontal loss of an abutment tooth, and fracture of metal or porcelain. The most common mode of failure (>90%) of RBBs is de-bonding.4,5 Failure by complete de-bonding leaves a cleansable area with a low risk of caries or sensitivity, especially if a non-preparation design was adopted. However, the de-bonding of a RBB may not be an absolute failure, as it may be re-bonded to restore function and aesthetics.
As mentioned previously, de-bond of a fixed-fixed RBB is frequently associated with only one retainer wing and will not result in the bridge becoming dislodged. Such a 'silent' de-bond carries the risk of recurrent caries occurring beneath the debonded retainer wing and it is therefore very important to check for this during routine review appointments and to ensure that the patient is advised to seek advice if he/she notices anything that may indicate unilateral bond failure. However, a minimal preparation technique reduces or eliminates the chance of dentine exposure and therefore reduces the risk of recurrent caries beneath a de-bonded retainer in these circumstances.
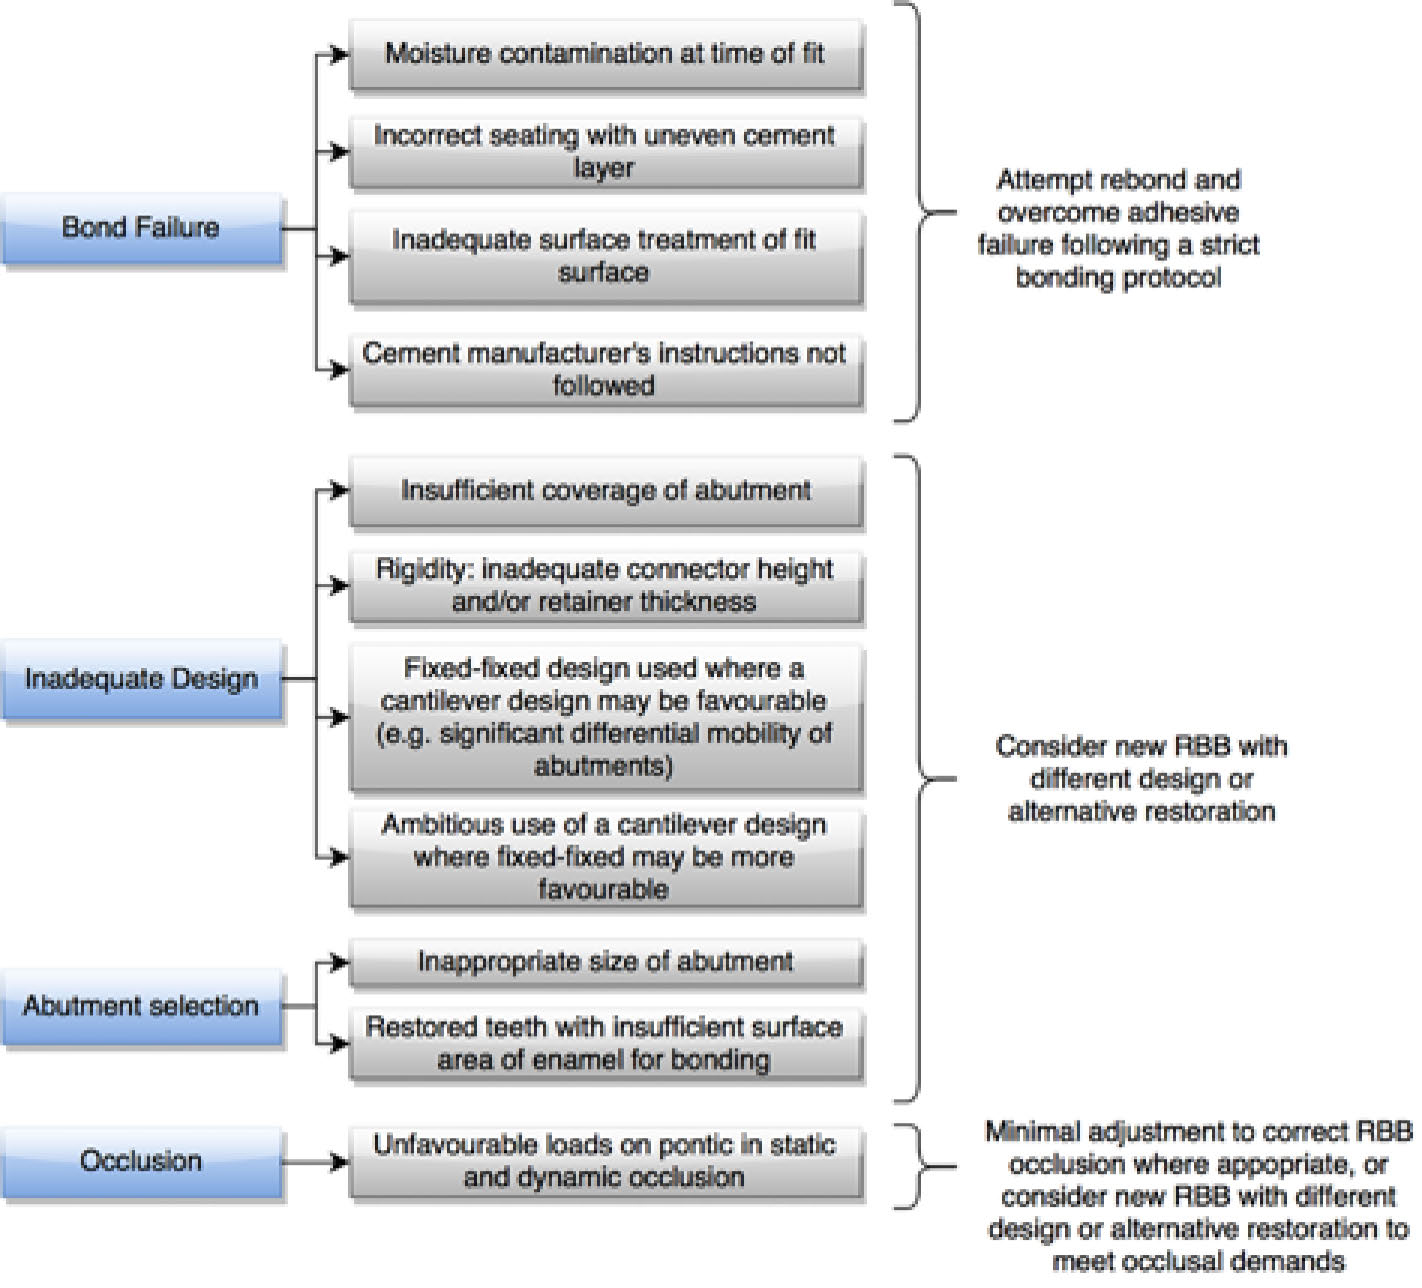
It is critical that the cause of de-bonding should be identified and a decision made to re-bond, remake, or to consider an alternative prosthodontic solution outright. Common underlying causes of de-bonding which can be used in the decision-making process have been summarized in Figure 2. If the design of the RBB and abutment selection are acceptable, and the clinical findings suggest a bond failure, re-bonding may be considered with a view to overcoming this failure through an improved adhesive protocol. A design or abutment selection fault may require remaking the RBB to rectify the problem.
Figure 2. A summary of the causes of RBB de-bond. More than one cause may be identified.
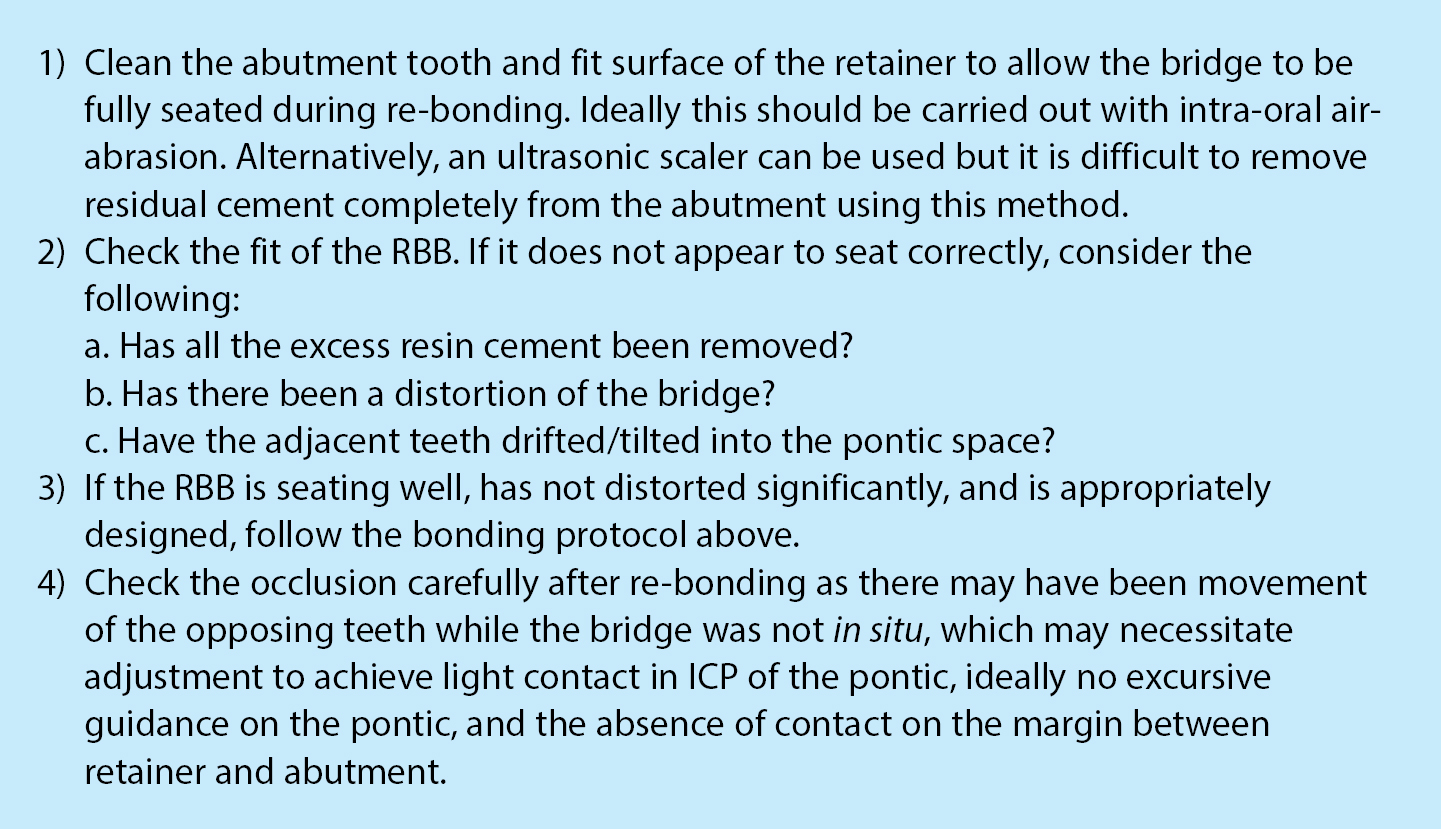
There is conflicting evidence regarding the success of re-bonded RBBs after they have de-bonded.10,11,12 When considering the low cost of re-bonding and high patient satisfaction, this should be considered as the first choice where appropriate. Figure 3 describes the sequence for re-bonding RBBs.
Figure 3. A suggested protocol for the successful re-bonding of RBBs.
Failure due to caries is rare in RBBs, but has been associated with fixed-fixed designs where one wing has de-bonded silently, and may be a greater risk where abutment preparation has resulted in exposure of dentine. In cases where caries is detected early in a unilateral de-bond of a fixed-fixed RBB, the wing associated with the carious tooth can be sectioned and polished to leave a cantilevered RBB in cases where a single unit is being replaced.
If necessary, a partially debonded F-F bridge can be removed using a straight enamel chisel and a sturdy instrument, such as a pair of Adams pliers, to use as a mallet. The chisel should be placed at the margin of the retainer wing to be debonded, such that shear force is directed along the cement lute. The ‘mallet’ is then used to tap firmly on the end of the chisel handle to break the cement bond, removing the bridge intact. It is extremely important to ensure sufficient purchase at the retainer wing margin before applying force to the chisel to prevent slippage and resulting trauma before any force is applied. Gauze should be placed behind the bridge and floss tied around the pontic/connector area to protect the airway, ensuring that the dislodged bridge is not displaced towards the oropharynx. Following removal, the bridge and tooth surfaces can be cleaned and the RBB re-bonded as described.
Managing the spaced dentition
The presence of spacing presents a challenge when restoring with RBBs, which usually require an intimate contact between the abutment and the pontic via a connector, thereby closing any spacing or diastema. In such cases, where there is spacing between abutment teeth and pontic spaces, the use of a modified spring cantilever design of RBB, as described by Gibson,13 can maintain a diastema. Alternatively, resin composite build-ups to eliminate spacing may be considered, which can be accomplished prior to impression, or at the fit appointment by altering the framework design to incorporate the altered contour of the abutment, as illustrated in Figure 4. An implant-supported crown is also a viable option to maintain spacing, providing that adequate 3-dimensional space and bone exists for this.
Figure 4. The use of a RBB framework that incorporates the modification of the abutment with resin composite to eliminate spacing. This would require good communication with the lab, and ideally a diagnostic wax-up to guide the framework stent. (a) The RBB is tried in to assess fit and the shape of the framework stent that will guide the diastemata closure between UR1–UR2 and between UR2–UR3. The dental technician was asked to modify the morphology of UR1 on the cast prior to bridge construction, thus leaving a space between the altered portion and unmodified abutment tooth. (b) The bridge is cemented, leaving a thin layer of opaque Panavia F2.0 luting cement over the exposed retainer wing and the void is then filled with resin composite, which has been extended onto the labial surface of enamel to increase bonding area. It is important that sufficient contact is maintained between the wing and the unmodified abutment tooth to allow positive seating of the bridge. The use of a dentine shade of resin composite is recommended, as this is less translucent than enamel shades and the opaque luting cement should be extended over the exposed fit surface of the retainer wing to prevent shine through of the metal and resulting greying appearance of the resin composite addition. There is an aesthetic compromise due to the black triangle formation, and the difference in proportions between the upper central incisors. (c) Occlusal view.
Alternative RBB frameworks
The scope of this article is limited to traditional adhesive bridges using non-precious metal to manufacture the framework, although the use of ceramics for this technique is growing in popularity. There is little published evidence in relation to the use of ceramic as the framework material for adhesive bridgework compared with metal alloys.14 The advantage of an aesthetic, metal-free framework is countered by the need for an increased cross-sectional area of the connector to maintain strength and rigidity, which itself may hinder the final aesthetic potential of the pontic and the embrasure spaces. This may mean that using ceramics may not be feasible in some cases due to a lack of strength of the framework. The most common cause of failure of all-ceramic RBBs is fracture of the framework, which is a less favourable mode of failure compared to metal RBBs where a complete de-bond is observed more commonly.14 Furthermore, the overall thickness of the ceramic framework necessary to maintain strength and rigidity would necessitate an over-contoured framework, which may compromise ultimate cleansability, aesthetics and interocclusal space. The alternative is to create the space for the required thickness of framework by tooth preparation, which may be more invasive. The removal of tooth structure to create enough space for an appropriately rigid ceramic framework may expose dentine, which would compromise the bond to abutment teeth. However, in cases where there is plentiful interocclusal space, or where the labial contour needs to be adjusted, there may be an indication. For example, in some cleft cases, the ceramic framework may be bonded labially, allowing modification of labial tooth contour for aesthetics incorporated in the bridge design. This may require no preparation yet still achieve the required cross-sectional framework thickness (Figure 5). The required minimal critical dimensions for the connectors are dependent on the type of core ceramic material being used,15 although these materials are an area where much development is ongoing. Based on the limited studies available, the success of all-ceramic RBBs has been estimated at 72.5% at 3 years, compared to 82.8% for metal RBBs for the same period, but the latter is based on more research.14 Therefore, in view of the relative scarcity of published evidence at present, the authors are cautious in recommmending this as a routine mode of treatment compared to metal framework designs.
Figure 5. A large span ceramic RBB case. (a) Pre-operative labial view of missing UR2–UL2 in a patient with a repaired cleft lip and palate. There is a history of a failed bone graft. (b) Post-operative labial view of an all-ceramic RBB replacing UR2–UL2, using the upper canines as abutments. Note the fact that the labial surface of the UL3 has been used as the bonding surface. Pink porcelain has been used to restore pink aesthetics. The patient's occlusion (anterior open bite) is favourable in terms of the loading of the adhesive ceramic bridgework. (c) Post-operative occlusal view of the all-ceramic RBB showing the thick framework, including the connectors, to maintain rigidity required for ceramics.
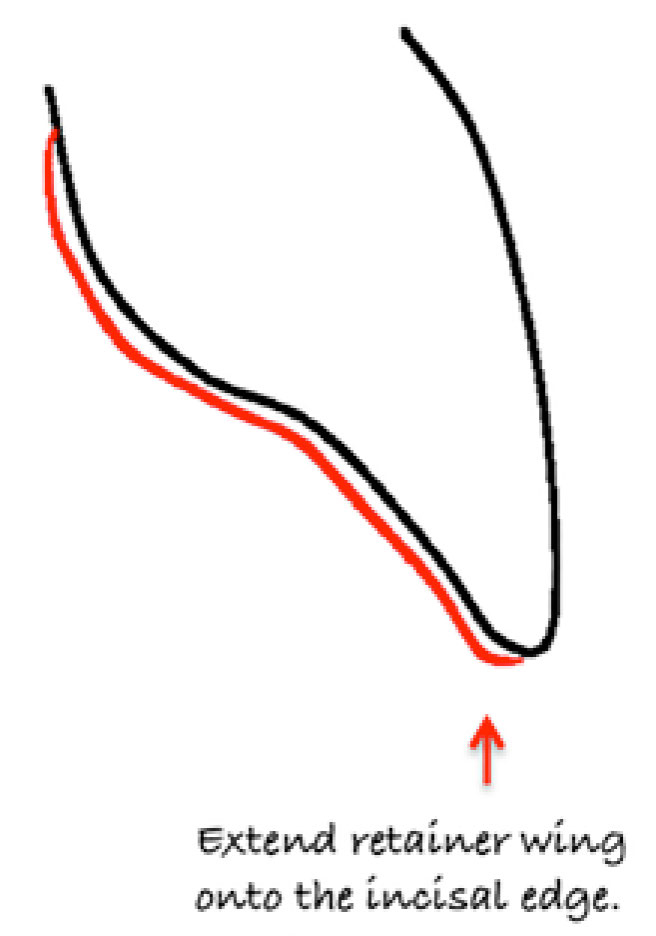
Summary
Resin-bonded bridges are a conservative and potentially non-invasive treatment modality used to replace missing teeth. This two-part series has outlined the fundamentals of successful RBB provision and shared the authors' experiences and tips for success (Figure 6). The clinical steps involved in RBB provision are relatively simple compared to conventional bridgework and implants. However, this does not preclude the need for careful case selection and design, which are critical factors in their success as for all restorations. The economics of RBB provision are favourable in comparison with implants, conventional bridges and metal-framed dentures due to lower laboratory costs and reduced chair time. The relatively low financial cost and reasonable longevity means that RBBs are good value for money, as well as being predictable and aesthetic if undertaken carefully and appropriately. The minimally invasive nature of RBBs means less tooth tissue being sacrificed, which is arguably the most significant benefit.